マネジメントコンソールで同じ構成を毎回画面ポチポチする工数を削減したくて、CloudFormationで自動化したかった
クロススタック分割
詳細はAWS備忘録記事3を参考にすること
参考
https://aws.amazon.com/jp/blogs/news/webinar-bb-aws-cloudformation-2020/
シングルAZを作成するCloudFormation
ネットワーク構成図
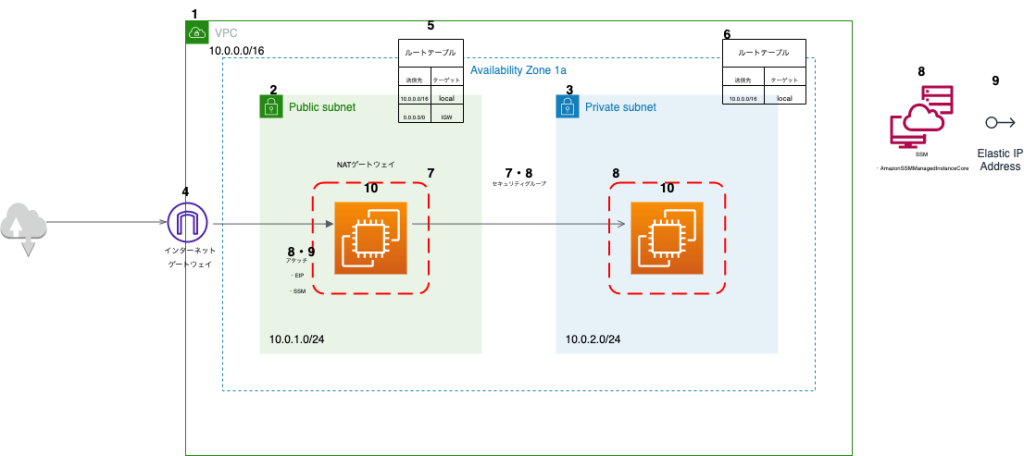
コード
参考
はじめてのAWS CloudFormationチュートリアル
SSMセッションマネージャーでコンソールアクセスできるEC2をCloudFormationで自動作成する方法
AWSTemplateFormatVersion: "2010-09-09"
Description: CloudTech single-az-ec2-template

#----------------------------------------------------------------
# パラメーター
# パラメーターとはプログラミングで例えると変数みたいなもの
#----------------------------------------------------------------
Parameters:
  # プロジェクト名を入力する。各リソースのNameタグの値となる。
  EnvironmentName:
    Description: single-az-ec2-template
    Type: String

  # VPCのCIDRレンジ
  VpcCIDR:
    Description: Please enter the IP range (CIDR notation) for this VPC
    Type: String
    Default: 10.0.0.0/16

  # パブリックサブネット1
  PublicSubnet1CIDR:
    Description: Please enter the IP range (CIDR notation) for the public subnet in the first Availability Zone
    Type: String
    Default: 10.0.1.0/24

  # プライベートサブネット1
  PrivateSubnet1CIDR:
    Description: Please enter the IP range (CIDR notation) for the private subnet in the first Availability Zone
    Type: String
    Default: 10.0.2.0/24

  # EC2インスタンスタイプ
  InstanceType:
    Type: String
    Default: t2.micro
    AllowedValues:
      - t2.micro
      - t2.nano
    Description: Select EC2 instance type.
#----------------------------------------------------------------
# リソース
#----------------------------------------------------------------
Resources:

#----------------------
# VPC作成
#----------------------
  VPC:
    Type: AWS::EC2::VPC
    Properties:
      CidrBlock: !Ref VpcCIDR
      # 何の設定かわからないが、基本的にtrueにしても良さそう
      EnableDnsSupport: true
      EnableDnsHostnames: false
      Tags:
        - Key: Name
          Value: !Ref EnvironmentName

#----------------------
# Publicサブネット1作成
#----------------------
  PublicSubnet1:
    Type: AWS::EC2::Subnet
    Properties:
      VpcId: !Ref VPC
      AvailabilityZone: !Select [ 0, !GetAZs '' ]
      CidrBlock: !Ref PublicSubnet1CIDR
      # サブネットで起動されたインスタンスが起動時にパブリック IP アドレスを設定するかどうか
      # Publicサブネットなのでtrueにする
      MapPublicIpOnLaunch: true
      Tags:
        - Key: Name
          Value: !Sub ${EnvironmentName} Public Subnet (AZ1)

#----------------------
# Privateサブネット1作成
#----------------------
  PrivateSubnet1:
    Type: AWS::EC2::Subnet
    Properties:
      VpcId: !Ref VPC
      AvailabilityZone: !Select [ 0, !GetAZs  '' ]
      CidrBlock: !Ref PrivateSubnet1CIDR
      # Privateサブネットなのでtrueにする
      MapPublicIpOnLaunch: false
      Tags:
        - Key: Name
          Value: !Sub ${EnvironmentName} Private Subnet (AZ1)

#----------------------
# IGW作成
#----------------------
  InternetGateway:
    Type: AWS::EC2::InternetGateway
    Properties:
      Tags:
        - Key: Name
          Value: !Ref EnvironmentName

#----------------------
# IGWをVPCにアタッチする
#----------------------
  InternetGatewayAttachment:
    Type: AWS::EC2::VPCGatewayAttachment
    Properties:
      InternetGatewayId: !Ref InternetGateway
      VpcId: !Ref VPC

#----------------------
# ルートテーブル(Publicサブネット用)作成
#----------------------
  # ルートテーブル(Publicサブネット用)作成
  PublicRouteTable:
    Type: AWS::EC2::RouteTable
    Properties:
      VpcId: !Ref VPC
      Tags:
        - Key: Name
          Value: !Sub ${EnvironmentName} Public Routes

  # 上記のルートテーブルに、下記レコードを追加
  DefaultPublicRoute:
    Type: AWS::EC2::Route
    # リソースの作成順序は、IGWがVPCにアタッチされた後とする
    DependsOn: InternetGatewayAttachment
    # カラム
    Properties:
      RouteTableId: !Ref PublicRouteTable
      # すべてネットワーク
      DestinationCidrBlock: 0.0.0.0/0
      GatewayId: !Ref InternetGateway

  # Publicサブネット1に、上記ルートテーブルを紐付ける
  PublicSubnet1RouteTableAssociation:
    Type: AWS::EC2::SubnetRouteTableAssociation
    Properties:
      # ルートテーブル(Publicサブネット用)
      RouteTableId: !Ref PublicRouteTable
      # Publicサブネット1
      SubnetId: !Ref PublicSubnet1

#----------------------
# ルートテーブル(Privateサブネット用)作成
#----------------------
  # ルートテーブル(Privateサブネット用)を作成
  PrivateRouteTable:
    Type: AWS::EC2::RouteTable
    Properties:
      VpcId: !Ref VPC
      Tags:
        - Key: Name
          Value: !Sub ${EnvironmentName} Private Routes

  # Privateサブネット1に、上記ルートテーブルを紐付ける
  PrivateSubnet1RouteTableAssociation:
    Type: AWS::EC2::SubnetRouteTableAssociation
    Properties:
      RouteTableId: !Ref PrivateRouteTable
      SubnetId: !Ref PrivateSubnet1

#----------------------
# セキュリティグループを作成する
#----------------------
  # PublicサブネットのEC2にアタッチするセキュリティグループを定義する
  PublicSecurityGroup:
    Type: AWS::EC2::SecurityGroup # 公開セキュリティグループのリソースを定義します。
    Properties:
      GroupDescription: Allow SSH or HTTP or HTTPS
      VpcId: !Ref VPC
      # セキュリティグループのインバウンドルールを設定
      SecurityGroupIngress:
        # SSH
        # - IpProtocol: tcp #プロトコル
        #  FromPort: 22 #開始ポート
        #  ToPort: 22 #終了ポート
        #  CidrIp: 0.0.0.0/0 # 許可する送信元CIDR IPアドレス範囲
        # HTTP
        - IpProtocol: tcp
          FromPort: 80
          ToPort: 80
          CidrIp: 0.0.0.0/0
        # HTTPS
        - IpProtocol: tcp
          FromPort: 443
          ToPort: 443
          CidrIp: 0.0.0.0/0
        # ポート3000を許可
        #- IpProtocol: tcp
        #  FromPort: 3000
        #  ToPort: 3000
        #  CidrIp: 0.0.0.0/0
      Tags:
        - Key: Name
          Value: public-sg

  # PrivateサブネットのEC2にアタッチするセキュリティグループを定義する
  PrivateSecurityGroup:
    Type: AWS::EC2::SecurityGroup
    Properties:
      GroupDescription: Allow SSH
      VpcId: !Ref VPC
      Tags:
        - Key: Name
          Value: private-sg
      SecurityGroupIngress:
        # SSH
        - IpProtocol: tcp
          FromPort: '22'
          ToPort: '22'
          CidrIp: 0.0.0.0/0

#----------------------
# PublicサブネットのEC2作成
#----------------------
  # 新しいキーペアを作成する。SSMに保存される
  NewKeyPair:
    Type: 'AWS::EC2::KeyPair'
    Properties:
      KeyName: KeyPair20230806

  # Publicサブネットに配置するEC2を作成する
  PublicSubnet1EC2Instance:
    Type: AWS::EC2::Instance
    Properties:
      # AMIはAmazonLinux2
      ImageId: "ami-0e25eba2025eea319"
      # インスタンスタイプは、t2.micro
      InstanceType: !Ref InstanceType
      # キーペア
      KeyName: !Ref NewKeyPair
      #SubnetId: !Ref PublicSubnet1
      #SecurityGroupIds: !Ref PublicSecurityGroup
      NetworkInterfaces:
        - SubnetId: !Ref PublicSubnet1
          GroupSet:
            - !Ref PublicSecurityGroup
          # パブリック IP の自動割り当て
          AssociatePublicIpAddress: true
          DeviceIndex : 0
      # ストレージを設定
      BlockDeviceMappings:
        # この値はAMIによって異なる場合があるため、適切な値に変更する必要があるかもしれません
        - DeviceName: "/dev/xvda"
          Ebs:
            VolumeType: "gp2"
            VolumeSize: 8
      # SSM経由でSSH接続出来るようにするIAMロールをアタッチする
      IamInstanceProfile:
        Ref: SessionManagerIamInstanceProfile
      Tags:
        - Key: Name
          Value: !Sub ${EnvironmentName} Public Subnet EC2Instance

  # PublicサブネットのEC2インスタンスをSSM経由でSSH接続出来るようにする
  SsmSessionManagerIamRole:
    Type: AWS::IAM::Role
    Properties:
      AssumeRolePolicyDocument:
        Version: '2012-10-17'
        Statement:
          - Effect: 'Allow'
            Principal:
              Service:
                - 'ec2.amazonaws.com'
            Action:
              - 'sts:AssumeRole'
      Path: '/'
      RoleName: 'SsmSessionManagerIamRole'
      ManagedPolicyArns:
        - arn:aws:iam::aws:policy/AmazonSSMManagedInstanceCore

  SessionManagerIamInstanceProfile:
    Type: 'AWS::IAM::InstanceProfile'
    Properties:
      Path: '/'
      Roles:
        - !Ref SsmSessionManagerIamRole

  # EC2にEIPをつける
  ElasticIpForPublicSubnet1EC2Instance:
    Type: AWS::EC2::EIP
    Properties:
      InstanceId: !Ref PublicSubnet1EC2Instance

#----------------------
# PublicサブネットのEC2作成
#----------------------
  # Privateサブネットに配置するEC2を作成する
  PrivateSubnet1EC2Instance:
    Type: AWS::EC2::Instance
    Properties:
      # AMIはAmazonLinux2
      ImageId: "ami-0e25eba2025eea319"
      # インスタンスタイプは、t2.micro
      InstanceType: !Ref InstanceType
      # キーペア
      KeyName: !Ref NewKeyPair
      SubnetId: !Ref PrivateSubnet1
      # ストレージを設定
      BlockDeviceMappings:
        # この値はAMIによって異なる場合があるため、適切な値に変更する必要があるかもしれません
        - DeviceName: "/dev/xvda"
          Ebs:
            VolumeType: "gp2"
            VolumeSize: 8
      Tags:
        - Key: Name
          Value: !Sub ${EnvironmentName} Private Subnet EC2Instance
      # セキュリティグループ
      SecurityGroupIds:
        - !Ref PrivateSecurityGroup
PublicSubnet1EC2InstanceにSSM経由でログイン
前提
AWS CLIがインストール済みである
IAMユーザのアクセスキーを発行する
マネジメントコンソールからIAM>ユーザー>{IAMユーザ}>アクセスキーを作成
から「アクセスキーID」と「シークレットアクセスキー」を発行して、控える。
あとで、
aws configreを設定する際に必要
参考
【AWS Systems Manager】AWS CLIを用いてSSM経由でEC2インスタンスにアクセスしてみた
AWS CLI 用の Session Manager プラグインをインストールする
参考
AWS CLI 用の Session Manager プラグインをインストールする
MacBook-Pro ~ %
curl "https://s3.amazonaws.com/session-manager-downloads/plugin/latest/mac/session-manager-plugin.pkg" -o "session-manager-plugin.pkg"
sudo installer -pkg session-manager-plugin.pkg -target /
sudo ln -s /usr/local/sessionmanagerplugin/bin/session-manager-plugin /usr/local/bin/session-manager-plugin
AWS configre とSSM経由でPublicSubnet1EC2Instanceにログイン
# AWS configre 設定
# プロファイルは複数あるので、確認も兼ねて毎回指定した方が良い
MacBook-Pro ~ % aws configure --profile {任意なプロファイル名}
AWS Access Key ID: {アクセスキーID}
AWS Secret Access Key: {シークレットアクセスキー}
Default region name: {利用しているリージョン}
Default output format: {jsonもしくはyaml}

# SSM経由でPublicSubnet1EC2Instanceにログイン
aws ssm start-session --target {EC2インスタンスID} --profile {任意なプロファイル名}

# 下記表示になれば成功
sh-4.2$
シングルAZ + プライベートサブネットのEC2にSSM接続する
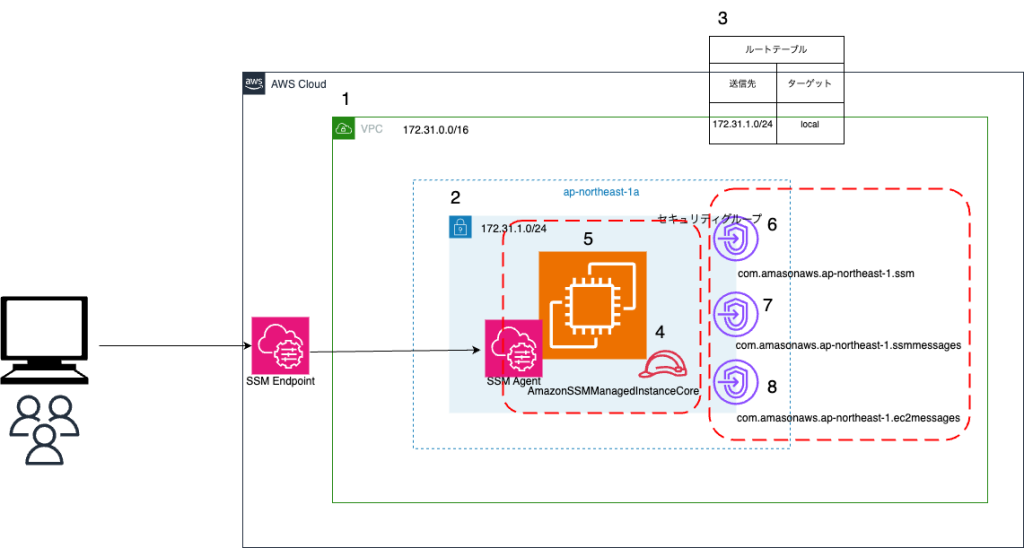
説明
EC2インスタンスのAMIがAmazon Linux2なんで、SSM Agentはプリインストールされている
4:EC2インスタンスにAmazonSSMManagedInstanceCoreポリシーが付与されたIAMロールをアタッチする
5:EC2インスタンスを作成する
6〜8:VPCエンドポイントを作成する
AWSサービス:com.amasonaws.ap-northeast-1.ssm
AWSサービス:com.amasonaws.ap-northeast-1.ssmmessages
AWSサービス:com.amasonaws.ap-northeast-1.ec2messages
VPCとプライベートサブネットに紐付けること
予め作成したセキュリティグループをアタッチすること
AWSTemplateFormatVersion: "2010-09-09"

Description: SSM Demo

#======================
# パラメーター
#======================
Parameters:

# VPCのCIDRレンジ
  VpcCIDR:
    Description: Please enter the IP range (CIDR notation) for this VPC
    Type: String
    Default: 172.31.0.0/16

# プライベートサブネット1
  PrivateSubnet1CIDR:
    Description: Please enter the IP range (CIDR notation) for the private subnet in the first Availability Zone
    Type: String
    Default: 172.31.1.0/24

  KeyName:
    Description: Please enter the IP range (CIDR notation) for the private subnet in the first Availability Zone
    Type: AWS::EC2::KeyPair::KeyName

# 環境変数
  EnvironmentName:
    Description: Evname-tag
    Type: String
    Default: TEST

  Ec2ImageId:
    Type: AWS::SSM::Parameter::Value<String>
    Default: /aws/service/ami-amazon-linux-latest/amzn2-ami-hvm-x86_64-gp2

  Ec2InstanceType:
    Type: String
    Default: t2.micro

#======================
# リソース
#======================

Resources:

#======================
##### VPC作成 #####
#======================
  VPC:
    Type: AWS::EC2::VPC
    Properties:
      CidrBlock: !Ref VpcCIDR
      EnableDnsSupport: true
      EnableDnsHostnames: true
      Tags:
        - Key: Name
          Value: !Ref EnvironmentName

# プライベートサブネット1を作成
  PrivateSubnet1:
    Type: AWS::EC2::Subnet
    Properties:
      VpcId: !Ref VPC
      AvailabilityZone: !Select [ 0, !GetAZs  '' ]
      CidrBlock: !Ref PrivateSubnet1CIDR
      MapPublicIpOnLaunch: false
      Tags:
        - Key: Name
          Value: !Sub ${EnvironmentName} Private Subnet (AZ1)

# ルートテーブル(プライベートサブネット用)作成
  PrivateRouteTable:
    Type: AWS::EC2::RouteTable
    Properties:
      VpcId: !Ref VPC
      Tags:
        - Key: Name
          Value: !Sub ${EnvironmentName} Private Routes

  PrivateSubnet1RouteTableAssociation:
    Type: AWS::EC2::SubnetRouteTableAssociation
    Properties:
      RouteTableId: !Ref PrivateRouteTable
      SubnetId: !Ref PrivateSubnet1

#======================
##### EC2インスタンス用IAMロール #####
#======================
  EC2Role:
    Type: AWS::IAM::Role
    Properties:
      AssumeRolePolicyDocument:
        Version: '2012-10-17'
        Statement:
          - Effect: Allow
            Principal:
              Service: [ec2.amazonaws.com]
            Action: ['sts:AssumeRole']
      ManagedPolicyArns:
        - arn:aws:iam::aws:policy/AmazonSSMManagedInstanceCore

  EC2InstanceProfile:
    Type: AWS::IAM::InstanceProfile
    Properties:
      Roles:
        - !Ref EC2Role

#======================
##### EC2作成 #####
#======================
  DemoInstance:
    Type: 'AWS::EC2::Instance'
    Properties:
      ImageId: !Ref Ec2ImageId
      InstanceType: !Ref Ec2InstanceType
      AvailabilityZone: !GetAtt PrivateSubnet1.AvailabilityZone
      KeyName: !Ref KeyName
      NetworkInterfaces:
        - DeviceIndex: 0
          AssociatePublicIpAddress: false
          DeleteOnTermination: true
          SubnetId: !Ref PrivateSubnet1
          GroupSet:
            - !Ref DemoSecurityGroup
      IamInstanceProfile: !Ref EC2InstanceProfile  # この行を追加

  DemoSecurityGroup:
    Type: 'AWS::EC2::SecurityGroup'
    Properties:
      VpcId: !Ref VPC
      GroupDescription: SG to allow SSH access via port 22
      SecurityGroupIngress:
        - IpProtocol: tcp
          FromPort: '22'
          ToPort: '22'
          CidrIp: '0.0.0.0/0'
      Tags:
        - Key: Name
          Value: SSH-SG

# ... [既存のテンプレート内容] ...

#======================
##### VPCエンドポイントの追加 #####
#======================

  VPCEndpointSSM:
    Type: AWS::EC2::VPCEndpoint
    Properties:
      ServiceName: com.amazonaws.ap-northeast-1.ssm
      VpcId: !Ref VPC
      SubnetIds:
        - !Ref PrivateSubnet1 # ここで紐づけるサブネットを指定
      PrivateDnsEnabled: true
      SecurityGroupIds:
        - !Ref VPCEndpointSecurityGroup
      VpcEndpointType: Interface


  VPCEndpointSSMMessages:
    Type: AWS::EC2::VPCEndpoint
    Properties:
      ServiceName: com.amazonaws.ap-northeast-1.ssmmessages
      VpcId: !Ref VPC
      SubnetIds:
        - !Ref PrivateSubnet1 # ここで紐づけるサブネットを指定
      PrivateDnsEnabled: true
      SecurityGroupIds:
        - !Ref VPCEndpointSecurityGroup
      VpcEndpointType: Interface

  VPCEndpointEC2Messages:
    Type: AWS::EC2::VPCEndpoint
    Properties:
      ServiceName: com.amazonaws.ap-northeast-1.ec2messages
      VpcId: !Ref VPC
      SubnetIds:
        - !Ref PrivateSubnet1 # ここで紐づけるサブネットを指定
      PrivateDnsEnabled: true
      SecurityGroupIds:
        - !Ref VPCEndpointSecurityGroup
      VpcEndpointType: Interface

# VPCエンドポイント用のセキュリティグループ
  VPCEndpointSecurityGroup:
    Type: 'AWS::EC2::SecurityGroup'
    Properties:
      VpcId: !Ref VPC
      GroupDescription: 'VPC Endpoint Security Group'
      SecurityGroupIngress:
        - IpProtocol: tcp
          FromPort: 443
          ToPort: 443
          CidrIp: 0.0.0.0/0
      SecurityGroupEgress:
        - IpProtocol: -1
          FromPort: 0
          ToPort: 65535
          CidrIp: 0.0.0.0/0
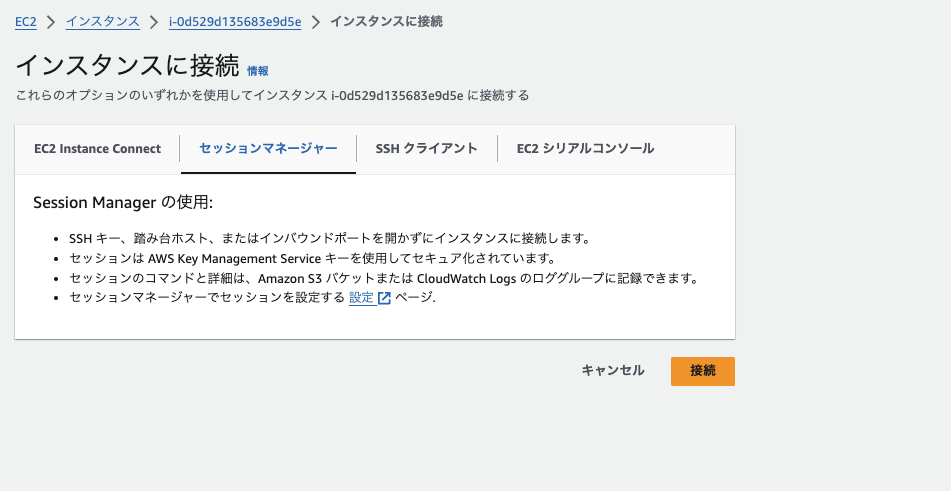
AWSマネジメントコンソールからSSM接続する
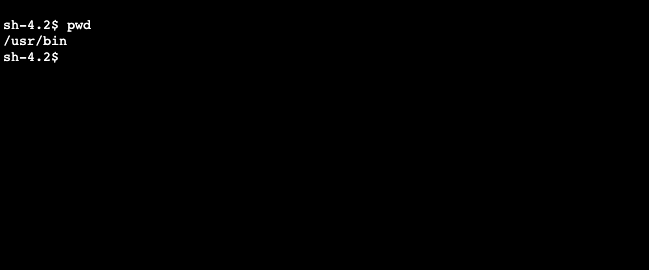
CLIが開けば成功
Lambda ハンズオン
デモ1
必要であれば動画参照
構成
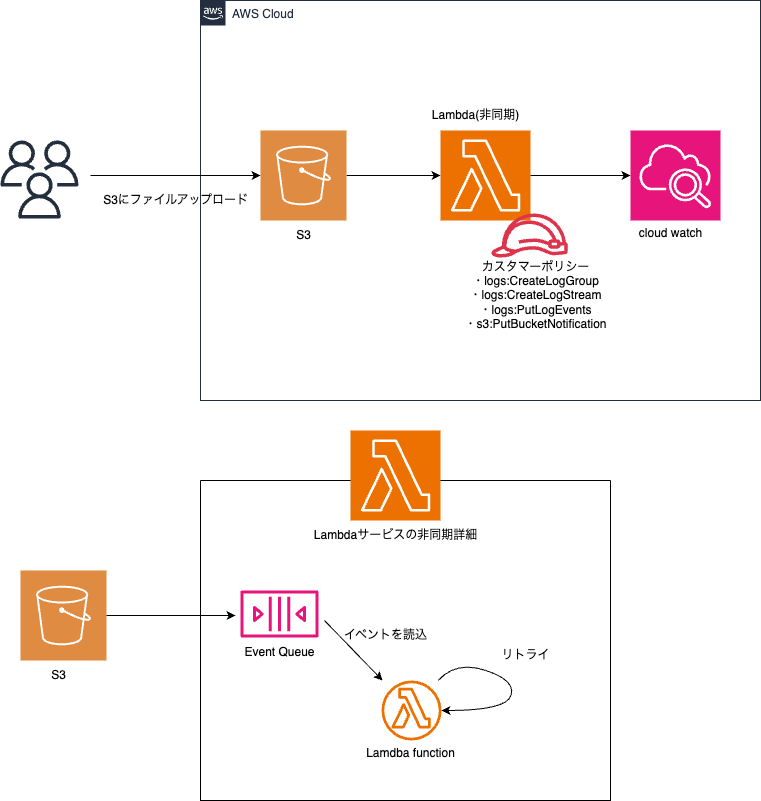
AWSTemplateFormatVersion: '2010-09-09'
Description: AWS CloudFormation template with S3 bucket and Lambda function, including event notification setup.

Resources:
  # Lambda関数を作成
  S3PythonLambdaFunction:
    Type: AWS::Lambda::Function
    Properties:
      FunctionName: s3-python-lambda-test
      Handler: "index.lambda_handler"
      Runtime: python3.7
      Role: !GetAtt LambdaExecutionRole.Arn
      Code:
        ZipFile: |
          import json
          def lambda_handler(event, context):
              # AWS default lambda function code
              return {
                  'statusCode': 200,
                  'body': json.dumps('Hello from Lambda!')
              }

  # Lambda関数にアタッチするIAMロールを作成。IAMロール名は、「LambdaExecutionRole」である
  LambdaExecutionRole:
    Type: AWS::IAM::Role
    Properties:
      # AWSのLambdaサービスはここで作成したIAMロールの権限を使用できるという宣言
      AssumeRolePolicyDocument:
        Version: '2012-10-17'
        Statement:
          - Effect: Allow
            Principal:
              Service: lambda.amazonaws.com
            Action: sts:AssumeRole
      # 付与するポリシーを定義
      Policies:
        - PolicyName: LambdaBasicExecution
          PolicyDocument:
            Version: '2012-10-17'
            Statement:
              # Lambda関数がCloudWatchに記録するアクションを許可する
              - Effect: Allow
                Action:

                  - logs:CreateLogGroup
                  - logs:CreateLogStream
                  - logs:PutLogEvents
                Resource: arn:aws:logs:*:*:*
              # S3がLambdaに通知するアクションを許可する
              - Effect: Allow
                Action:
                  - s3:PutBucketNotification
                Resource: !GetAtt S3Bucket.Arn

  # S3バケットを作成
  S3Bucket:
    Type: AWS::S3::Bucket
    Properties:
      BucketName: s3bucket-s3-python-lambda-test
      PublicAccessBlockConfiguration:
        BlockPublicAcls: true
        BlockPublicPolicy: true
        IgnorePublicAcls: true
        RestrictPublicBuckets: true

  # S3バケットの権限に権限を与える。与える権限の内容は、S3からLambda関数に対してイベントをトリガーするという権限
  S3BucketPermission:
    Type: AWS::Lambda::Permission
    Properties:
      FunctionName: !Ref S3PythonLambdaFunction
      Action: "lambda:InvokeFunction"
      Principal: "s3.amazonaws.com"
      SourceArn: !GetAtt S3Bucket.Arn

  # S3バケットからLambda関数へのイベント通知の設定をCloudFormationで直接行うことはできないため、代わりにカスタムリソースを作成する
  NotificationLambdaFunction:
    Type: AWS::Lambda::Function
    Properties:
      FunctionName: NotificationLambdaFunctionTest
      Handler: "index.lambda_handler"
      Runtime: python3.7
      Role: !GetAtt LambdaExecutionRole.Arn
      Code:
        ZipFile: |
          import boto3
          def lambda_handler(event, context):
              s3 = boto3.client('s3')
              response = s3.put_bucket_notification_configuration(
                  Bucket=event['ResourceProperties']['Bucket'],
                  NotificationConfiguration={'LambdaFunctionConfigurations': [{
                      'LambdaFunctionArn': event['ResourceProperties']['LambdaArn'],
                      'Events': ['s3:ObjectCreated:*']
                  }]})
              return response

  # カスタムリソースを作成
  CustomResourceForS3Notification:
    Type: AWS::CloudFormation::CustomResource
    Properties:
      ServiceToken: !GetAtt NotificationLambdaFunction.Arn
      Bucket: !Ref S3Bucket
      LambdaArn: !GetAtt S3PythonLambdaFunction.Arn

# エクスポート
Outputs:
  LambdaFunctionARN:
    Description: The ARN of the Lambda function
    Value: !GetAtt S3PythonLambdaFunction.Arn
  S3BucketName:
    Description: The name of the S3 Bucket
    Value: !Ref S3Bucket
デモ2
必要であれば動画参照
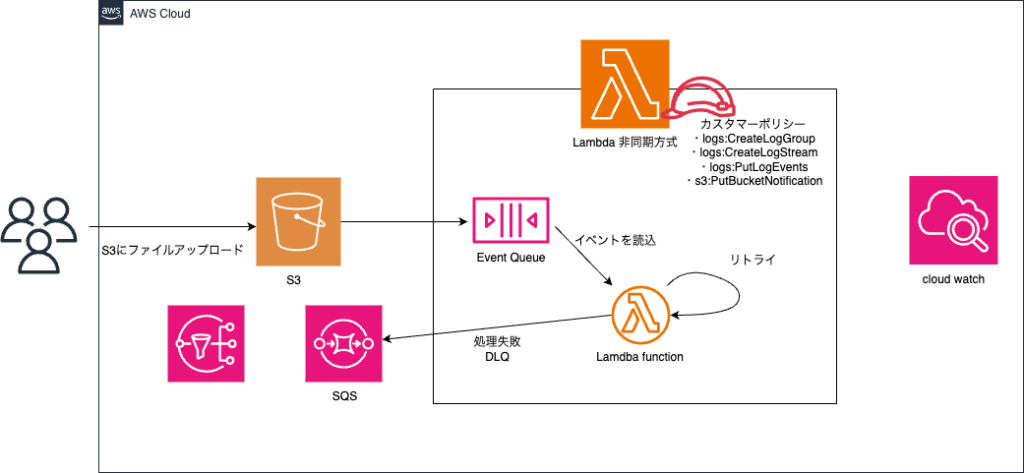
AWSTemplateFormatVersion: '2010-09-09'
Description: AWS CloudFormation template with S3 bucket and Lambda function, including event notification setup.

Resources:
  # Lambda関数を作成
  S3PythonLambdaFunction:
    Type: AWS::Lambda::Function
    Properties:
      FunctionName: s3-python-lambda-dlq
      Handler: "index.lambda_handler"
      Runtime: python3.7
      Role: !GetAtt LambdaExecutionRole.Arn
      Code:
        ZipFile: |
          import json
          def lambda_handler(event, context):
              # エラーを発生させるためのコードを追加
              raise Exception('エラー')
              # AWS default lambda function code
              return {
                  'statusCode': 200,
                  'body': json.dumps('Hello from Lambda!')
              }
      DeadLetterConfig:
        TargetArn: !GetAtt LambdaDeadLetterQueue.Arn

  # Lambda関数にアタッチするIAMロールを作成。IAMロール名は、「LambdaExecutionRole」である
  LambdaExecutionRole:
    Type: AWS::IAM::Role
    Properties:
      # AWSのLambdaサービスはここで作成したIAMロールの権限を使用できるという宣言
      AssumeRolePolicyDocument:
        Version: '2012-10-17'
        Statement:
          - Effect: Allow
            Principal:
              Service: lambda.amazonaws.com
            Action: sts:AssumeRole
      # 付与するポリシーを定義
      Policies:
        - PolicyName: LambdaBasicExecution
          PolicyDocument:
            Version: '2012-10-17'
            Statement:
              # Lambda関数がCloudWatchに記録するアクションを許可する
              - Effect: Allow
                Action:
                  - logs:CreateLogGroup
                  - logs:CreateLogStream
                  - logs:PutLogEvents
                Resource: arn:aws:logs:*:*:*
              # S3がLambdaに通知するアクションを許可する
              - Effect: Allow
                Action:
                  - s3:PutBucketNotification
                Resource: !GetAtt S3Bucket.Arn
      ManagedPolicyArns:
        - arn:aws:iam::aws:policy/AmazonSQSFullAccess

  # DLQを作成
  LambdaDeadLetterQueue:
    Type: AWS::SQS::Queue
    Properties:
      QueueName: lambda-dead-queue

  # S3バケットを作成
  S3Bucket:
    Type: AWS::S3::Bucket
    Properties:
      BucketName: s3bucket-s3-python-lambda-dlq
      PublicAccessBlockConfiguration:
        BlockPublicAcls: true
        BlockPublicPolicy: true
        IgnorePublicAcls: true
        RestrictPublicBuckets: true

  # S3バケットの権限に権限を与える。与える権限の内容は、S3からLambda関数に対してイベントをトリガーするという権限
  S3BucketPermission:
    Type: AWS::Lambda::Permission
    Properties:
      FunctionName: !Ref S3PythonLambdaFunction
      Action: "lambda:InvokeFunction"
      Principal: "s3.amazonaws.com"
      SourceArn: !GetAtt S3Bucket.Arn

  # S3バケットからLambda関数へのイベント通知の設定をCloudFormationで直接行うことはできないため、代わりにカスタムリソースを作成する
  NotificationLambdaFunction:
    Type: AWS::Lambda::Function
    Properties:
      FunctionName: NotificationLambdaFunctionTestDlq
      Handler: "index.lambda_handler"
      Runtime: python3.7
      Role: !GetAtt LambdaExecutionRole.Arn
      Code:
        ZipFile: |
          import boto3
          def lambda_handler(event, context):
              s3 = boto3.client('s3')
              response = s3.put_bucket_notification_configuration(
                  Bucket=event['ResourceProperties']['Bucket'],
                  NotificationConfiguration={'LambdaFunctionConfigurations': [{
                      'LambdaFunctionArn': event['ResourceProperties']['LambdaArn'],
                      'Events': ['s3:ObjectCreated:*']
                  }]})
              return response

  # カスタムリソースを作成
  CustomResourceForS3Notification:
    Type: AWS::CloudFormation::CustomResource
    Properties:
      ServiceToken: !GetAtt NotificationLambdaFunction.Arn
      Bucket: !Ref S3Bucket
      LambdaArn: !GetAtt S3PythonLambdaFunction.Arn

# エクスポート
Outputs:
  LambdaFunctionARN:
    Description: The ARN of the Lambda function
    Value: !GetAtt S3PythonLambdaFunction.Arn
  S3BucketName:
    Description: The name of the S3 Bucket
    Value: !Ref S3Bucket
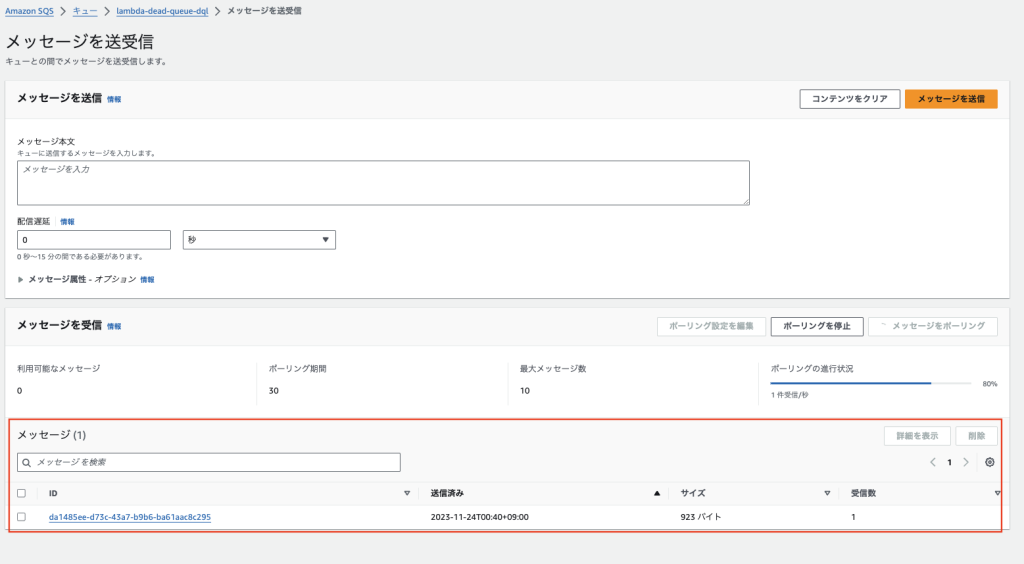
結果
Lambdaで例外が発生しているログ
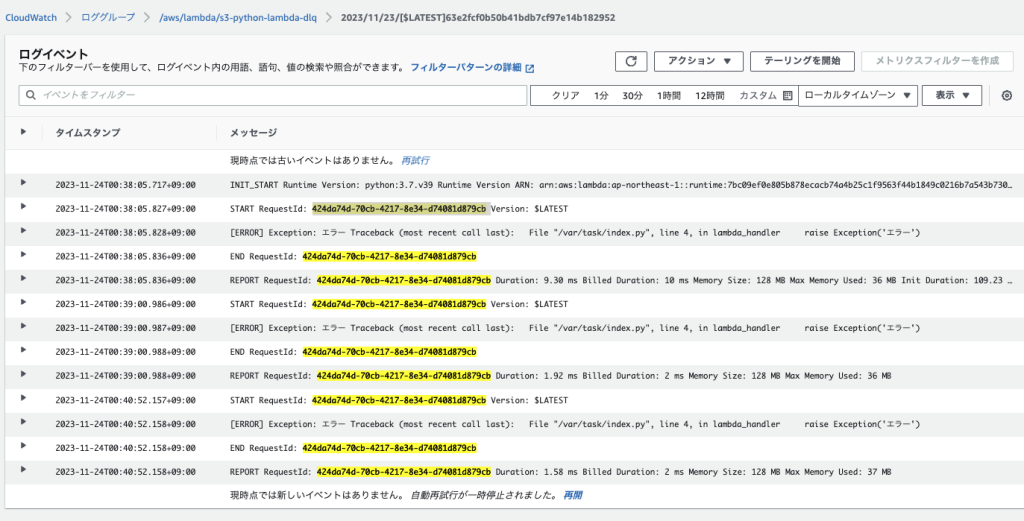
Lambdaを実行したが、例外が発生し、失敗内容がSQSに到達し、メッセージをポーリング(取得)するとSQSにメッセージが出現すれば成功
デモ3
チュートリアル: API Gateway で Lambda を使用する をコード化する
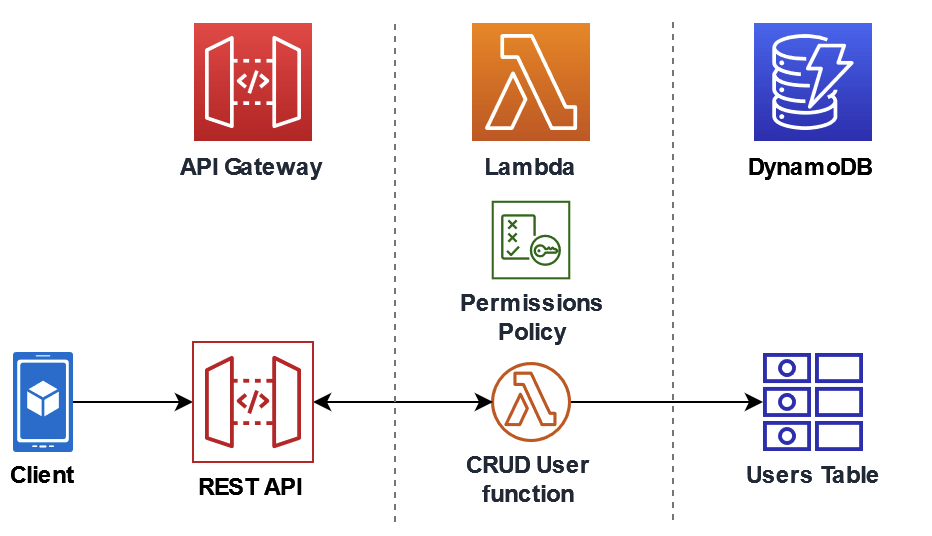
AWSTemplateFormatVersion: '2010-09-09'
Description: Lambda, API Gateway, and DynamoDB Example

Resources:
  MyDynamoDBTable:
    Type: AWS::DynamoDB::Table
    Properties:
      TableName: MyDynamoDBTable
      AttributeDefinitions:
        - AttributeName: id
          AttributeType: S
      KeySchema:
        - AttributeName: id
          KeyType: HASH
      ProvisionedThroughput:
        ReadCapacityUnits: 1
        WriteCapacityUnits: 1

  LambdaExecutionRole:
    Type: AWS::IAM::Role
    Properties:
      AssumeRolePolicyDocument:
        Version: '2012-10-17'
        Statement:
          - Effect: Allow
            Principal:
              Service: lambda.amazonaws.com
            Action: sts:AssumeRole
      Policies:
        - PolicyName: LambdaDynamoDBAccess
          PolicyDocument:
            Version: '2012-10-17'
            Statement:
              - Effect: Allow
                Action:
                  - dynamodb:GetItem
                  - dynamodb:PutItem
                  - dynamodb:UpdateItem
                  - dynamodb:DeleteItem
                  - dynamodb:Scan
                  - dynamodb:Query
                Resource: !GetAtt MyDynamoDBTable.Arn

  MyLambdaFunction:
    Type: AWS::Lambda::Function
    Properties:
      Code:
        ZipFile: |
          # Lambda function code goes here
      Handler: index.handler
      Role: !GetAtt LambdaExecutionRole.Arn
      Runtime: nodejs18.x

  ApiGatewayRestApi:
    Type: AWS::ApiGateway::RestApi
    Properties:
      Name: MyAPI

  ApiGatewayResource:
    Type: AWS::ApiGateway::Resource
    Properties:
      RestApiId: !Ref ApiGatewayRestApi
      ParentId: !GetAtt ApiGatewayRestApi.RootResourceId
      PathPart: myresource


  MyLambdaPermission:
    Type: AWS::Lambda::Permission
    Properties:
      Action: lambda:InvokeFunction
      FunctionName: !GetAtt MyLambdaFunction.Arn
      Principal: apigateway.amazonaws.com
      SourceArn: !Sub arn:aws:execute-api:${AWS::Region}:${AWS::AccountId}:${ApiGatewayRestApi}/Prod/POST/myresource

  ApiGatewayMethod:
    Type: AWS::ApiGateway::Method
    Properties:
      RestApiId: !Ref ApiGatewayRestApi
      ResourceId: !Ref ApiGatewayResource
      HttpMethod: POST
      AuthorizationType: NONE
      Integration:
        IntegrationHttpMethod: POST
        Type: AWS_PROXY
        Uri: !Sub arn:aws:apigateway:${AWS::Region}:lambda:path/2015-03-31/functions/${MyLambdaFunction.Arn}/invocations

  ApiGatewayDeployment:
    Type: 'AWS::ApiGateway::Deployment'
    DependsOn: ApiGatewayMethod
    Properties:
      RestApiId: !Ref ApiGatewayRestApi
      StageName: 'Prod'


Outputs:
  ApiGatewayInvokeURL:
    Description: URL to invoke the API Gateway
    Value: !Sub https://${ApiGatewayRestApi}.execute-api.${AWS::Region}.amazonaws.com/Prod/myresource
  DynamoDBTableName:
    Description: Name of the DynamoDB Table
    Value: !Ref MyDynamoDBTable
lambdaのコード
ざっくりDynamoDBのテーブル似対してCRUDするコード
const { DynamoDBClient } = require('@aws-sdk/client-dynamodb');
const { DynamoDBDocumentClient, PutCommand, GetCommand, UpdateCommand, DeleteCommand } = require('@aws-sdk/lib-dynamodb');

const ddbClient = new DynamoDBClient({ region: "ap-northeast-1" });
const ddbDocClient = DynamoDBDocumentClient.from(ddbClient);

const tablename = "MyDynamoDBTable";

module.exports.handler = async (event, context) => {
    const operation = event.operation;
    if (!event.payload) {
        return { error: "Payload is undefined" };
    }

    event.payload.TableName = tablename;

    if (operation === 'echo'){
        return event.payload;
    } else {
        switch (operation) {
            case 'create':
                await ddbDocClient.send(new PutCommand(event.payload));
                break;
            case 'read':
                var table_item = await ddbDocClient.send(new GetCommand(event.payload));
                console.log(table_item);
                break;
            case 'update':
                await ddbDocClient.send(new UpdateCommand(event.payload));
                break;
            case 'delete':
                await ddbDocClient.send(new DeleteCommand(event.payload));
                break;
            default:
                return `Unknown operation: ${operation}`;
        }
    }
};
失敗原因がわかるまでは、APIGateWayはAWSマネジメントコンソールから直接APIを作成する。
CloudFormatinoから作成したAPIGateWayからでは、下記JSONをリクエストしてもDynamoDBにレコードがCreateできない。Lambdaもしくは、AWSマネジメントコンソールで直接下記JSONを実行するとDynamoDBにレコードが作成される。恐らくAPIGateWayとLambdaの権限で何かが失敗している。
もしくは、下記CloudFormationテンプレートファイルを基に作成
https://docs.aws.amazon.com/ja_jp/lambda/latest/dg/services-apigateway-template.html
{
  "operation": "create",
  "payload": {
    "Item": {
      "id": "1234ABCD",
      "number": 5
    }
  }
}
総合
AWSのRDSのマネジメント画面にはどんな項目があるのかをコード化前に把握する用

ハンズオン1
構成
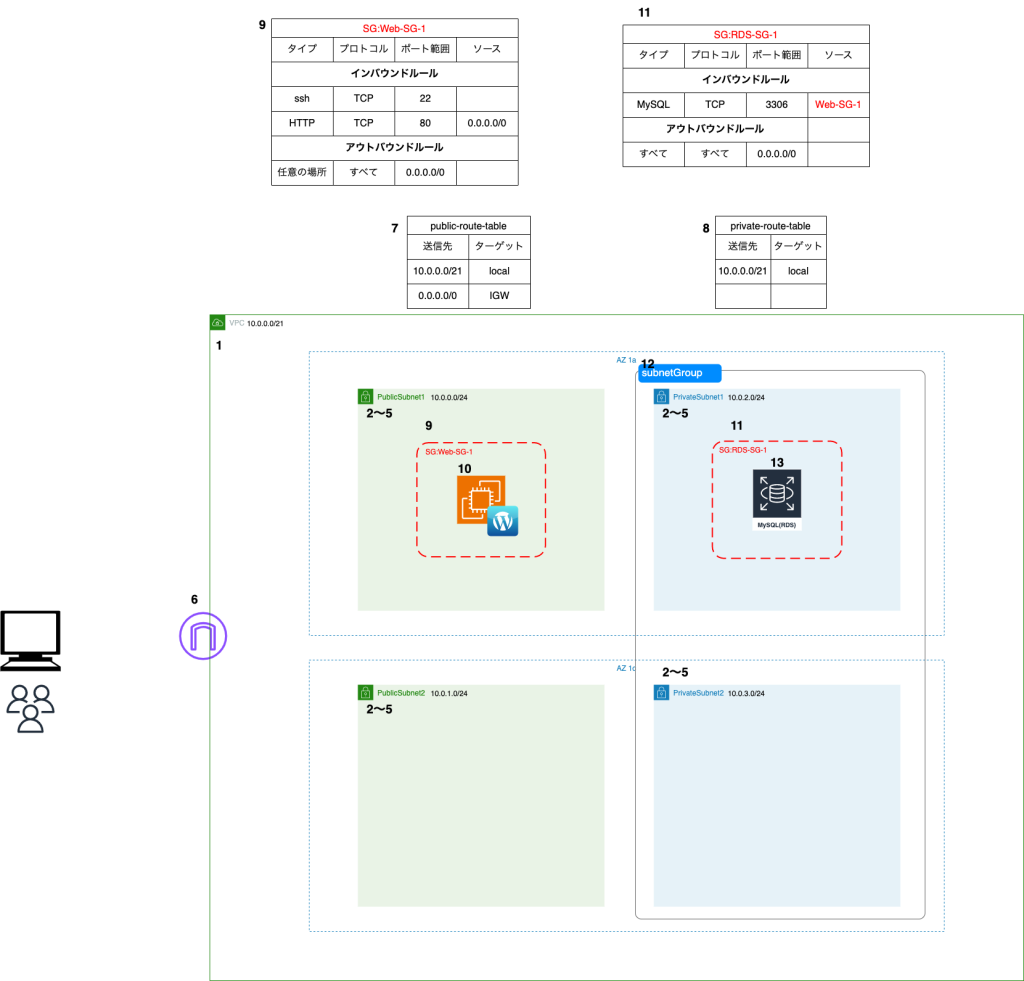
- VPC作成
- パブリックサブネット1作成
- パブリックサブネット2作成
- プライベートサブネット1作成
- プライベートサブネット2作成
- インターネットゲートウェイを作成
- ルートテーブルを作成 (パブリックサブネット専用)
- ルートテーブルを作成(プライベートサブネット専用)
- セキュリティグループ作成(パブリックサブネットのEC2用)
- EC2インスタンスを作成
- セキュリティグループ作成(RDS用)
- サブネットグループ作成
- RDSインスタンスを作成
CloudFormationテンプレート
- クロススタック分割
- network-stack-template.yaml
- security-stack-template.yaml
- application-stack-template.yaml
AWSTemplateFormatVersion: '2010-09-09'
Description: 'hands-on1'
#----------------------------------------------------------------
# パラメーター
#----------------------------------------------------------------
Parameters:
  # プロジェクト名を入力する。各リソースのNameタグで参照する
  EnvironmentName:
    Description: hands-on1-template
    Type: String

  # VPCのCIDRレンジ
  VpcCIDR:
    Description: Please enter the IP range (CIDR notation) for this VPC
    Type: String
    Default: 10.0.0.0/21

  # パブリックサブネット1
  PublicSubnet1CIDR:
    Description: Please enter the IP range (CIDR notation) for the public subnet in the first Availability Zone
    Type: String
    Default: 10.0.0.0/24

  # パブリックサブネット2
  PublicSubnet2CIDR:
    Description: Please enter the IP range (CIDR notation) for the public subnet in the first Availability Zone
    Type: String
    Default: 10.0.1.0/24

  # プライベートサブネット1
  PrivateSubnet1CIDR:
    Description: Please enter the IP range (CIDR notation) for the private subnet in the first Availability Zone
    Type: String
    Default: 10.0.2.0/24

  # プライベートサブネット2
  PrivateSubnet2CIDR:
    Description: Please enter the IP range (CIDR notation) for the private subnet in the first Availability Zone
    Type: String
    Default: 10.0.3.0/24

#----------------------------------------------------------------
# リソース
#----------------------------------------------------------------
Resources:
#----------------------
# VPC作成
#----------------------
  VPC:
    Type: AWS::EC2::VPC
    Properties:
      CidrBlock: !Ref VpcCIDR
      # 何の設定かわからないが、基本的にtrueにしても良さそう
      EnableDnsSupport: true
      EnableDnsHostnames: false
      Tags:
        - Key: Name
          Value: !Ref EnvironmentName
#----------------------
# Publicサブネット作成
#----------------------
  # パブリックサブネット1
  PublicSubnet1:
    Type: AWS::EC2::Subnet
    Properties:
      VpcId: !Ref VPC
      # AZ-1a
      AvailabilityZone: ap-northeast-1a
      CidrBlock: !Ref PublicSubnet1CIDR
      # サブネットで起動されたインスタンスが起動時にパブリック IP アドレスを設定するかどうか
      # Publicサブネットなのでtrueにする
      MapPublicIpOnLaunch: true
      Tags:
        - Key: Name
          Value: !Sub ${EnvironmentName} Public Subnet

  # パブリックサブネット2
  PublicSubnet2:
    Type: AWS::EC2::Subnet
    Properties:
      VpcId: !Ref VPC
      # AZ-1c
      AvailabilityZone: ap-northeast-1c
      CidrBlock: !Ref PublicSubnet2CIDR
      MapPublicIpOnLaunch: true
      Tags:
        - Key: Name
          Value: !Sub ${EnvironmentName} Public Subnet
#----------------------
# Privateサブネット作成
#----------------------
  #プライベートサブネット1
  PrivateSubnet1:
    Type: AWS::EC2::Subnet
    Properties:
      VpcId: !Ref VPC
      # AZ-1a
      AvailabilityZone: ap-northeast-1a
      CidrBlock: !Ref PrivateSubnet1CIDR
      # Privateサブネットなのでfalseにする
      MapPublicIpOnLaunch: false
      Tags:
        - Key: Name
          Value: !Sub ${EnvironmentName} Private Subnet

  #プライベートサブネット2
  PrivateSubnet2:
    Type: AWS::EC2::Subnet
    Properties:
      VpcId: !Ref VPC
      # AZ-1c
      AvailabilityZone: ap-northeast-1c
      CidrBlock: !Ref PrivateSubnet2CIDR
      # Privateサブネットなのでfalseにする
      MapPublicIpOnLaunch: false
      Tags:
        - Key: Name
          Value: !Sub ${EnvironmentName} Private Subnet

#----------------------
# IGW作成
#----------------------
  InternetGateway:
    Type: AWS::EC2::InternetGateway
    Properties:
      Tags:
        - Key: Name
          Value: !Ref EnvironmentName

#----------------------
# IGWをVPCにアタッチする
#----------------------
  InternetGatewayAttachment:
    Type: AWS::EC2::VPCGatewayAttachment
    Properties:
      InternetGatewayId: !Ref InternetGateway
      VpcId: !Ref VPC

#----------------------
# ルートテーブル作成 (Publicサブネット用)
#----------------------
  # ルートテーブル(Publicサブネット用)作成
  PublicRouteTable:
    Type: AWS::EC2::RouteTable
    Properties:
      VpcId: !Ref VPC
      Tags:
        - Key: Name
          Value: !Sub ${EnvironmentName} Public Routes

  # 上記のルートテーブルに、レコードを追加する
  DefaultPublicRoute:
    Type: AWS::EC2::Route
    DependsOn: InternetGatewayAttachment
    Properties:
      RouteTableId: !Ref PublicRouteTable
      # IGW用のレコードを追加する
      DestinationCidrBlock: 0.0.0.0/0
      GatewayId: !Ref InternetGateway

  # Publicサブネット1に、上記ルートテーブルを関連付ける
  PublicSubnet1RouteTableAssociation:
    Type: AWS::EC2::SubnetRouteTableAssociation
    Properties:
      RouteTableId: !Ref PublicRouteTable
      SubnetId: !Ref PublicSubnet1

#----------------------
# RDSサブネットグループ作成
#----------------------
  RdsSubnetGroup:
    Type: AWS::RDS::DBSubnetGroup
    Properties:
      DBSubnetGroupDescription: "Subnet Group for RDS instances"
      SubnetIds:
        - !Ref PrivateSubnet1
        - !Ref PrivateSubnet2
      DBSubnetGroupName: my-rds-subnet-group
      Tags:
        - Key: Name
          Value: !Sub "${EnvironmentName} RDS Subnet Group"

#----------------------
# SSMロール
#----------------------
  SsmSessionManagerIamRole:
    Type: AWS::IAM::Role
    Properties:
      AssumeRolePolicyDocument:
        Version: '2012-10-17'
        Statement:
          - Effect: 'Allow'
            Principal:
              Service:
                - 'ec2.amazonaws.com'
            Action:
              - 'sts:AssumeRole'
      Path: '/'
      RoleName: 'SsmSessionManagerIamRole'
      ManagedPolicyArns:
        - arn:aws:iam::aws:policy/AmazonSSMManagedInstanceCore

  SessionManagerIamInstanceProfile:
    Type: 'AWS::IAM::InstanceProfile'
    Properties:
      Path: '/'
      Roles:
        - !Ref SsmSessionManagerIamRole

#----------------------
# エクスポート
#----------------------
Outputs:
  VPCId:
    Value: !Ref VPC
    Description: "VPC ID"
    Export:
      Name: !Sub "${EnvironmentName}-VPCId"

  PublicSubnetId:
    Value: !Ref PublicSubnet1
    Description: "PublicSubnet1"
    Export:
      Name: !Sub "${EnvironmentName}-PublicSubnet1Id"

  RdsSubnetGroupId:
    Value: !Ref RdsSubnetGroup
    Description: "RDS Subnet Group Name"
    Export:
      Name: !Sub "${EnvironmentName}-RdsSubnetGroupId"

  SessionManagerIamInstanceProfile:
    Value: !Ref SessionManagerIamInstanceProfile
    Description: "SessionManagerIamInstanceProfile"
    Export:
      Name: !Sub "${EnvironmentName}-SessionManagerIamInstanceProfile"
AWSTemplateFormatVersion: '2010-09-09'
Description: 'hands-on1'
#----------------------------------------------------------------
# パラメーター
#----------------------------------------------------------------
Parameters:
EnvironmentName:
Description: hands-on1-template
Type: String
#----------------------------------------------------------------
# リソース
#----------------------------------------------------------------
Resources:
#----------------------
# セキュリティグループ作成
#----------------------
# EC2用のセキュリティグループ
WebSecurityGroup:
Type: AWS::EC2::SecurityGroup
Properties:
GroupName: Web-SG-1
GroupDescription: "Description"
VpcId: !ImportValue
'Fn::Sub': '${EnvironmentName}-VPCId'
#インバウンドルール
SecurityGroupIngress:
# SSH
- IpProtocol: tcp
FromPort: 22
ToPort: 22
CidrIp: 0.0.0.0/0
#アウトバウンドルール
SecurityGroupEgress:
- IpProtocol: -1
CidrIp: 0.0.0.0/0
Tags:
- Key: Name
Value: Web-sg1
RdsSecurityGroup:
Type: AWS::EC2::SecurityGroup
Properties:
GroupName: RDS-SG-1
GroupDescription: "Description"
VpcId: !ImportValue
'Fn::Sub': '${EnvironmentName}-VPCId'
SecurityGroupIngress:
# Replace with your specific IP range or remove the CidrIp property to allow access from anywhere
- IpProtocol: tcp
FromPort: 3306
ToPort: 3306
SourceSecurityGroupId: !Ref WebSecurityGroup
Tags:
- Key: Name
Value: RDS-SG-1
#----------------------
# エクスポート
#----------------------
Outputs:
WebSecurityGroup:
Value: !Ref WebSecurityGroup
Description: "Web Security Group ID"
Export:
Name: !Sub "${EnvironmentName}-WebSecurityGroupId"
RdsSecurityGroup:
Value: !Ref RdsSecurityGroup
Description: "Security Group ID for RDS access"
Export:
Name: !Sub "${EnvironmentName}-RdsSecurityGroupId"
AWSTemplateFormatVersion: '2010-09-09'
Description: 'hands-on1'
#----------------------------------------------------------------
# パラメーター
#----------------------------------------------------------------
Parameters:
  # EC2インスタンスタイプ
  InstanceType:
    Type: String
    Default: t2.micro
    AllowedValues:
      - t2.micro
      - t2.nano
    Description: Select EC2 instance type.

  EnvironmentName:
    Description: hands-on1-template
    Type: String
#----------------------------------------------------------------
# リソース
#----------------------------------------------------------------
Resources:

#----------------------
# EC2作成
#----------------------
  PublicSubnet1EC2Instance:
    Type: AWS::EC2::Instance
    Properties:
      # AMIは、AmazonLinux2
      ImageId: "ami-0e25eba2025eea319"
      # インスタンスタイプは、t2.micro
      InstanceType: !Ref InstanceType
      # 自動割当パプリックIPを有効にする場合はNetworkInterfacesを記載する必要がある
      NetworkInterfaces:
        - SubnetId: !ImportValue
            'Fn::Sub': '${EnvironmentName}-PublicSubnet1Id'
          GroupSet:
            - !ImportValue
              'Fn::Sub': '${EnvironmentName}-WebSecurityGroupId'
          # 自動割当パプリックIPを有効
          AssociatePublicIpAddress: true
          DeviceIndex: 0
      # ストレージを設定
      BlockDeviceMappings:
        - DeviceName: "/dev/xvda"
          Ebs:
            VolumeType: "gp2"
            VolumeSize: 8
      # SSM経由でSSH接続出来るようにするIAMロールをアタッチする
      IamInstanceProfile: !ImportValue
        'Fn::Sub': '${EnvironmentName}-SessionManagerIamInstanceProfile'
      Tags:
        - Key: Name
          Value: !Sub "${EnvironmentName} Public Subnet EC2Instance"

  # EC2にEIPをつける
  ElasticIpForPublicSubnet1EC2Instance:
    Type: AWS::EC2::EIP
    Properties:
      InstanceId: !Ref PublicSubnet1EC2Instance


#----------------------
# RDS作成
#----------------------
  MyRDSInstance:
    Type: AWS::RDS::DBInstance
    Properties:
      # データベースエンジン
      Engine: mysql
      # マスターユーザー名
      MasterUsername: wordpress
      # ストレージの割り当て (GB)
      AllocatedStorage: 20
      # マスターパスワード(実際の環境ではセキュアな方法で提供する)
      MasterUserPassword: "ChangeMe1234"
      # DBインスタンスクラス
      DBInstanceClass: db.t2.micro
      # データベース名
      DBName: wordpress
      # VPCの設定(Outputsから参照)
      DBSubnetGroupName: !ImportValue
        'Fn::Sub': '${EnvironmentName}-RdsSubnetGroupId'
      # パブリックアクセス無効
      PubliclyAccessible: false
      # セキュリティグループ
      VPCSecurityGroups:
        - !ImportValue
          'Fn::Sub': '${EnvironmentName}-RdsSecurityGroupId'
      # スタンバイインスタンスを作成しない(シングルAZ)
      MultiAZ: false
wordpressインストール
# プロファイル一覧を表示する
aws configure list-profiles

# プロファイル未設定の場合は、プロファイルを設定する
aws configure --profile adminuser

# SSM経由でPublicSubnet1EC2Instanceにログイン
aws ssm start-session --target {EC2インスタンスID} --profile {任意なプロファイル名}

# 下記表示になれば成功
sh-4.2$

sh-4.2$ sudo su -

[root@ ~]# amazon-linux-extras install php7.2 -y
[root@ ~]# yum -y install mysql httpd php-mbstring php-xml gd php-gd

[root@ ~]# systemctl enable httpd.service
[root@ ~]# systemctl start httpd.service

[root@ ~]# wget http://ja.wordpress.org/latest-ja.tar.gz ~/
[root@ ~]# tar zxvf ~/latest-ja.tar.gz
[root@ ~]# cp -r ~/wordpress/* /var/www/html/
[root@ ~]# chown apache:apache -R /var/www/html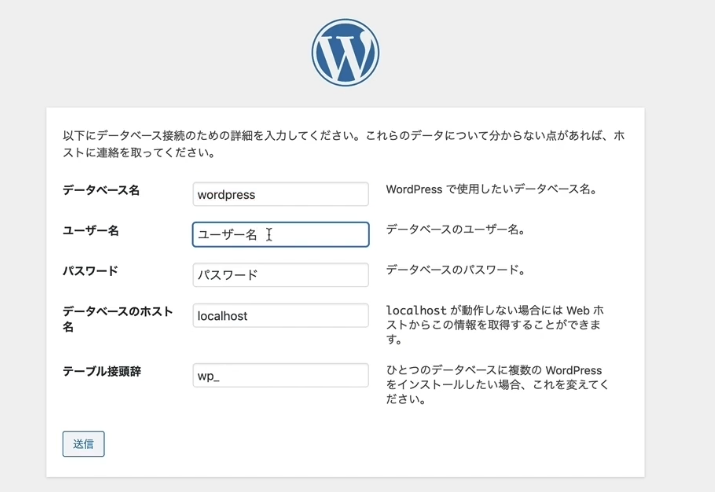
| データベース名 | wordpress |
| ユーザー名 | wordpress |
| パスワード | {cloudformation(パラメーターストア)等で指定したパスワード} |
| データベースのホスト名 | RDSのエンドポイント |
| テーブルの接頭辞 | wp_ |
下記になれば成功
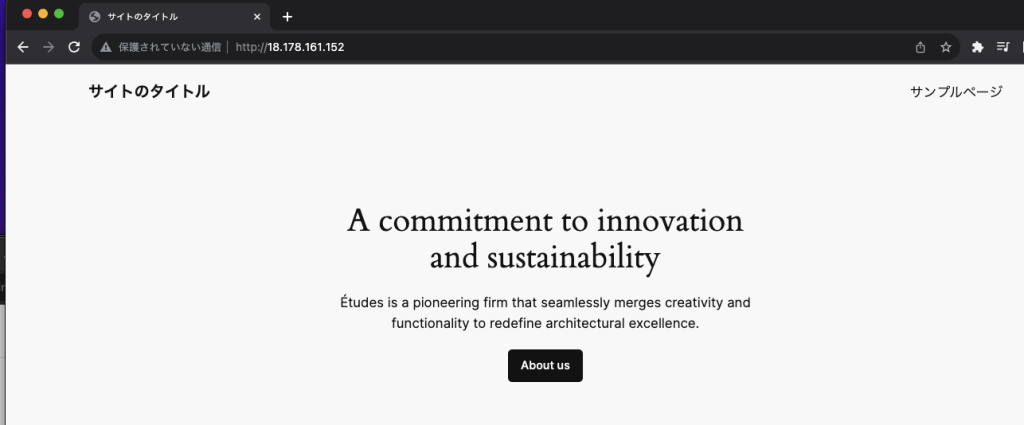
ハンズオン2
AWSマネジメントコンソールのターゲットグループにはどんな項目があるのかを把握する用、コード化前に
ターゲットグループ
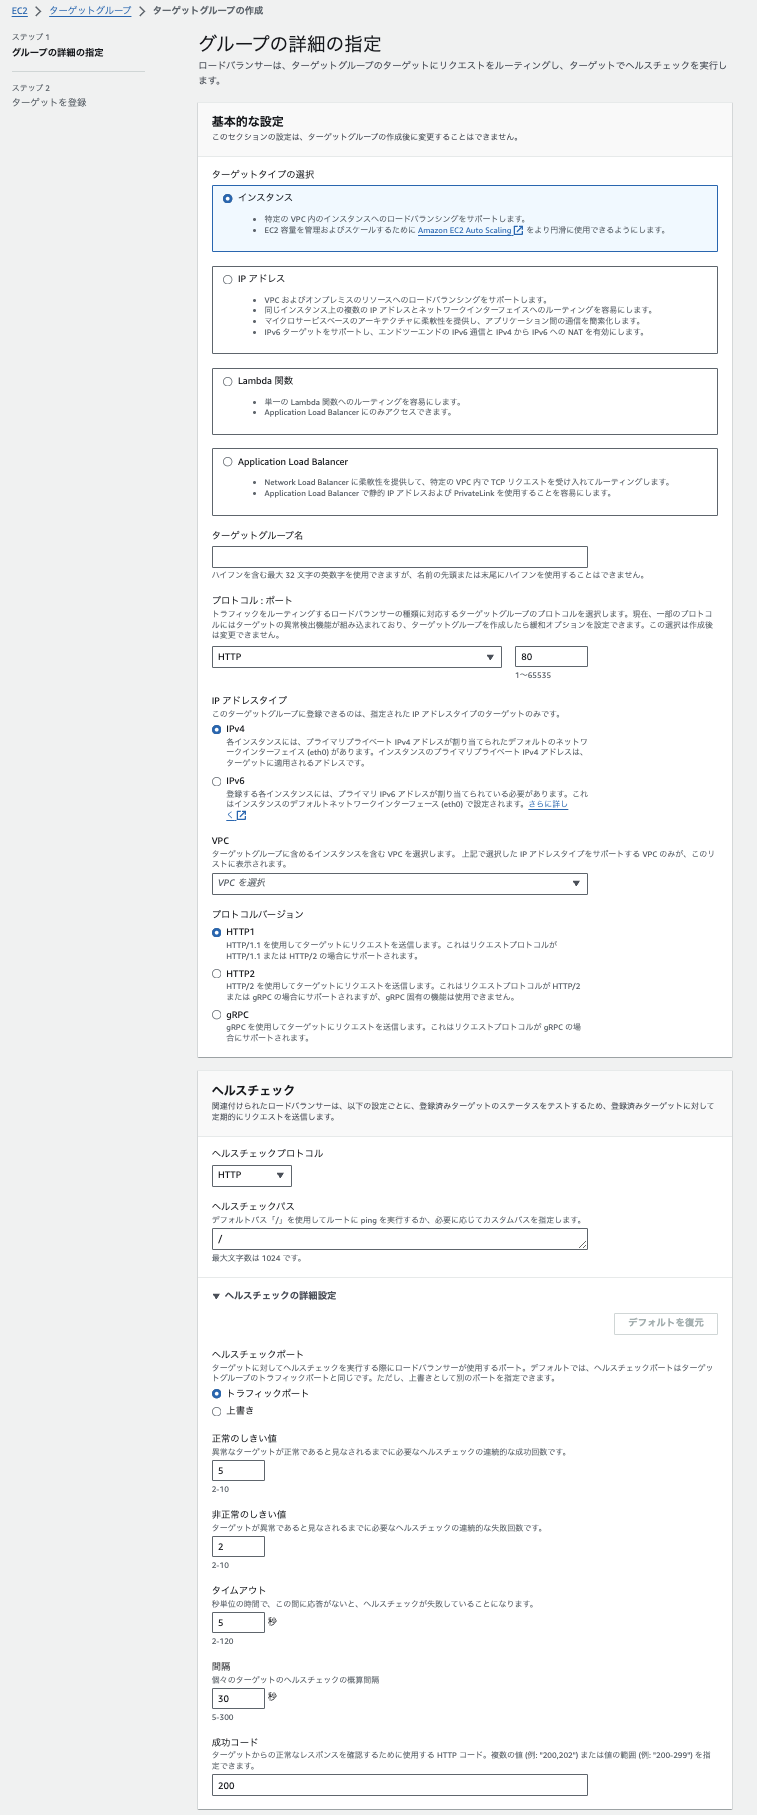
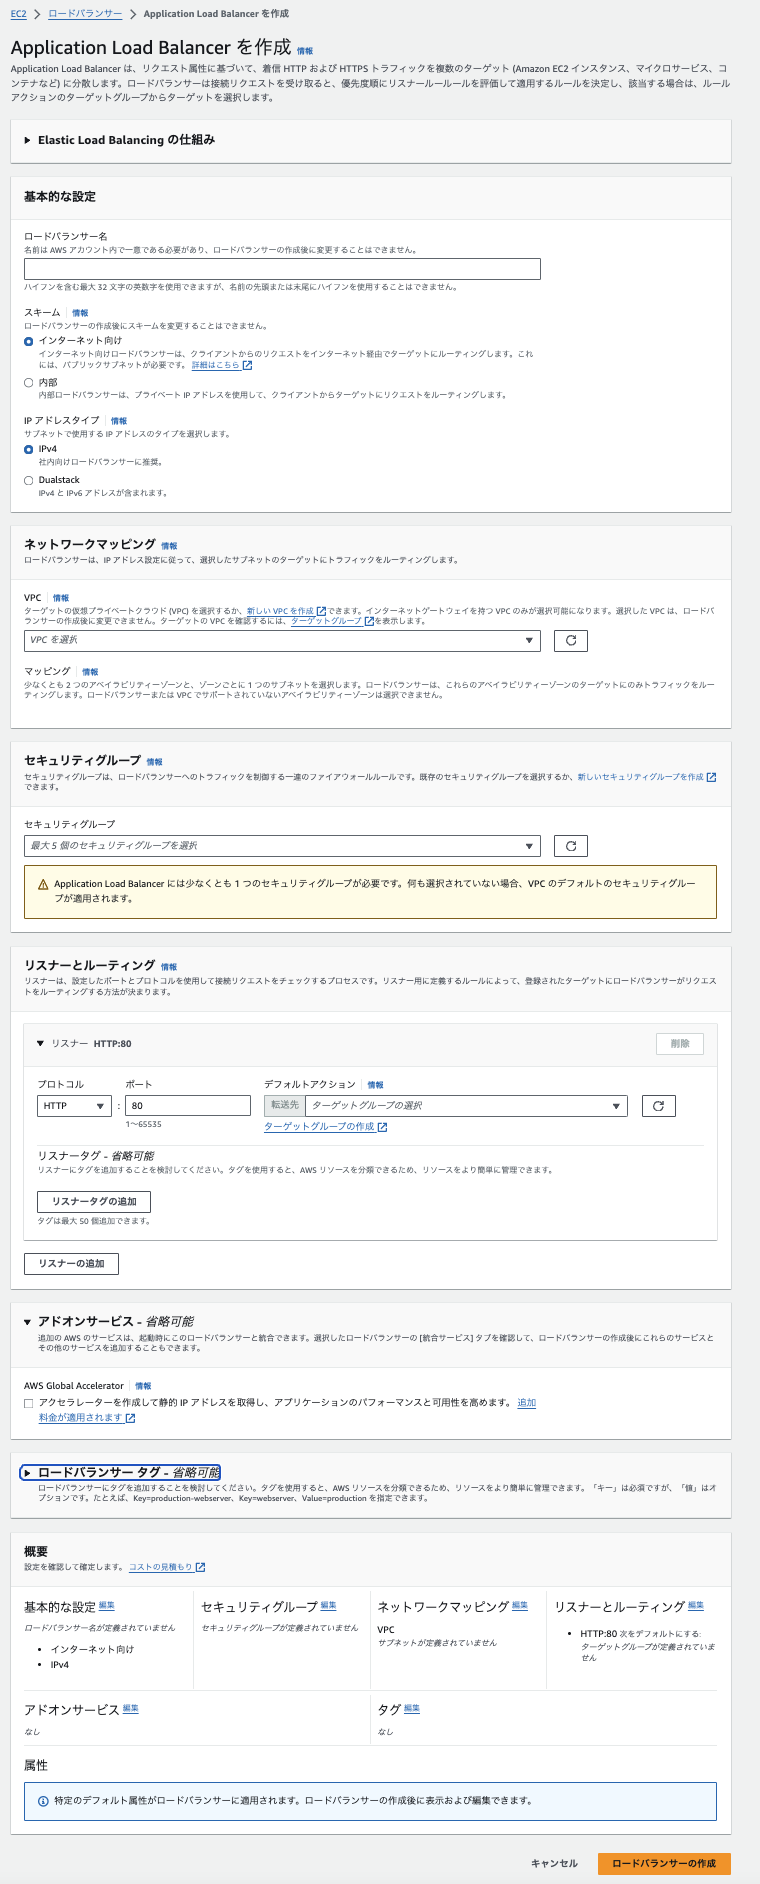
ALB作成画面
構成
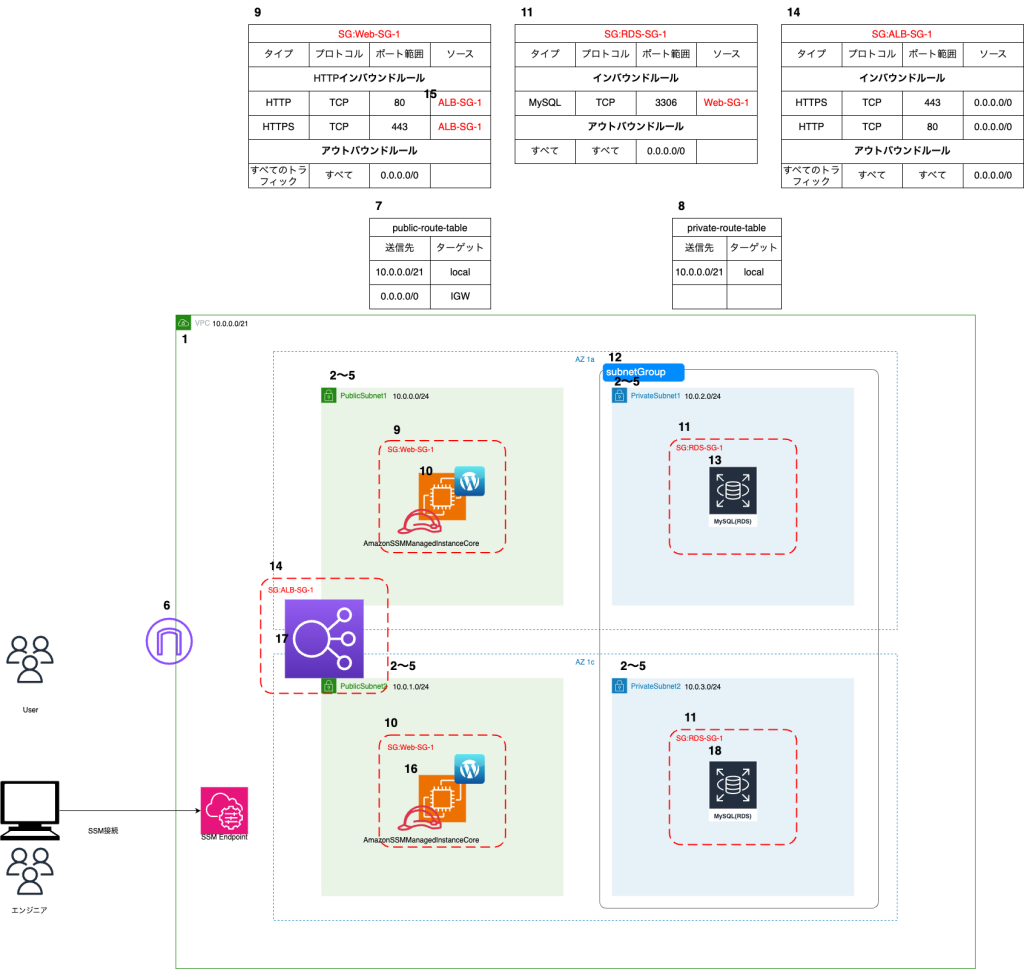
14.セキュリティグループ作成(ALB用)
15.セキュリティグループWebに対してソースを更新する。更新値は、上記で作成したALBを参照する。
16.パブリックサブネット2の中にEC2インスタンスを作成
17.ALBターゲットグループ、ALBリスナー、ALBを作成
18.プライベートサブネット1で作成したRDSに対してマルチAZオプションを有効化する
CloudFormationテンプレート
- クロススタック分割
- network-stack-template.yaml
- security-stack-template.yaml
- application-stack-template.yaml
AWSTemplateFormatVersion: '2010-09-09'
Description: 'hands-on1'
#----------------------------------------------------------------
# パラメーター
#----------------------------------------------------------------
Parameters:
  # プロジェクト名を入力する。各リソースのNameタグで参照する
  EnvironmentName:
    Description: hands-on1-template
    Type: String

  # VPCのCIDRレンジ
  VpcCIDR:
    Description: Please enter the IP range (CIDR notation) for this VPC
    Type: String
    Default: 10.0.0.0/21

  # パブリックサブネット1
  PublicSubnet1CIDR:
    Description: Please enter the IP range (CIDR notation) for the public subnet in the first Availability Zone
    Type: String
    Default: 10.0.0.0/24

  # パブリックサブネット2
  PublicSubnet2CIDR:
    Description: Please enter the IP range (CIDR notation) for the public subnet in the first Availability Zone
    Type: String
    Default: 10.0.1.0/24

  # プライベートサブネット1
  PrivateSubnet1CIDR:
    Description: Please enter the IP range (CIDR notation) for the private subnet in the first Availability Zone
    Type: String
    Default: 10.0.2.0/24

  # プライベートサブネット2
  PrivateSubnet2CIDR:
    Description: Please enter the IP range (CIDR notation) for the private subnet in the first Availability Zone
    Type: String
    Default: 10.0.3.0/24

#----------------------------------------------------------------
# リソース
#----------------------------------------------------------------
Resources:
  #----------------------
  # VPC作成
  #----------------------
  VPC:
    Type: AWS::EC2::VPC
    Properties:
      CidrBlock: !Ref VpcCIDR
      # 何の設定かわからないが、基本的にtrueにしても良さそう
      EnableDnsSupport: true
      EnableDnsHostnames: false
      Tags:
        - Key: Name
          Value: !Ref EnvironmentName
  #----------------------
  # Publicサブネット作成
  #----------------------
  # パブリックサブネット1
  PublicSubnet1:
    Type: AWS::EC2::Subnet
    Properties:
      VpcId: !Ref VPC
      # AZ-1a
      AvailabilityZone: ap-northeast-1a
      CidrBlock: !Ref PublicSubnet1CIDR
      # サブネットで起動されたインスタンスが起動時にパブリック IP アドレスを設定するかどうか
      # Publicサブネットなのでtrueにする
      MapPublicIpOnLaunch: true
      Tags:
        - Key: Name
          Value: !Sub ${EnvironmentName} Public Subnet

  # パブリックサブネット2
  PublicSubnet2:
    Type: AWS::EC2::Subnet
    Properties:
      VpcId: !Ref VPC
      # AZ-1c
      AvailabilityZone: ap-northeast-1c
      CidrBlock: !Ref PublicSubnet2CIDR
      MapPublicIpOnLaunch: true
      Tags:
        - Key: Name
          Value: !Sub ${EnvironmentName} Public Subnet
  #----------------------
  # Privateサブネット作成
  #----------------------
  #プライベートサブネット1
  PrivateSubnet1:
    Type: AWS::EC2::Subnet
    Properties:
      VpcId: !Ref VPC
      # AZ-1a
      AvailabilityZone: ap-northeast-1a
      CidrBlock: !Ref PrivateSubnet1CIDR
      # Privateサブネットなのでfalseにする
      MapPublicIpOnLaunch: false
      Tags:
        - Key: Name
          Value: !Sub ${EnvironmentName} Private Subnet

  #プライベートサブネット2
  PrivateSubnet2:
    Type: AWS::EC2::Subnet
    Properties:
      VpcId: !Ref VPC
      # AZ-1c
      AvailabilityZone: ap-northeast-1c
      CidrBlock: !Ref PrivateSubnet2CIDR
      # Privateサブネットなのでfalseにする
      MapPublicIpOnLaunch: false
      Tags:
        - Key: Name
          Value: !Sub ${EnvironmentName} Private Subnet

  #----------------------
  # IGW作成
  #----------------------
  InternetGateway:
    Type: AWS::EC2::InternetGateway
    Properties:
      Tags:
        - Key: Name
          Value: !Ref EnvironmentName

  #----------------------
  # IGWをVPCにアタッチする
  #----------------------
  InternetGatewayAttachment:
    Type: AWS::EC2::VPCGatewayAttachment
    Properties:
      InternetGatewayId: !Ref InternetGateway
      VpcId: !Ref VPC

  #----------------------
  # ルートテーブル作成 (Publicサブネット用)
  #----------------------
  # ルートテーブル(Publicサブネット用)作成
  PublicRouteTable:
    Type: AWS::EC2::RouteTable
    Properties:
      VpcId: !Ref VPC
      Tags:
        - Key: Name
          Value: !Sub ${EnvironmentName} Public Routes

  # 上記のルートテーブルに、レコードを追加する
  DefaultPublicRoute:
    Type: AWS::EC2::Route
    DependsOn: InternetGatewayAttachment
    Properties:
      RouteTableId: !Ref PublicRouteTable
      # IGW用のレコードを追加する
      DestinationCidrBlock: 0.0.0.0/0
      GatewayId: !Ref InternetGateway

  # Publicサブネット1に、上記ルートテーブルを関連付ける
  PublicSubnet1RouteTableAssociation:
    Type: AWS::EC2::SubnetRouteTableAssociation
    Properties:
      RouteTableId: !Ref PublicRouteTable
      SubnetId: !Ref PublicSubnet1

  # Publicサブネット2に、パブリックサブネット用ルートテーブルを関連付ける
  PublicSubnet2RouteTableAssociation:
    Type: AWS::EC2::SubnetRouteTableAssociation
    Properties:
      RouteTableId: !Ref PublicRouteTable
      SubnetId: !Ref PublicSubnet2

  #----------------------
  # RDSサブネットグループ作成
  #----------------------
  RdsSubnetGroup:
    Type: AWS::RDS::DBSubnetGroup
    Properties:
      DBSubnetGroupDescription: "Subnet Group for RDS instances"
      SubnetIds:
        - !Ref PrivateSubnet1
        - !Ref PrivateSubnet2
      DBSubnetGroupName: my-rds-subnet-group
      Tags:
        - Key: Name
          Value: !Sub "${EnvironmentName} RDS Subnet Group"

  #----------------------
  # SSMロール
  #----------------------
  SsmSessionManagerIamRole:
    Type: AWS::IAM::Role
    Properties:
      AssumeRolePolicyDocument:
        Version: '2012-10-17'
        Statement:
          - Effect: 'Allow'
            Principal:
              Service:
                - 'ec2.amazonaws.com'
            Action:
              - 'sts:AssumeRole'
      Path: '/'
      RoleName: 'SsmSessionManagerIamRole'
      ManagedPolicyArns:
        - arn:aws:iam::aws:policy/AmazonSSMManagedInstanceCore

  SessionManagerIamInstanceProfile:
    Type: 'AWS::IAM::InstanceProfile'
    Properties:
      Path: '/'
      Roles:
        - !Ref SsmSessionManagerIamRole

#----------------------
# エクスポート
#----------------------
Outputs:
  VPCId:
    Value: !Ref VPC
    Description: "VPC ID"
    Export:
      Name: !Sub "${EnvironmentName}-VPCId"

  PublicSubnet1Id:
    Value: !Ref PublicSubnet1
    Description: "PublicSubnet1"
    Export:
      Name: !Sub "${EnvironmentName}-PublicSubnet1Id"

  PublicSubnet2Id:
    Value: !Ref PublicSubnet2
    Description: "PublicSubnet2"
    Export:
      Name: !Sub "${EnvironmentName}-PublicSubnet2Id"

  RdsSubnetGroupId:
    Value: !Ref RdsSubnetGroup
    Description: "RDS Subnet Group Name"
    Export:
      Name: !Sub "${EnvironmentName}-RdsSubnetGroupId"

  SessionManagerIamInstanceProfile:
    Value: !Ref SessionManagerIamInstanceProfile
    Description: "SessionManagerIamInstanceProfile"
    Export:
      Name: !Sub "${EnvironmentName}-SessionManagerIamInstanceProfile"
AWSTemplateFormatVersion: '2010-09-09'
Description: 'hands-on1'
#----------------------------------------------------------------
# パラメーター
#----------------------------------------------------------------
Parameters:
EnvironmentName:
Description: hands-on1-template
Type: String
#----------------------------------------------------------------
# リソース
#----------------------------------------------------------------
Resources:
#----------------------
# セキュリティグループ作成
#----------------------
# EC2用のセキュリティグループ
WebSecurityGroup:
Type: AWS::EC2::SecurityGroup
Properties:
GroupName: Web-SG-1
GroupDescription: "Description"
VpcId: !ImportValue
'Fn::Sub': '${EnvironmentName}-VPCId'
#インバウンドルール
SecurityGroupIngress:
- IpProtocol: tcp
FromPort: 80
ToPort: 80
SourceSecurityGroupId: !Ref LbSecurityGroup
- IpProtocol: tcp
FromPort: 443
ToPort: 443
SourceSecurityGroupId: !Ref LbSecurityGroup
#アウトバウンドルール
SecurityGroupEgress:
- IpProtocol: -1
CidrIp: 0.0.0.0/0
Tags:
- Key: Name
Value: Web-sg1
#RDS用セキュリティグループ
RdsSecurityGroup:
Type: AWS::EC2::SecurityGroup
Properties:
GroupName: RDS-SG-1
GroupDescription: "Description"
VpcId: !ImportValue
'Fn::Sub': '${EnvironmentName}-VPCId'
SecurityGroupIngress:
# Replace with your specific IP range or remove the CidrIp property to allow access from anywhere
- IpProtocol: tcp
FromPort: 3306
ToPort: 3306
SourceSecurityGroupId: !Ref WebSecurityGroup
Tags:
- Key: Name
Value: RDS-SG-1
# ALB用のセキュリティグループ
LbSecurityGroup:
Type: AWS::EC2::SecurityGroup
Properties:
GroupName: LB-SG-1
GroupDescription: "Security Group for ALB"
VpcId: !ImportValue
'Fn::Sub': '${EnvironmentName}-VPCId'
SecurityGroupIngress:
# HTTP
- IpProtocol: tcp
FromPort: 80
ToPort: 80
CidrIp: 0.0.0.0/0
# HTTPS
- IpProtocol: tcp
FromPort: 443
ToPort: 443
CidrIp: 0.0.0.0/0
Tags:
- Key: Name
Value: LB-SG-1
#----------------------
# エクスポート
#----------------------
Outputs:
WebSecurityGroup:
Value: !Ref WebSecurityGroup
Description: "Web Security Group ID"
Export:
Name: !Sub "${EnvironmentName}-WebSecurityGroupId"
RdsSecurityGroup:
Value: !Ref RdsSecurityGroup
Description: "Security Group ID for RDS access"
Export:
Name: !Sub "${EnvironmentName}-RdsSecurityGroupId"
# ALB用セキュリティグループのエクスポート
LbSecurityGroup:
Description: "Security Group ID for ALB"
Value: !Ref LbSecurityGroup
Export:
Name: !Sub "${EnvironmentName}-LbSecurityGroupId"AWSTemplateFormatVersion: '2010-09-09'
Description: 'hands-on1'
#----------------------------------------------------------------
# パラメーター
#----------------------------------------------------------------
Parameters:
# EC2インスタンスタイプ
InstanceType:
Type: String
Default: t2.micro
AllowedValues:
- t2.micro
- t2.nano
Description: Select EC2 instance type.
EnvironmentName:
Description: hands-on1-template
Type: String
#----------------------------------------------------------------
# リソース
#----------------------------------------------------------------
Resources:
#----------------------
# EC2作成
#----------------------
PublicSubnet1EC2Instance:
Type: AWS::EC2::Instance
Properties:
# AMIは、AmazonLinux2
ImageId: "ami-0e25eba2025eea319"
# インスタンスタイプは、t2.micro
InstanceType: !Ref InstanceType
# 自動割当パプリックIPを有効にする場合はNetworkInterfacesを記載する必要がある
NetworkInterfaces:
- SubnetId: !ImportValue
'Fn::Sub': '${EnvironmentName}-PublicSubnet1Id'
GroupSet:
- !ImportValue
'Fn::Sub': '${EnvironmentName}-WebSecurityGroupId'
# 自動割当パプリックIPを有効
AssociatePublicIpAddress: true
DeviceIndex: 0
# ストレージを設定
BlockDeviceMappings:
- DeviceName: "/dev/xvda"
Ebs:
VolumeType: "gp2"
VolumeSize: 8
# SSM経由でSSH接続出来るようにするIAMロールをアタッチする
IamInstanceProfile: !ImportValue
'Fn::Sub': '${EnvironmentName}-SessionManagerIamInstanceProfile'
Tags:
- Key: Name
Value: !Sub "${EnvironmentName} Public Subnet EC2Instance"
UserData:
Fn::Base64: !Sub |
#!/bin/bash
# Amazon Linux 2 に PHP、MySQL、Apache、WordPress をインストール
amazon-linux-extras install -y php7.4
yum install -y mysql httpd php-mbstring php-xml gd php-gd
systemctl enable httpd.service
systemctl start httpd.service
wget https://ja.wordpress.org/latest-ja.tar.gz
tar zxvf latest-ja.tar.gz
cp -r wordpress/* /var/www/html/
chown apache:apache -R /var/www/html/
# EC2にEIPをつける
ElasticIpForPublicSubnet1EC2Instance:
Type: AWS::EC2::EIP
Properties:
InstanceId: !Ref PublicSubnet1EC2Instance
# PublicSubnet2 に新しいEC2インスタンスを作成
PublicSubnet2EC2Instance:
Type: AWS::EC2::Instance
Properties:
ImageId: "ami-0e25eba2025eea319"
InstanceType: !Ref InstanceType
NetworkInterfaces:
- SubnetId: !ImportValue
'Fn::Sub': '${EnvironmentName}-PublicSubnet2Id'
GroupSet:
- !ImportValue
'Fn::Sub': '${EnvironmentName}-WebSecurityGroupId'
AssociatePublicIpAddress: true
DeviceIndex: 0
BlockDeviceMappings:
- DeviceName: "/dev/xvda"
Ebs:
VolumeType: "gp2"
VolumeSize: 8
IamInstanceProfile: !ImportValue
'Fn::Sub': '${EnvironmentName}-SessionManagerIamInstanceProfile'
Tags:
- Key: Name
Value: !Sub "${EnvironmentName} Public Subnet 2 EC2Instance"
UserData:
Fn::Base64: !Sub |
#!/bin/bash
# Amazon Linux 2 に PHP、MySQL、Apache、WordPress をインストール
amazon-linux-extras install -y php7.4
yum install -y mysql httpd php-mbstring php-xml gd php-gd
systemctl enable httpd.service
systemctl start httpd.service
wget https://ja.wordpress.org/latest-ja.tar.gz
tar zxvf latest-ja.tar.gz
cp -r wordpress/* /var/www/html/
chown apache:apache -R /var/www/html/
# PublicSubnet2 の新しいEC2インスタンスにEIPを割り当てる
ElasticIpForPublicSubnet2EC2Instance:
Type: AWS::EC2::EIP
Properties:
InstanceId: !Ref PublicSubnet2EC2Instance
#----------------------
# RDS作成
#----------------------
MyRDSInstance:
Type: AWS::RDS::DBInstance
Properties:
# データベースエンジン
Engine: mysql
# マスターユーザー名
MasterUsername: wordpress
# ストレージの割り当て (GB)
AllocatedStorage: 20
# マスターパスワード(実際の環境ではセキュアな方法で提供する)
MasterUserPassword: "ChangeMe1234"
# DBインスタンスクラス
DBInstanceClass: db.t2.micro
# データベース名
DBName: wordpress
# VPCの設定(Outputsから参照)
DBSubnetGroupName: !ImportValue
'Fn::Sub': '${EnvironmentName}-RdsSubnetGroupId'
# パブリックアクセス無効
PubliclyAccessible: false
# セキュリティグループ
VPCSecurityGroups:
- !ImportValue
'Fn::Sub': '${EnvironmentName}-RdsSecurityGroupId'
# マルチAZ
MultiAZ: true
#----------------------
# ALBのリスナーとターゲットグループ作成
#----------------------
ALBTargetGroup:
Type: AWS::ElasticLoadBalancingV2::TargetGroup
Properties:
HealthCheckIntervalSeconds: 10
HealthCheckPath: /readme.html
HealthCheckProtocol: HTTP
HealthCheckTimeoutSeconds: 5
HealthyThresholdCount: 2
UnhealthyThresholdCount: 2
Port: 80
Protocol: HTTP
TargetType: instance
VpcId: !ImportValue
'Fn::Sub': '${EnvironmentName}-VPCId'
# ターゲットの登録
Targets:
- Id: !Ref PublicSubnet1EC2Instance
- Id: !Ref PublicSubnet2EC2Instance
ALBListener:
Type: AWS::ElasticLoadBalancingV2::Listener
Properties:
DefaultActions:
- Type: forward
TargetGroupArn: !Ref ALBTargetGroup
LoadBalancerArn: !Ref ApplicationLoadBalancer
Port: 80
Protocol: HTTP
ApplicationLoadBalancer:
Type: AWS::ElasticLoadBalancingV2::LoadBalancer
Properties:
Name: LB1
Scheme: internet-facing
Subnets:
- !ImportValue
'Fn::Sub': '${EnvironmentName}-PublicSubnet1Id'
- !ImportValue
'Fn::Sub': '${EnvironmentName}-PublicSubnet2Id'
SecurityGroups:
- !ImportValue
'Fn::Sub': '${EnvironmentName}-LbSecurityGroupId'
#----------------------
# Outputs
#----------------------ALBの振り分け動作確認
# プロファイル一覧を表示する
aws configure list-profiles

# SSM経由でPublicSubnet1EC2Instanceにログイン
aws ssm start-session --target {EC2インスタンスID} --profile {任意なプロファイル名}

# 下記表示になれば成功
sh-4.2$

sh-4.2$ sudo su -

sh-4.2$  cd /var/www/html/wp-admin
sh-4.2$  vi setup-config.php
【変更前】
<li><?php _e( 'Database name' ); ?></li>
【変更後】
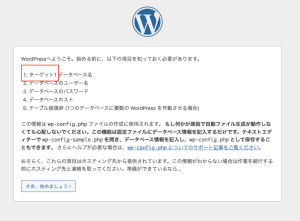
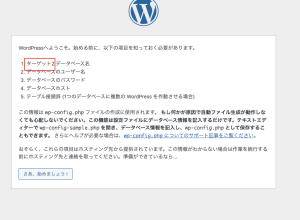
<li>ターゲット2  <?php _e( 'Database name' ); ?></li>


// PublicSubnet2EC2Instanceも同じように
ALBのDNS名をURLに入力
ハンズオン3
構成
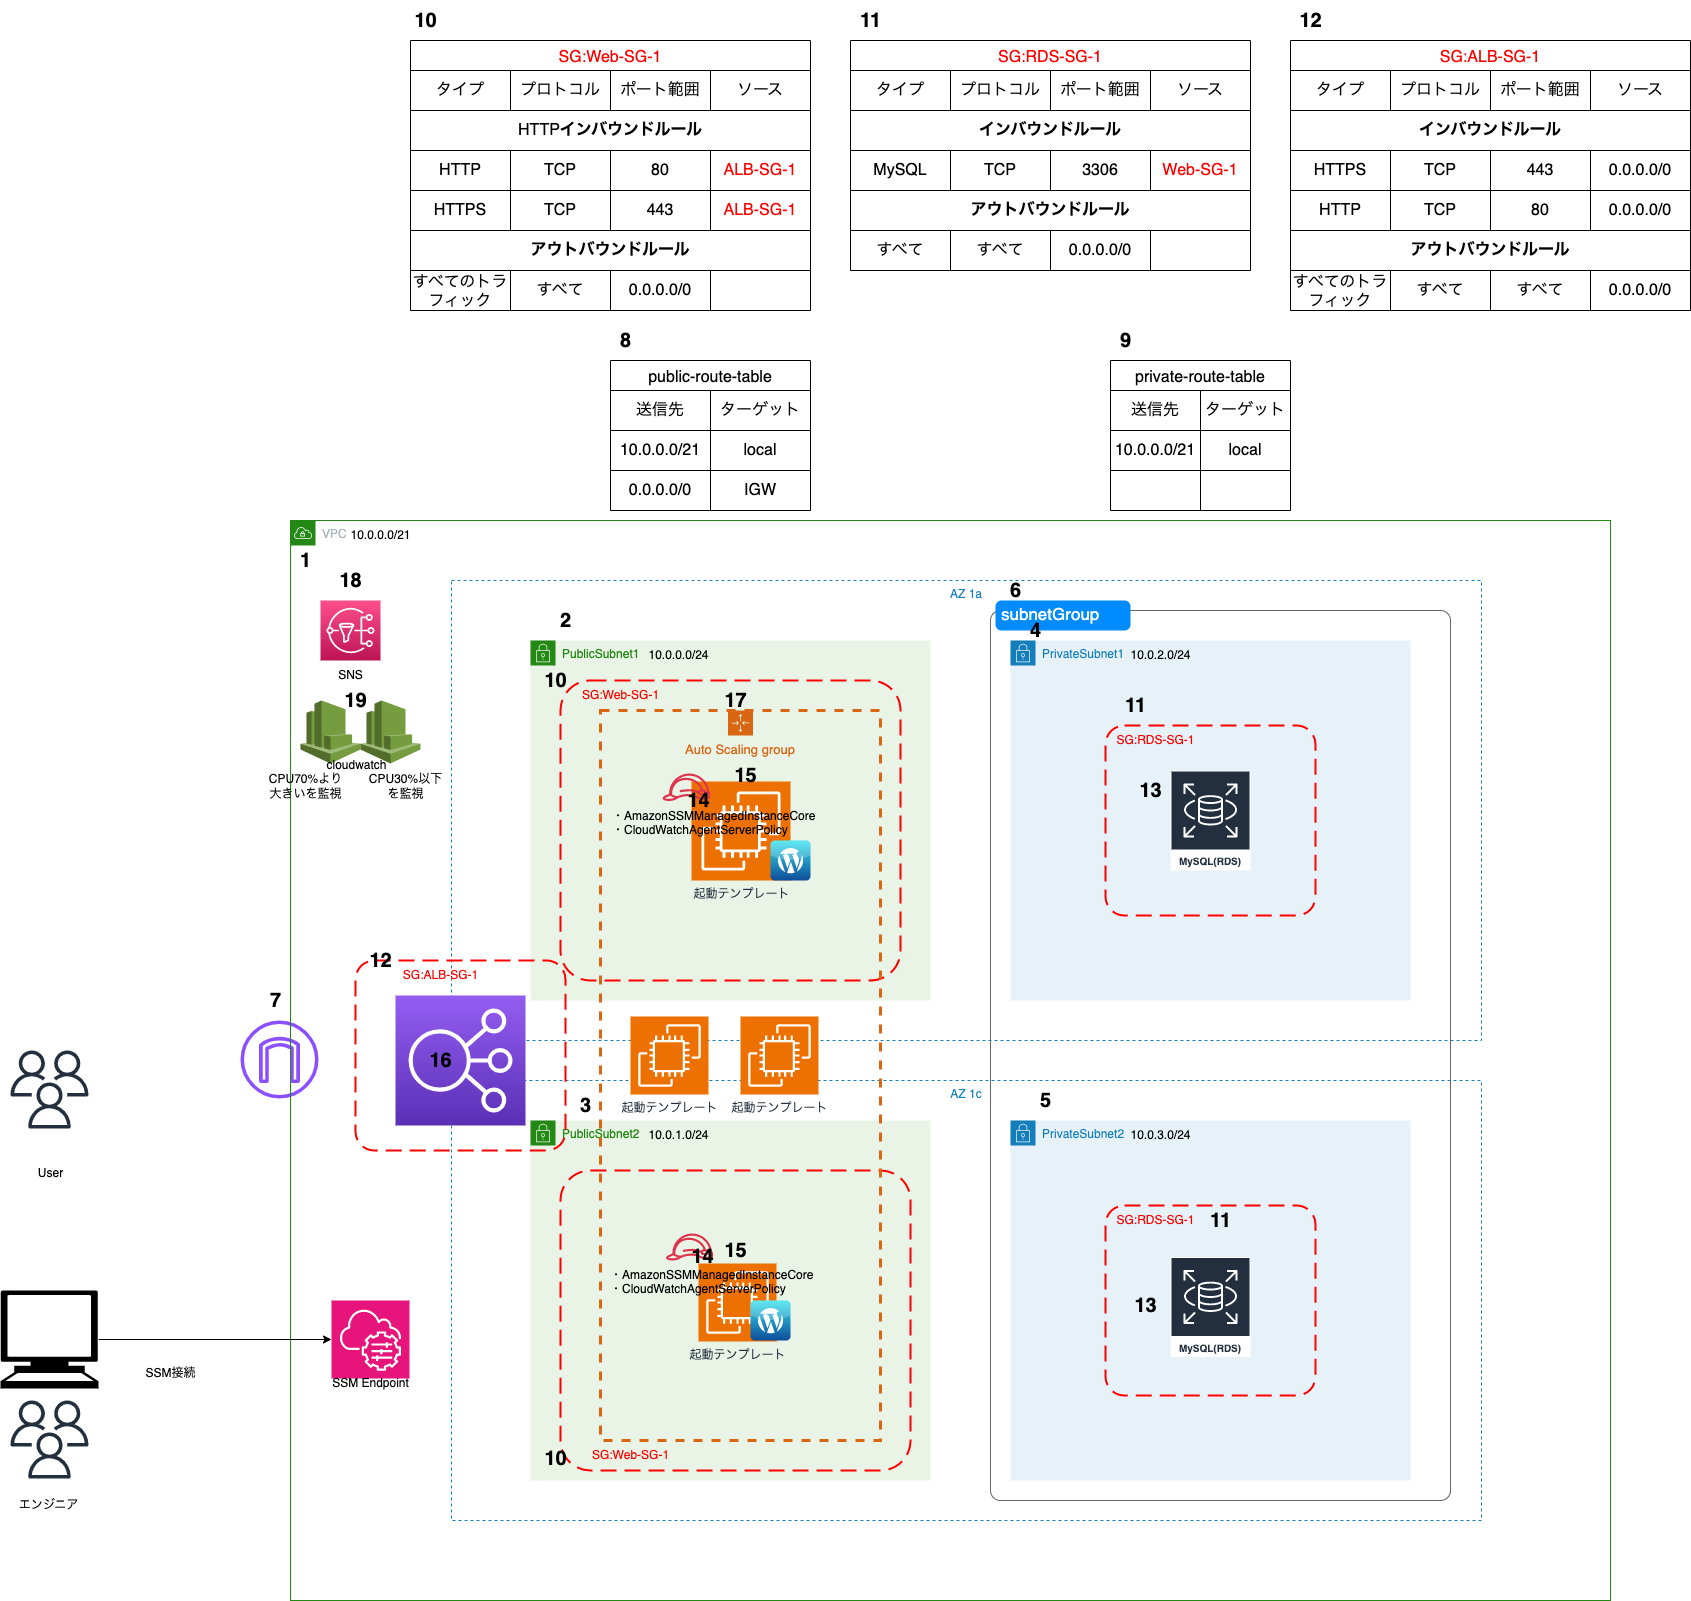
- VPC作成
- パブリックサブネット1作成
- パブリックサブネット2作成
- プライベートサブネット1作成
- プライベートサブネット2作成
- サブネットグループ作成(RDS用)
- インターネットゲートウェイ作成
- ルートテーブルを作成 (パブリックサブネット専用)
- ルートテーブルを作成(プライベートサブネット専用)
- セキュリティグループ作成(パブリックサブネットのEC2用)
- セキュリティグループ作成(RDS用)
- セキュリティグループ作成(ALB用)
- RDSインスタンスを作成
- IAMロールの作成
下記をアタッチする
・SSM接続に必要なポリシーとEC2
・CloudWatchにログ送信を許可するポリシー - 起動テンプレートを作成
- ALBターゲットグループ、ALBリスナー、ALBを作成
- AutoScalingGroupを作成
- SNSトッピクの作成
- CloudWatchの作成
CloudFormationテンプレート
AWSTemplateFormatVersion: '2010-09-09'
Description: 'hands-on1'
#----------------------------------------------------------------
# パラメーター
#----------------------------------------------------------------
Parameters:
  # プロジェクト名を入力する。各リソースのNameタグで参照する
  EnvironmentName:
    Description: hands-on1-template
    Type: String

  # VPCのCIDRレンジ
  VpcCIDR:
    Description: Please enter the IP range (CIDR notation) for this VPC
    Type: String
    Default: 10.0.0.0/21

  # パブリックサブネット1
  PublicSubnet1CIDR:
    Description: Please enter the IP range (CIDR notation) for the public subnet in the first Availability Zone
    Type: String
    Default: 10.0.0.0/24

  # パブリックサブネット2
  PublicSubnet2CIDR:
    Description: Please enter the IP range (CIDR notation) for the public subnet in the first Availability Zone
    Type: String
    Default: 10.0.1.0/24

  # プライベートサブネット1
  PrivateSubnet1CIDR:
    Description: Please enter the IP range (CIDR notation) for the private subnet in the first Availability Zone
    Type: String
    Default: 10.0.2.0/24

  # プライベートサブネット2
  PrivateSubnet2CIDR:
    Description: Please enter the IP range (CIDR notation) for the private subnet in the first Availability Zone
    Type: String
    Default: 10.0.3.0/24

#----------------------------------------------------------------
# リソース
#----------------------------------------------------------------
Resources:
  #----------------------
  # VPC作成
  #----------------------
  VPC:
    Type: AWS::EC2::VPC
    Properties:
      CidrBlock: !Ref VpcCIDR
      # 何の設定かわからないが、基本的にtrueにしても良さそう
      EnableDnsSupport: true
      EnableDnsHostnames: false
      Tags:
        - Key: Name
          Value: !Ref EnvironmentName
  #----------------------
  # Publicサブネット作成
  #----------------------
  # パブリックサブネット1
  PublicSubnet1:
    Type: AWS::EC2::Subnet
    Properties:
      VpcId: !Ref VPC
      # AZ-1a
      AvailabilityZone: ap-northeast-1a
      CidrBlock: !Ref PublicSubnet1CIDR
      # サブネットで起動されたインスタンスが起動時にパブリック IP アドレスを設定するかどうか
      # Publicサブネットなのでtrueにする
      MapPublicIpOnLaunch: true
      Tags:
        - Key: Name
          Value: !Sub ${EnvironmentName} Public Subnet

  # パブリックサブネット2
  PublicSubnet2:
    Type: AWS::EC2::Subnet
    Properties:
      VpcId: !Ref VPC
      # AZ-1c
      AvailabilityZone: ap-northeast-1c
      CidrBlock: !Ref PublicSubnet2CIDR
      MapPublicIpOnLaunch: true
      Tags:
        - Key: Name
          Value: !Sub ${EnvironmentName} Public Subnet
  #----------------------
  # Privateサブネット作成
  #----------------------
  #プライベートサブネット1
  PrivateSubnet1:
    Type: AWS::EC2::Subnet
    Properties:
      VpcId: !Ref VPC
      # AZ-1a
      AvailabilityZone: ap-northeast-1a
      CidrBlock: !Ref PrivateSubnet1CIDR
      # Privateサブネットなのでfalseにする
      MapPublicIpOnLaunch: false
      Tags:
        - Key: Name
          Value: !Sub ${EnvironmentName} Private Subnet

  #プライベートサブネット2
  PrivateSubnet2:
    Type: AWS::EC2::Subnet
    Properties:
      VpcId: !Ref VPC
      # AZ-1c
      AvailabilityZone: ap-northeast-1c
      CidrBlock: !Ref PrivateSubnet2CIDR
      # Privateサブネットなのでfalseにする
      MapPublicIpOnLaunch: false
      Tags:
        - Key: Name
          Value: !Sub ${EnvironmentName} Private Subnet

  #----------------------
  # IGW作成
  #----------------------
  InternetGateway:
    Type: AWS::EC2::InternetGateway
    Properties:
      Tags:
        - Key: Name
          Value: !Ref EnvironmentName

  #----------------------
  # IGWをVPCにアタッチする
  #----------------------
  InternetGatewayAttachment:
    Type: AWS::EC2::VPCGatewayAttachment
    Properties:
      InternetGatewayId: !Ref InternetGateway
      VpcId: !Ref VPC

  #----------------------
  # ルートテーブル作成 (Publicサブネット用)
  #----------------------
  # ルートテーブル(Publicサブネット用)作成
  PublicRouteTable:
    Type: AWS::EC2::RouteTable
    Properties:
      VpcId: !Ref VPC
      Tags:
        - Key: Name
          Value: !Sub ${EnvironmentName} Public Routes

  # 上記のルートテーブルに、レコードを追加する
  DefaultPublicRoute:
    Type: AWS::EC2::Route
    DependsOn: InternetGatewayAttachment
    Properties:
      RouteTableId: !Ref PublicRouteTable
      # IGW用のレコードを追加する
      DestinationCidrBlock: 0.0.0.0/0
      GatewayId: !Ref InternetGateway

  # Publicサブネット1に、上記ルートテーブルを関連付ける
  PublicSubnet1RouteTableAssociation:
    Type: AWS::EC2::SubnetRouteTableAssociation
    Properties:
      RouteTableId: !Ref PublicRouteTable
      SubnetId: !Ref PublicSubnet1

  # Publicサブネット2に、パブリックサブネット用ルートテーブルを関連付ける
  PublicSubnet2RouteTableAssociation:
    Type: AWS::EC2::SubnetRouteTableAssociation
    Properties:
      RouteTableId: !Ref PublicRouteTable
      SubnetId: !Ref PublicSubnet2

  #----------------------
  # RDSサブネットグループ作成
  #----------------------
  RdsSubnetGroup:
    Type: AWS::RDS::DBSubnetGroup
    Properties:
      DBSubnetGroupDescription: "Subnet Group for RDS instances"
      SubnetIds:
        - !Ref PrivateSubnet1
        - !Ref PrivateSubnet2
      DBSubnetGroupName: my-rds-subnet-group
      Tags:
        - Key: Name
          Value: !Sub "${EnvironmentName} RDS Subnet Group"

#----------------------
# エクスポート
#----------------------
Outputs:
  VPCId:
    Value: !Ref VPC
    Description: "VPC ID"
    Export:
      Name: !Sub "${EnvironmentName}-VPCId"

  PublicSubnet1Id:
    Value: !Ref PublicSubnet1
    Description: "PublicSubnet1"
    Export:
      Name: !Sub "${EnvironmentName}-PublicSubnet1Id"

  PublicSubnet2Id:
    Value: !Ref PublicSubnet2
    Description: "PublicSubnet2"
    Export:
      Name: !Sub "${EnvironmentName}-PublicSubnet2Id"

  RdsSubnetGroupId:
    Value: !Ref RdsSubnetGroup
    Description: "RDS Subnet Group Name"
    Export:
      Name: !Sub "${EnvironmentName}-RdsSubnetGroupId"
AWSTemplateFormatVersion: '2010-09-09'
Description: 'hands-on1'
#----------------------------------------------------------------
# パラメーター
#----------------------------------------------------------------
Parameters:
EnvironmentName:
Description: hands-on1-template
Type: String
#----------------------------------------------------------------
# リソース
#----------------------------------------------------------------
Resources:
#----------------------
# セキュリティグループ作成
#----------------------
# EC2用のセキュリティグループ
WebSecurityGroup:
Type: AWS::EC2::SecurityGroup
Properties:
GroupName: Web-SG-1
GroupDescription: "Description"
VpcId: !ImportValue
'Fn::Sub': '${EnvironmentName}-VPCId'
#インバウンドルール
SecurityGroupIngress:
- IpProtocol: tcp
FromPort: 80
ToPort: 80
SourceSecurityGroupId: !Ref LbSecurityGroup
- IpProtocol: tcp
FromPort: 443
ToPort: 443
SourceSecurityGroupId: !Ref LbSecurityGroup
#アウトバウンドルール
SecurityGroupEgress:
- IpProtocol: -1
CidrIp: 0.0.0.0/0
Tags:
- Key: Name
Value: Web-sg1
#RDS用セキュリティグループ
RdsSecurityGroup:
Type: AWS::EC2::SecurityGroup
Properties:
GroupName: RDS-SG-1
GroupDescription: "Description"
VpcId: !ImportValue
'Fn::Sub': '${EnvironmentName}-VPCId'
SecurityGroupIngress:
# Replace with your specific IP range or remove the CidrIp property to allow access from anywhere
- IpProtocol: tcp
FromPort: 3306
ToPort: 3306
SourceSecurityGroupId: !Ref WebSecurityGroup
Tags:
- Key: Name
Value: RDS-SG-1
# ALB用のセキュリティグループ
LbSecurityGroup:
Type: AWS::EC2::SecurityGroup
Properties:
GroupName: LB-SG-1
GroupDescription: "Security Group for ALB"
VpcId: !ImportValue
'Fn::Sub': '${EnvironmentName}-VPCId'
SecurityGroupIngress:
# HTTP
- IpProtocol: tcp
FromPort: 80
ToPort: 80
CidrIp: 0.0.0.0/0
# HTTPS
- IpProtocol: tcp
FromPort: 443
ToPort: 443
CidrIp: 0.0.0.0/0
Tags:
- Key: Name
Value: LB-SG-1
#----------------------
# エクスポート
#----------------------
Outputs:
WebSecurityGroup:
Value: !Ref WebSecurityGroup
Description: "Web Security Group ID"
Export:
Name: !Sub "${EnvironmentName}-WebSecurityGroupId"
RdsSecurityGroup:
Value: !Ref RdsSecurityGroup
Description: "Security Group ID for RDS access"
Export:
Name: !Sub "${EnvironmentName}-RdsSecurityGroupId"
# ALB用セキュリティグループのエクスポート
LbSecurityGroup:
Description: "Security Group ID for ALB"
Value: !Ref LbSecurityGroup
Export:
Name: !Sub "${EnvironmentName}-LbSecurityGroupId"AWSTemplateFormatVersion: '2010-09-09'
Description: 'hands-on1'
#----------------------------------------------------------------
# パラメーター
#----------------------------------------------------------------
Parameters:
# EC2インスタンスタイプ
InstanceType:
Type: String
Default: t2.micro
AllowedValues:
- t2.micro
- t2.nano
Description: Select EC2 instance type.
EnvironmentName:
Description: hands-on1-template
Type: String
#----------------------------------------------------------------
# リソース
#----------------------------------------------------------------
Resources:
#----------------------
# RDS作成
#----------------------
MyRDSInstance:
Type: AWS::RDS::DBInstance
Properties:
# データベースエンジン
Engine: mysql
# マスターユーザー名
MasterUsername: wordpress
# ストレージの割り当て (GB)
AllocatedStorage: 20
# マスターパスワード(実際の環境ではセキュアな方法で提供する)
MasterUserPassword: "ChangeMe1234"
# DBインスタンスクラス
DBInstanceClass: db.t2.micro
# データベース名
DBName: wordpress
# VPCの設定(Outputsから参照)
DBSubnetGroupName: !ImportValue
'Fn::Sub': '${EnvironmentName}-RdsSubnetGroupId'
# パブリックアクセス無効
PubliclyAccessible: false
# セキュリティグループ
VPCSecurityGroups:
- !ImportValue
'Fn::Sub': '${EnvironmentName}-RdsSecurityGroupId'
# マルチAZ
MultiAZ: false
#----------------------
# IAMロール クロススタック参照ができない為、ここでIAMロールを作成する
# ポリシー
# ・SSMログインの為のポリシー
# ・EC2のログをcloudwatchに送信する為のポリシー
#----------------------
SsmSessionManagerIamRole:
Type: AWS::IAM::Role
Properties:
AssumeRolePolicyDocument:
Version: '2012-10-17'
Statement:
- Effect: 'Allow'
Principal:
Service:
- 'ec2.amazonaws.com'
Action:
- 'sts:AssumeRole'
Path: '/'
RoleName: 'SsmSessionManagerIamRole'
ManagedPolicyArns:
- arn:aws:iam::aws:policy/AmazonSSMManagedInstanceCore
- arn:aws:iam::aws:policy/CloudWatchAgentServerPolicy
SessionManagerIamInstanceProfile:
Type: 'AWS::IAM::InstanceProfile'
Properties:
Path: '/'
Roles:
- !Ref SsmSessionManagerIamRole
#----------------------
# 起動テンプレート作成(EC2インスタンスの設計書を作成)
#----------------------
LaunchTemplate:
Type: AWS::EC2::LaunchTemplate
Properties:
LaunchTemplateName: MyLaunchTemplate
LaunchTemplateData:
# AmazonLinux2
ImageId: "ami-0e25eba2025eea319"
InstanceType: !Ref InstanceType
NetworkInterfaces:
# 自動割当パプリックIPを有効
- AssociatePublicIpAddress: true
DeviceIndex: 0
# セキュリティグループはこちらに指定
Groups:
- !ImportValue
'Fn::Sub': '${EnvironmentName}-WebSecurityGroupId'
# ストレージを設定
BlockDeviceMappings:
- DeviceName: "/dev/xvda"
Ebs:
VolumeType: "gp2"
VolumeSize: 8
# SSM経由でSSH接続出来るようにするIAMロールをアタッチする
IamInstanceProfile:
Arn: !GetAtt SessionManagerIamInstanceProfile.Arn
UserData:
Fn::Base64: !Sub |
#!/bin/bash
# AWS CLIをインストール
yum install -y aws-cli
# Amazon Linux 2 に PHP、MySQL、Apache、WordPress をインストール
amazon-linux-extras install -y php7.4
yum install -y mysql httpd php-mbstring php-xml gd php-gd
systemctl enable httpd.service
systemctl start httpd.service
wget https://ja.wordpress.org/latest-ja.tar.gz
tar zxvf latest-ja.tar.gz
cp -r wordpress/* /var/www/html/
chown apache:apache -R /var/www/html/
####################### cloudwatchでログ監視 ###########################
# awslogs のインストール
yum -y install awslogs
# awslogs の設定
sed -i 's/region = us-east-1/region = ap-northeast-1/' /etc/awslogs/awscli.conf
cat <<EOT >> /etc/awslogs/awslogs.conf
[HttpAccessLog]
file = /var/log/httpd/access_log
log_group_name = HttpAccessLog
log_stream_name = {instance_id}
datetime_format = %b %d %H:%M:%S
[HttpErrorLog]
file = /var/log/httpd/error_log
log_group_name = HttpErrorLog
log_stream_name = {instance_id}
datetime_format = %b %d %H:%M:%S
EOT
systemctl enable awslogsd
systemctl start awslogsd
#----------------------
# ALBターゲットグループ作成
#----------------------
ALBTargetGroup:
Type: AWS::ElasticLoadBalancingV2::TargetGroup
Properties:
VpcId: !ImportValue
'Fn::Sub': '${EnvironmentName}-VPCId'
HealthCheckPath: /readme.html
HealthCheckProtocol: HTTP
HealthCheckPort: '80'
#ヘルスチェック間隔
HealthCheckIntervalSeconds: 10
#ヘルスチェックのタイムアウト時間
HealthCheckTimeoutSeconds: 5
#ヘルシーと見なすための連続成功回数
HealthyThresholdCount: 2
#アンヘルシーと見なすための連続失敗回数
UnhealthyThresholdCount: 2
Port: 80
Protocol: HTTP
TargetType: instance
#----------------------
# ALBリスナー作成
#----------------------
ALBListener:
Type: AWS::ElasticLoadBalancingV2::Listener
Properties:
DefaultActions:
- Type: forward
TargetGroupArn: !Ref ALBTargetGroup
LoadBalancerArn: !Ref ApplicationLoadBalancer
Port: 80
Protocol: HTTP
#----------------------
# ALB作成
#----------------------
ApplicationLoadBalancer:
Type: AWS::ElasticLoadBalancingV2::LoadBalancer
Properties:
Name: LB1
Scheme: internet-facing
Subnets:
- !ImportValue
'Fn::Sub': '${EnvironmentName}-PublicSubnet1Id'
- !ImportValue
'Fn::Sub': '${EnvironmentName}-PublicSubnet2Id'
SecurityGroups:
- !ImportValue
'Fn::Sub': '${EnvironmentName}-LbSecurityGroupId'
#----------------------
# AutoScalingGroup作成
#----------------------
AutoScalingGroup:
Type: AWS::AutoScaling::AutoScalingGroup
Properties:
#起動テンプレート
LaunchTemplate:
LaunchTemplateId: !Ref LaunchTemplate
Version: !GetAtt LaunchTemplate.LatestVersionNumber
# AutoScalingグループにALBを紐付ける
TargetGroupARNs:
- !Ref ALBTargetGroup
# 任意な名前
AutoScalingGroupName: Test-AutoScaling1
# 希望する容量
DesiredCapacity: 2
# 最小キャパシティ
MinSize: 2
# 最大キャパシティ
MaxSize: 4
VPCZoneIdentifier:
- !ImportValue
'Fn::Sub': '${EnvironmentName}-PublicSubnet1Id'
- !ImportValue
'Fn::Sub': '${EnvironmentName}-PublicSubnet2Id'
# ヘルスチェックタイプ ELBの場合はELB
HealthCheckType: ELB
# ヘルスチェック感覚
HealthCheckGracePeriod: 300
#----------------------
# SNSトピックの作成
#----------------------
NotificationTopic:
Type: AWS::SNS::Topic
Properties:
Subscription:
- Endpoint: dev.takakura0318@gmail.com
Protocol: email
TopicName: "NotificationTopic"
#----------------------
# CloudWatchアラーム(CPUが70%を超えた場合)
#----------------------
HighCpuAlarm:
Type: AWS::CloudWatch::Alarm
Properties:
AlarmDescription: "Alarm when CPU exceeds 70%"
# メトリクスの選択
Namespace: AWS/EC2
MetricName: CPUUtilization
# 統計
Statistic: Average
# 集計期間
Period: 300
# 静的
EvaluationPeriods: 1
# 条件値
Threshold: 70
# 演算子:より大きい
ComparisonOperator: GreaterThanThreshold
# よくわからないけどざっくり名前みたいもの
Dimensions:
- Name: AutoScalingGroupName
Value: !Ref AutoScalingGroup
AlarmActions:
- !Ref NotificationTopic
- !Ref HighCpuScalingPolicy
# 欠落データは見つかりませんで処理
TreatMissingData: missing
#----------------------
# CloudWatchアラーム(CPUが30%以下の場合)
#----------------------
LowCpuAlarm:
Type: AWS::CloudWatch::Alarm
Properties:
AlarmDescription: "Alarm when CPU falls below 30%"
MetricName: CPUUtilization
Namespace: AWS/EC2
Statistic: Average
Period: 300
EvaluationPeriods: 1
Threshold: 30
ComparisonOperator: LessThanThreshold
Dimensions:
- Name: AutoScalingGroupName
Value: !Ref AutoScalingGroup
AlarmActions:
- !Ref NotificationTopic
- !Ref LowCpuScalingPolicy
TreatMissingData: notBreaching
#----------------------
# AutoScalingグループのスケーリングポリシー(CPU使用率が高い場合)
#----------------------
HighCpuScalingPolicy:
Type: AWS::AutoScaling::ScalingPolicy
Properties:
AutoScalingGroupName: !Ref AutoScalingGroup
# ポリシータイプ
PolicyType: SimpleScaling
# 1台追加
ScalingAdjustment: 1
AdjustmentType: ChangeInCapacity
# 別のスケーリングアクティビティを許可するまでの秒数
Cooldown: 30
#----------------------
# AutoScalingグループのスケーリングポリシー(CPU使用率が低い場合)
#----------------------
LowCpuScalingPolicy:
Type: AWS::AutoScaling::ScalingPolicy
Properties:
AutoScalingGroupName: !Ref AutoScalingGroup
PolicyType: SimpleScaling
ScalingAdjustment: -1
AdjustmentType: ChangeInCapacity
Cooldown: 30
#----------------------
# Outputs
#----------------------動作確認
ALBの動作確認
# プロファイル一覧を表示する
aws configure list-profiles
# SSM経由でPublicSubnet1EC2Instanceにログイン
aws ssm start-session --target {EC2インスタンスID} --profile {任意なプロファイル名}

# 下記表示になれば成功
sh-4.2$
sh-4.2$ sudo su -
root$ cd /var/www/html/
root$  vi readme.html
【変更前】
<h2>First Things First</h2>

【変更後】
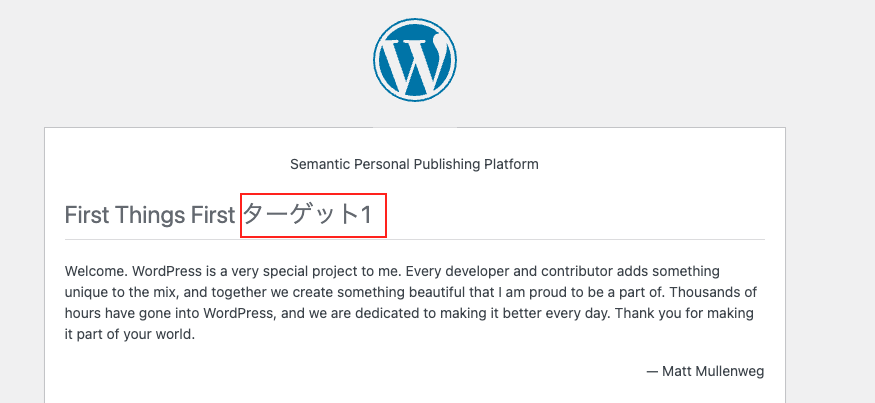
<h2>First Things First ターゲット1</h2>
----------------------------------------------
# ターゲット2であるEC2インスタンスも同様
sh-4.2$  vi readme.html
【変更前】
<h2>First Things First</h2>

【変更後】
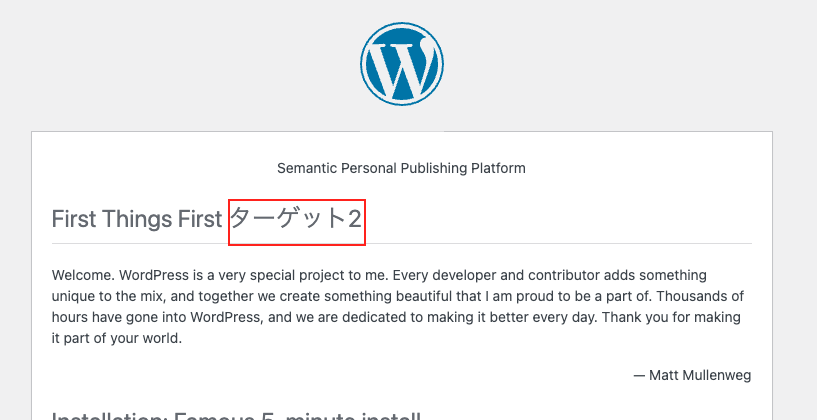
<h2>First Things First ターゲット2</h2>
「ALBのDNS名/readme.html」にWebアクセス
Autoスケールの動作確認
現在の設定を確認
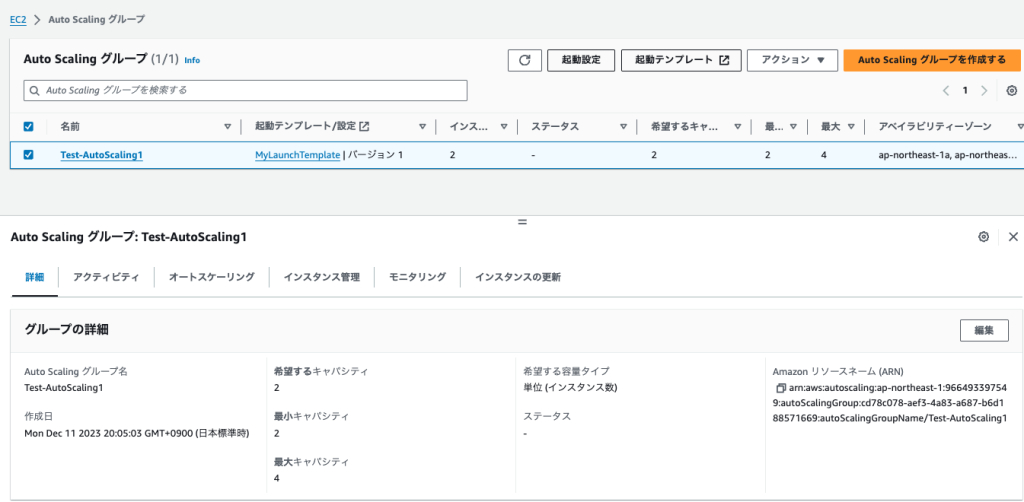
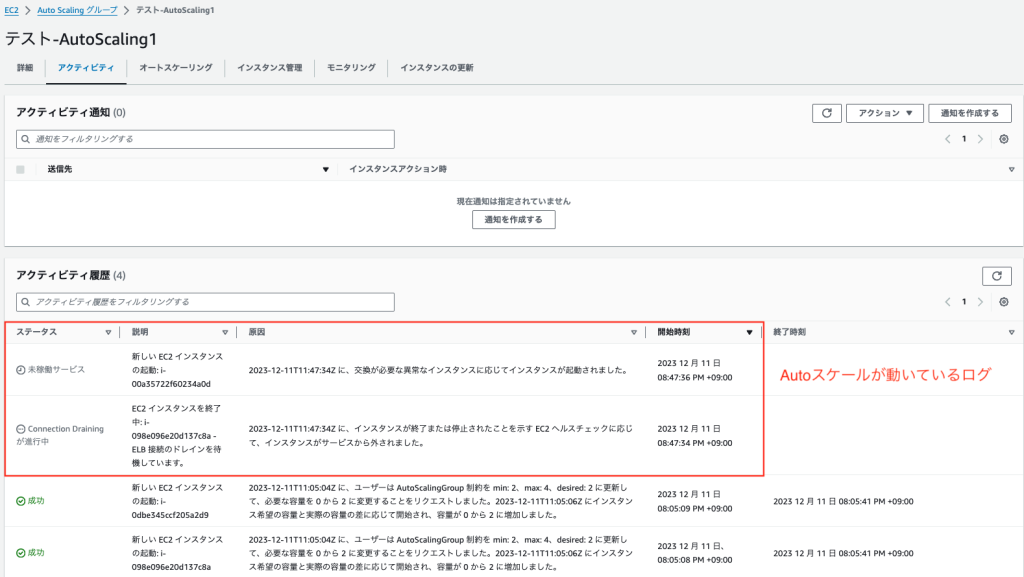
EC2インスタンスを1台終了にする

EC2を手動で停止したがEC2の合計数が少なくなったが、Autoスケールにより、EC2の合計数が維持されている

EC2のCPUが70%より大きい場合に、EC2が1つ追加されることを確認する
# プロファイル一覧を表示する
aws configure list-profiles
# SSM経由でPublicSubnet1EC2Instanceにログイン
aws ssm start-session --target {EC2インスタンスID} --profile {任意なプロファイル名}

sh-4.2$
sh-4.2$ sudo su -

//負荷をかけるコマンド
root$ yes >> /dev/null &
root$ yes >> /dev/null &
root$ yes >> /dev/null &
root$ yes >> /dev/null &

// CPUが90%超えていることを確認
root$ top
top - 00:53:47 up 20 min,  0 users,  load average: 4.16, 3.51, 1.92
Tasks: 111 total,   5 running,  65 sleeping,   0 stopped,   0 zombie
%Cpu(s): 99.3 us,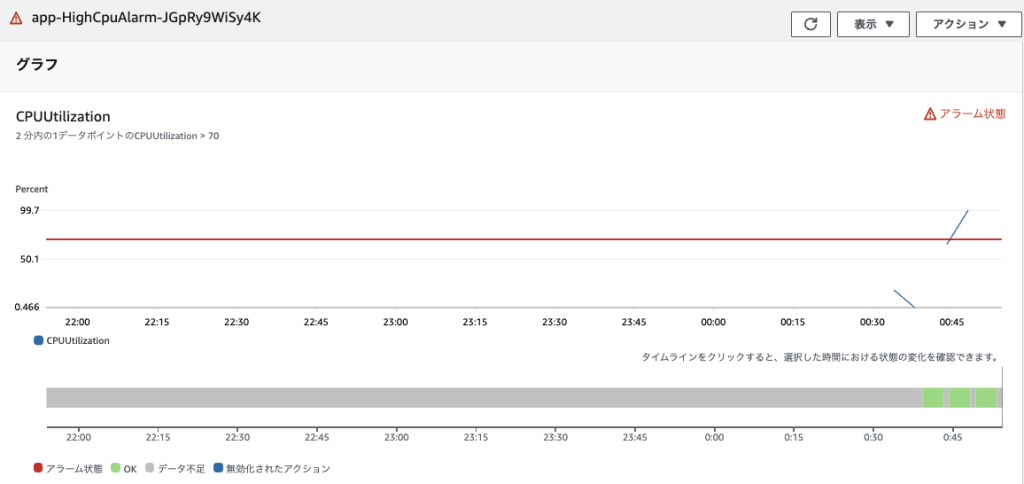
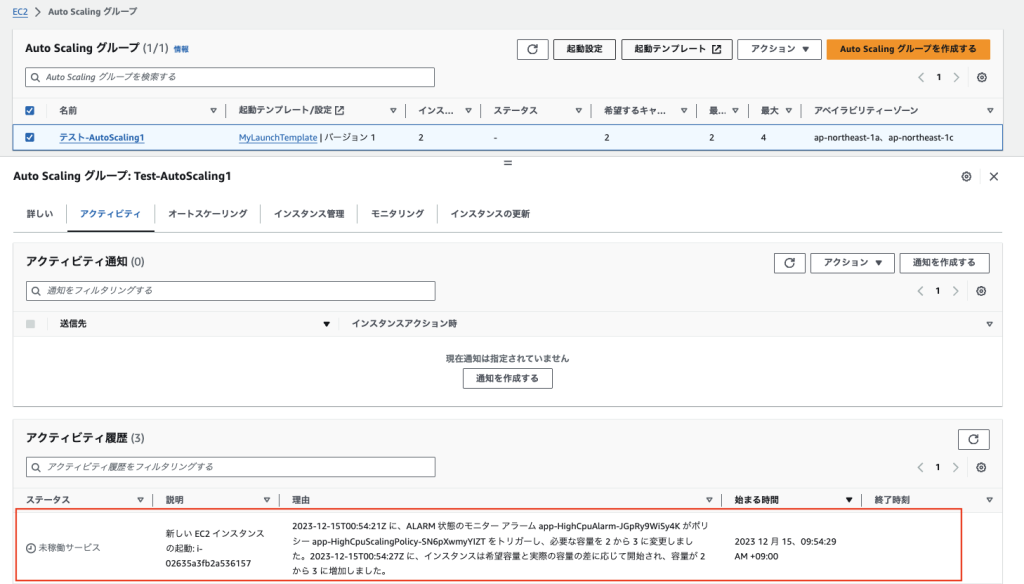
EC2が2台増えている

CPUが30%以下の動き
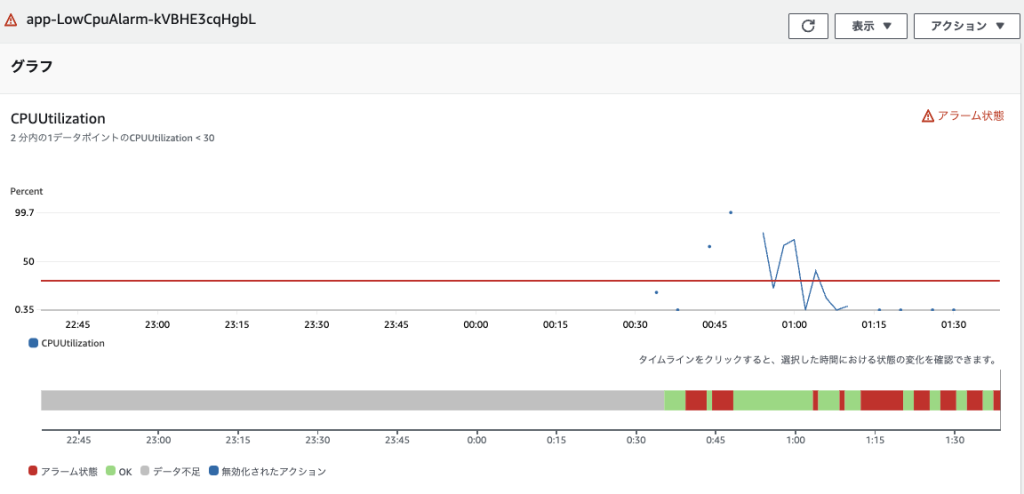
CPU30%以下になったので、EC2インスタンスが通常時の2台に戻っている

ログの確認
LaunchTemplateのUserDataで設定したAWSlogsの内容がログ出力されている

ハンズオン4
構成
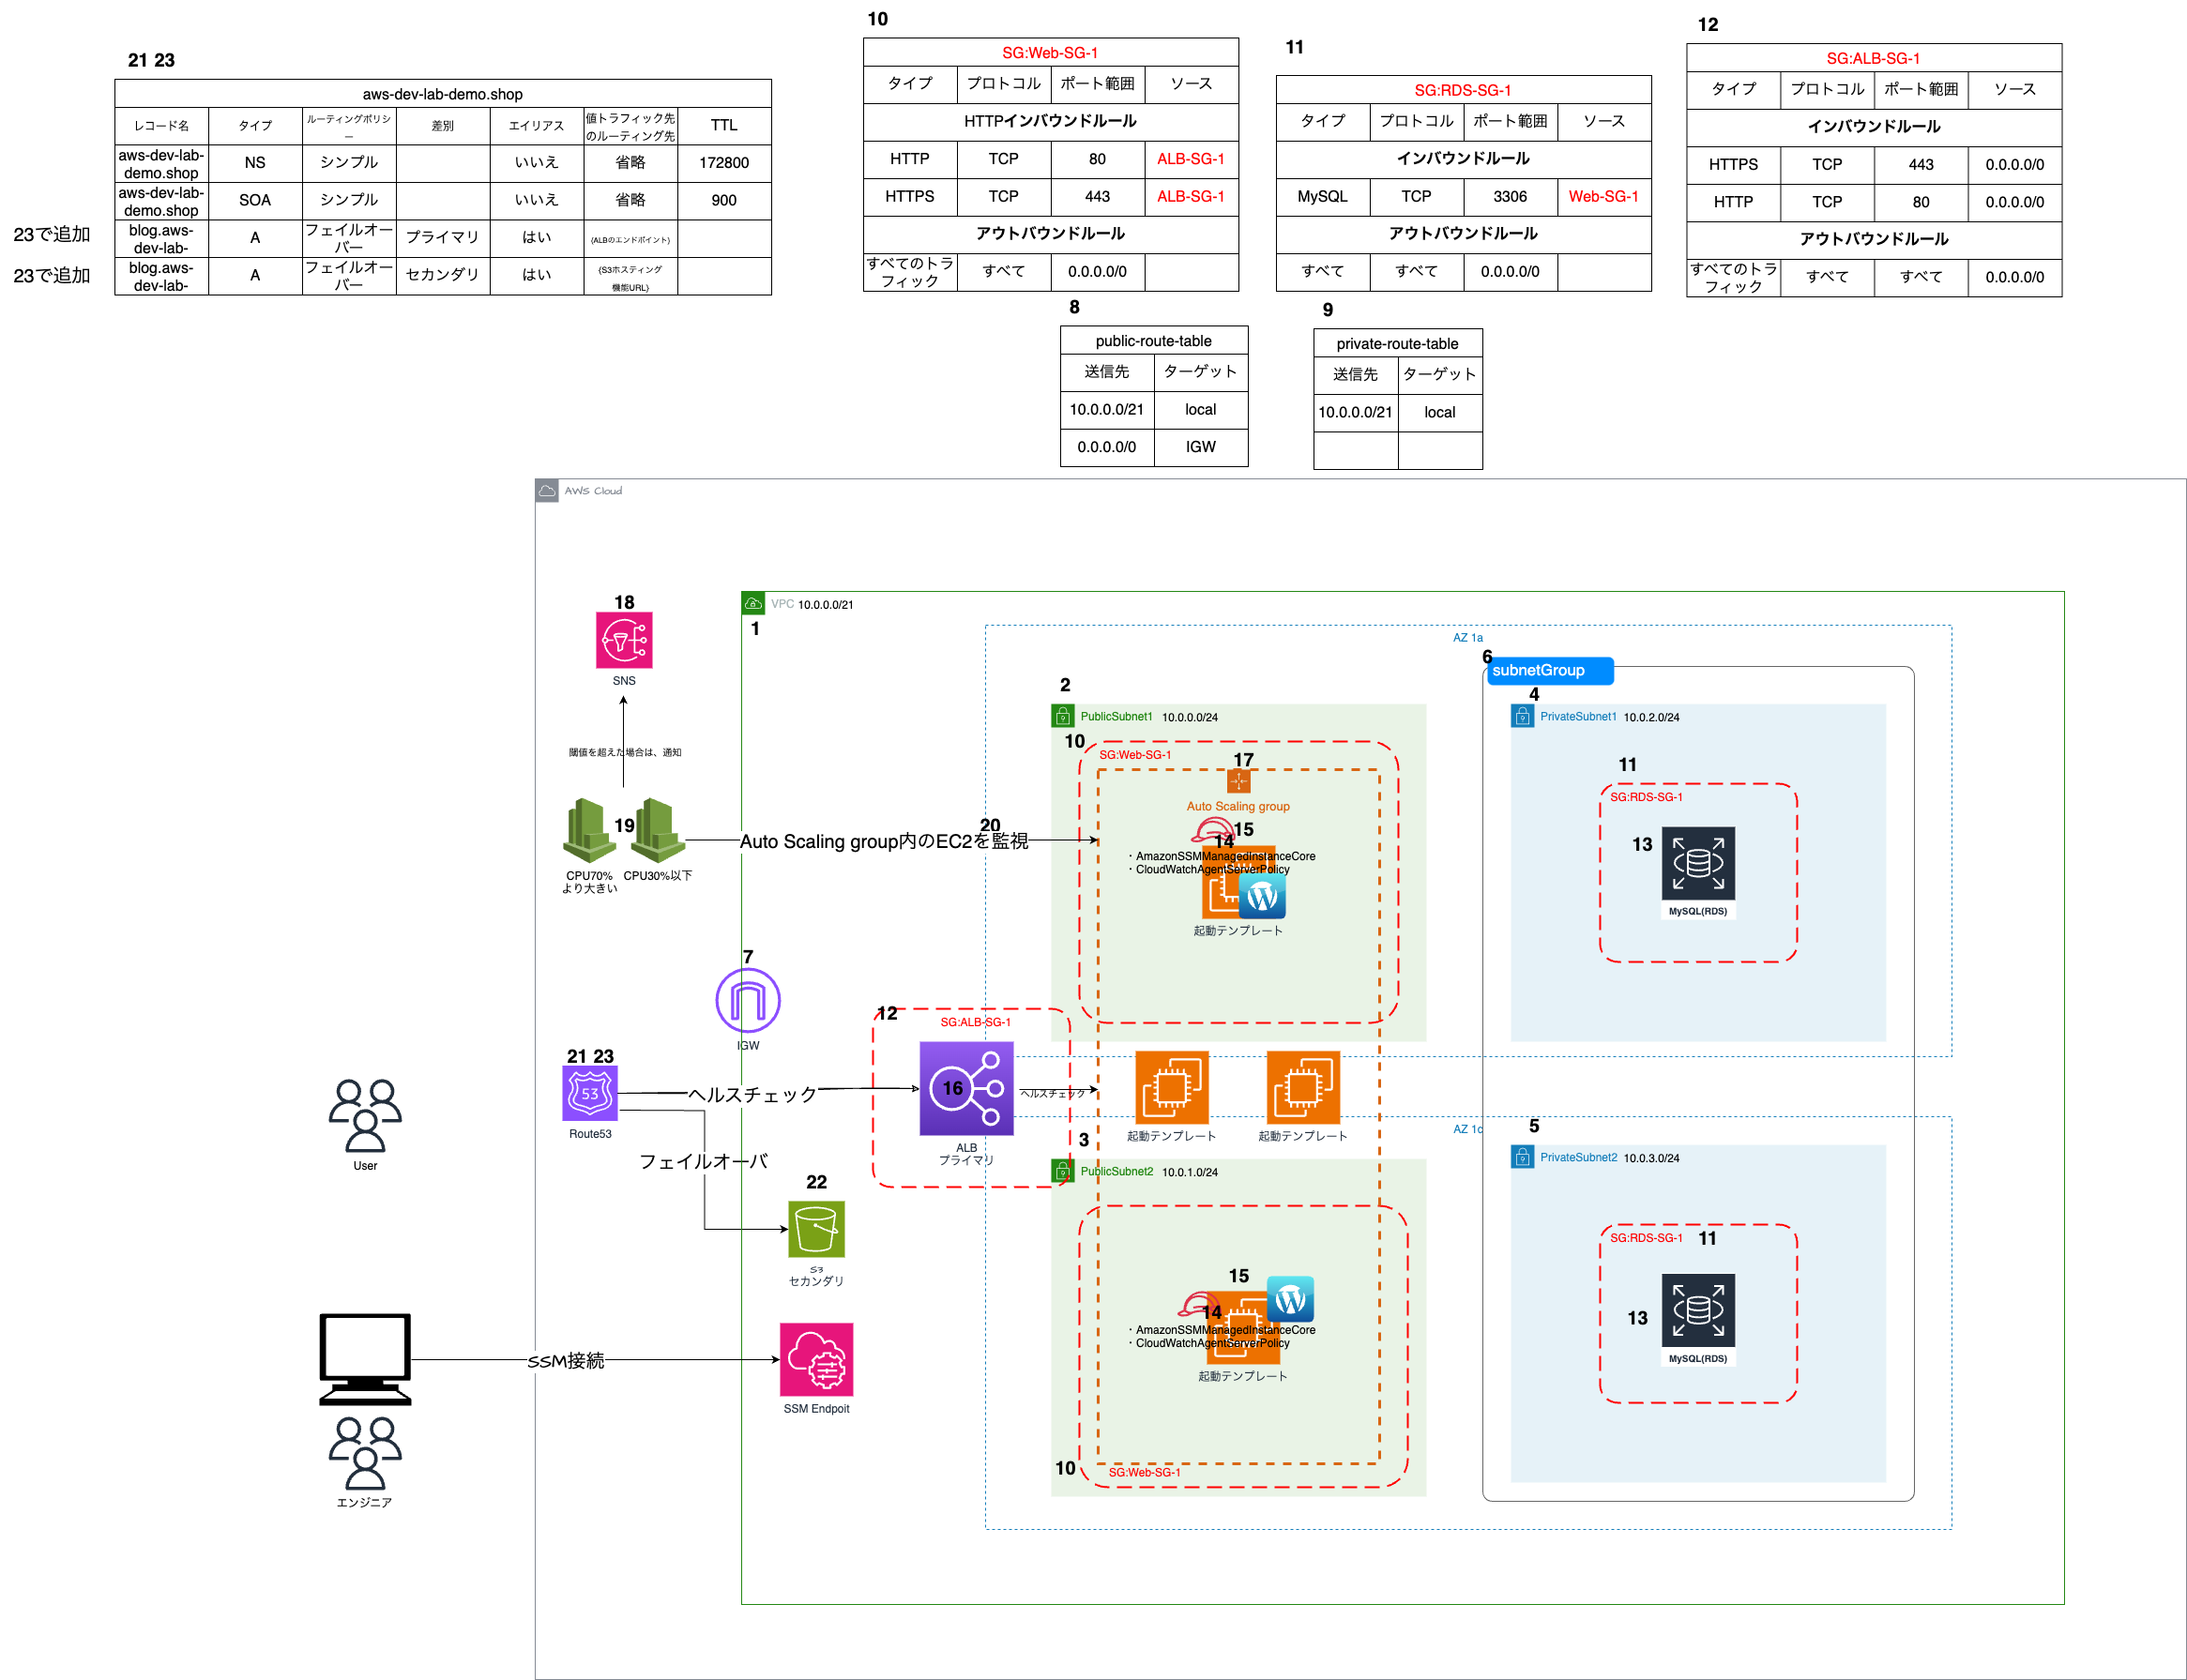
- VPCを作成
- パブリックサブネット1作成
- パブリックサブネット2作成
- プライベートサブネット1作成
- プライベートサブネット2作成
- サブネットグループ作成(RDS用)
- インターネットゲートウェイ作成
- ルートテーブルを作成 (パブリックサブネット専用)
- ルートテーブルを作成(プライベートサブネット専用)
- セキュリティグループ作成(パブリックサブネットのEC2用)
- セキュリティグループ作成(RDS用)
- セキュリティグループ作成(ALB用)
- RDSインスタンスを作成
- IAMロールの作成
下記をアタッチする
・SSM接続に必要なポリシーとEC2
・CloudWatchにログ送信を許可するポリシー - 起動テンプレートを作成
- ALBターゲットグループ、ALBリスナー、ALBを作成
- AutoScalingGroupを作成
- SNSトッピクの作成
- CloudWatchの作成
・CPU使用率70%より大きいを監視するCloudWatchアラームを作成
・CPU使用率が30%以下を監視するCloudWatchアラームを作成 - AutoScalingGroupのスケーリングポリシーを設定する
・EC2を1台増やすスケーリングポリシーを追加
・EC2を1台減らすスケーリングポリシーを追加 - Route53でホストゾーンを作成する
- S3バケットを作成する
Route53のフェイルオーバルーティング機能を使いたいので、バケット名は、ドメインと一致すること - 21で作成したホストゾーンにレコードを追加する
・お名前.comで取得したドメインとALBのエンドポイントを紐付ける為のAレコードを追加(プライマリ)
・お名前.comで取得したドメインとS3のsorryページを紐付ける為のAレコードを追加(セカンダリ)
CloudFormationテンプレート
AWSTemplateFormatVersion: '2010-09-09'
Description: 'hands-on1'
#----------------------------------------------------------------
# パラメーター
#----------------------------------------------------------------
Parameters:
  # プロジェクト名を入力する。各リソースのNameタグで参照する
  EnvironmentName:
    Description: hands-on1-template
    Type: String

  # VPCのCIDRレンジ
  VpcCIDR:
    Description: Please enter the IP range (CIDR notation) for this VPC
    Type: String
    Default: 10.0.0.0/21

  # パブリックサブネット1
  PublicSubnet1CIDR:
    Description: Please enter the IP range (CIDR notation) for the public subnet in the first Availability Zone
    Type: String
    Default: 10.0.0.0/24

  # パブリックサブネット2
  PublicSubnet2CIDR:
    Description: Please enter the IP range (CIDR notation) for the public subnet in the first Availability Zone
    Type: String
    Default: 10.0.1.0/24

  # プライベートサブネット1
  PrivateSubnet1CIDR:
    Description: Please enter the IP range (CIDR notation) for the private subnet in the first Availability Zone
    Type: String
    Default: 10.0.2.0/24

  # プライベートサブネット2
  PrivateSubnet2CIDR:
    Description: Please enter the IP range (CIDR notation) for the private subnet in the first Availability Zone
    Type: String
    Default: 10.0.3.0/24

#----------------------------------------------------------------
# リソース
#----------------------------------------------------------------
Resources:
  #----------------------
  # VPC作成
  #----------------------
  VPC:
    Type: AWS::EC2::VPC
    Properties:
      CidrBlock: !Ref VpcCIDR
      # 何の設定かわからないが、基本的にtrueにしても良さそう
      EnableDnsSupport: true
      EnableDnsHostnames: false
      Tags:
        - Key: Name
          Value: !Ref EnvironmentName
  #----------------------
  # Publicサブネット作成
  #----------------------
  # パブリックサブネット1
  PublicSubnet1:
    Type: AWS::EC2::Subnet
    Properties:
      VpcId: !Ref VPC
      # AZ-1a
      AvailabilityZone: ap-northeast-1a
      CidrBlock: !Ref PublicSubnet1CIDR
      # サブネットで起動されたインスタンスが起動時にパブリック IP アドレスを設定するかどうか
      # Publicサブネットなのでtrueにする
      MapPublicIpOnLaunch: true
      Tags:
        - Key: Name
          Value: !Sub ${EnvironmentName} Public Subnet

  # パブリックサブネット2
  PublicSubnet2:
    Type: AWS::EC2::Subnet
    Properties:
      VpcId: !Ref VPC
      # AZ-1c
      AvailabilityZone: ap-northeast-1c
      CidrBlock: !Ref PublicSubnet2CIDR
      MapPublicIpOnLaunch: true
      Tags:
        - Key: Name
          Value: !Sub ${EnvironmentName} Public Subnet
  #----------------------
  # Privateサブネット作成
  #----------------------
  #プライベートサブネット1
  PrivateSubnet1:
    Type: AWS::EC2::Subnet
    Properties:
      VpcId: !Ref VPC
      # AZ-1a
      AvailabilityZone: ap-northeast-1a
      CidrBlock: !Ref PrivateSubnet1CIDR
      # Privateサブネットなのでfalseにする
      MapPublicIpOnLaunch: false
      Tags:
        - Key: Name
          Value: !Sub ${EnvironmentName} Private Subnet

  #プライベートサブネット2
  PrivateSubnet2:
    Type: AWS::EC2::Subnet
    Properties:
      VpcId: !Ref VPC
      # AZ-1c
      AvailabilityZone: ap-northeast-1c
      CidrBlock: !Ref PrivateSubnet2CIDR
      # Privateサブネットなのでfalseにする
      MapPublicIpOnLaunch: false
      Tags:
        - Key: Name
          Value: !Sub ${EnvironmentName} Private Subnet

  #----------------------
  # IGW作成
  #----------------------
  InternetGateway:
    Type: AWS::EC2::InternetGateway
    Properties:
      Tags:
        - Key: Name
          Value: !Ref EnvironmentName

  #----------------------
  # IGWをVPCにアタッチする
  #----------------------
  InternetGatewayAttachment:
    Type: AWS::EC2::VPCGatewayAttachment
    Properties:
      InternetGatewayId: !Ref InternetGateway
      VpcId: !Ref VPC

  #----------------------
  # ルートテーブル作成 (Publicサブネット用)
  #----------------------
  # ルートテーブル(Publicサブネット用)作成
  PublicRouteTable:
    Type: AWS::EC2::RouteTable
    Properties:
      VpcId: !Ref VPC
      Tags:
        - Key: Name
          Value: !Sub ${EnvironmentName} Public Routes

  # 上記のルートテーブルに、レコードを追加する
  DefaultPublicRoute:
    Type: AWS::EC2::Route
    DependsOn: InternetGatewayAttachment
    Properties:
      RouteTableId: !Ref PublicRouteTable
      # IGW用のレコードを追加する
      DestinationCidrBlock: 0.0.0.0/0
      GatewayId: !Ref InternetGateway

  # Publicサブネット1に、上記ルートテーブルを関連付ける
  PublicSubnet1RouteTableAssociation:
    Type: AWS::EC2::SubnetRouteTableAssociation
    Properties:
      RouteTableId: !Ref PublicRouteTable
      SubnetId: !Ref PublicSubnet1

  # Publicサブネット2に、パブリックサブネット用ルートテーブルを関連付ける
  PublicSubnet2RouteTableAssociation:
    Type: AWS::EC2::SubnetRouteTableAssociation
    Properties:
      RouteTableId: !Ref PublicRouteTable
      SubnetId: !Ref PublicSubnet2

  #----------------------
  # RDSサブネットグループ作成
  #----------------------
  RdsSubnetGroup:
    Type: AWS::RDS::DBSubnetGroup
    Properties:
      DBSubnetGroupDescription: "Subnet Group for RDS instances"
      SubnetIds:
        - !Ref PrivateSubnet1
        - !Ref PrivateSubnet2
      DBSubnetGroupName: my-rds-subnet-group
      Tags:
        - Key: Name
          Value: !Sub "${EnvironmentName} RDS Subnet Group"

  #----------------------
  # Route 53ホストゾーン作成
  #----------------------
  HostedZone:
    Type: AWS::Route53::HostedZone
    Properties:
      Name: aws-dev-lab-demo.shop

#----------------------
# エクスポート
#----------------------
Outputs:
  VPCId:
    Value: !Ref VPC
    Description: "VPC ID"
    Export:
      Name: !Sub "${EnvironmentName}-VPCId"

  PublicSubnet1Id:
    Value: !Ref PublicSubnet1
    Description: "PublicSubnet1"
    Export:
      Name: !Sub "${EnvironmentName}-PublicSubnet1Id"

  PublicSubnet2Id:
    Value: !Ref PublicSubnet2
    Description: "PublicSubnet2"
    Export:
      Name: !Sub "${EnvironmentName}-PublicSubnet2Id"

  RdsSubnetGroupId:
    Value: !Ref RdsSubnetGroup
    Description: "RDS Subnet Group Name"
    Export:
      Name: !Sub "${EnvironmentName}-RdsSubnetGroupId"

  HostedZoneId:
    Description: "The HostedZone ID"
    Value: !Ref HostedZone
    Export:
      Name: !Sub "${EnvironmentName}-HostedZoneId"
AWSTemplateFormatVersion: '2010-09-09'
Description: 'hands-on1'
#----------------------------------------------------------------
# パラメーター
#----------------------------------------------------------------
Parameters:
EnvironmentName:
Description: hands-on1-template
Type: String
#----------------------------------------------------------------
# リソース
#----------------------------------------------------------------
Resources:
#----------------------
# セキュリティグループ作成
#----------------------
# EC2用のセキュリティグループ
WebSecurityGroup:
Type: AWS::EC2::SecurityGroup
Properties:
GroupName: Web-SG-1
GroupDescription: "Description"
VpcId: !ImportValue
'Fn::Sub': '${EnvironmentName}-VPCId'
#インバウンドルール
SecurityGroupIngress:
- IpProtocol: tcp
FromPort: 80
ToPort: 80
SourceSecurityGroupId: !Ref LbSecurityGroup
- IpProtocol: tcp
FromPort: 443
ToPort: 443
SourceSecurityGroupId: !Ref LbSecurityGroup
#アウトバウンドルール
SecurityGroupEgress:
- IpProtocol: -1
CidrIp: 0.0.0.0/0
Tags:
- Key: Name
Value: Web-sg1
#RDS用セキュリティグループ
RdsSecurityGroup:
Type: AWS::EC2::SecurityGroup
Properties:
GroupName: RDS-SG-1
GroupDescription: "Description"
VpcId: !ImportValue
'Fn::Sub': '${EnvironmentName}-VPCId'
SecurityGroupIngress:
# Replace with your specific IP range or remove the CidrIp property to allow access from anywhere
- IpProtocol: tcp
FromPort: 3306
ToPort: 3306
SourceSecurityGroupId: !Ref WebSecurityGroup
Tags:
- Key: Name
Value: RDS-SG-1
# ALB用のセキュリティグループ
LbSecurityGroup:
Type: AWS::EC2::SecurityGroup
Properties:
GroupName: LB-SG-1
GroupDescription: "Security Group for ALB"
VpcId: !ImportValue
'Fn::Sub': '${EnvironmentName}-VPCId'
SecurityGroupIngress:
# HTTP
- IpProtocol: tcp
FromPort: 80
ToPort: 80
CidrIp: 0.0.0.0/0
# HTTPS
- IpProtocol: tcp
FromPort: 443
ToPort: 443
CidrIp: 0.0.0.0/0
Tags:
- Key: Name
Value: LB-SG-1
#----------------------
# エクスポート
#----------------------
Outputs:
WebSecurityGroup:
Value: !Ref WebSecurityGroup
Description: "Web Security Group ID"
Export:
Name: !Sub "${EnvironmentName}-WebSecurityGroupId"
RdsSecurityGroup:
Value: !Ref RdsSecurityGroup
Description: "Security Group ID for RDS access"
Export:
Name: !Sub "${EnvironmentName}-RdsSecurityGroupId"
# ALB用セキュリティグループのエクスポート
LbSecurityGroup:
Description: "Security Group ID for ALB"
Value: !Ref LbSecurityGroup
Export:
Name: !Sub "${EnvironmentName}-LbSecurityGroupId"AWSTemplateFormatVersion: '2010-09-09'
Description: 'hands-on1'
#----------------------------------------------------------------
# パラメーター
#----------------------------------------------------------------
Parameters:
# EC2インスタンスタイプ
InstanceType:
Type: String
Default: t2.micro
AllowedValues:
- t2.micro
- t2.nano
Description: Select EC2 instance type.
EnvironmentName:
Description: hands-on1-template
Type: String
#----------------------------------------------------------------
# リソース
#----------------------------------------------------------------
Resources:
#----------------------
# RDS作成
#----------------------
MyRDSInstance:
Type: AWS::RDS::DBInstance
Properties:
# データベースエンジン
Engine: mysql
# マスターユーザー名
MasterUsername: wordpress
# ストレージの割り当て (GB)
AllocatedStorage: 20
# マスターパスワード(実際の環境ではセキュアな方法で提供する)
MasterUserPassword: "ChangeMe1234"
# DBインスタンスクラス
DBInstanceClass: db.t2.micro
# データベース名
DBName: wordpress
# VPCの設定(Outputsから参照)
DBSubnetGroupName: !ImportValue
'Fn::Sub': '${EnvironmentName}-RdsSubnetGroupId'
# パブリックアクセス無効
PubliclyAccessible: false
# セキュリティグループ
VPCSecurityGroups:
- !ImportValue
'Fn::Sub': '${EnvironmentName}-RdsSecurityGroupId'
# マルチAZ
MultiAZ: false
#----------------------
# IAMロール クロススタック参照ができない為、ここでIAMロールを作成する
# ポリシー
# ・SSMログインの為のポリシー
# ・EC2のログをcloudwatchに送信する為のポリシー
#----------------------
SsmSessionManagerIamRole:
Type: AWS::IAM::Role
Properties:
AssumeRolePolicyDocument:
Version: '2012-10-17'
Statement:
- Effect: 'Allow'
Principal:
Service:
- 'ec2.amazonaws.com'
Action:
- 'sts:AssumeRole'
Path: '/'
RoleName: 'SsmSessionManagerIamRole'
ManagedPolicyArns:
- arn:aws:iam::aws:policy/AmazonSSMManagedInstanceCore
- arn:aws:iam::aws:policy/CloudWatchAgentServerPolicy
SessionManagerIamInstanceProfile:
Type: 'AWS::IAM::InstanceProfile'
Properties:
Path: '/'
Roles:
- !Ref SsmSessionManagerIamRole
#----------------------
# 起動テンプレート作成(EC2インスタンスの設計書を作成)
#----------------------
LaunchTemplate:
Type: AWS::EC2::LaunchTemplate
Properties:
LaunchTemplateName: MyLaunchTemplate
LaunchTemplateData:
# AmazonLinux2
ImageId: "ami-0e25eba2025eea319"
InstanceType: !Ref InstanceType
NetworkInterfaces:
# 自動割当パプリックIPを有効
- AssociatePublicIpAddress: true
DeviceIndex: 0
# セキュリティグループはこちらに指定
Groups:
- !ImportValue
'Fn::Sub': '${EnvironmentName}-WebSecurityGroupId'
# ストレージを設定
BlockDeviceMappings:
- DeviceName: "/dev/xvda"
Ebs:
VolumeType: "gp2"
VolumeSize: 8
# SSM経由でSSH接続出来るようにするIAMロールをアタッチする
IamInstanceProfile:
Arn: !GetAtt SessionManagerIamInstanceProfile.Arn
UserData:
Fn::Base64: !Sub |
#!/bin/bash
# AWS CLIをインストール
yum install -y aws-cli
# Amazon Linux 2 に PHP、MySQL、Apache、WordPress をインストール
amazon-linux-extras install -y php7.4
yum install -y mysql httpd php-mbstring php-xml gd php-gd
systemctl enable httpd.service
systemctl start httpd.service
wget https://ja.wordpress.org/latest-ja.tar.gz
tar zxvf latest-ja.tar.gz
cp -r wordpress/* /var/www/html/
chown apache:apache -R /var/www/html/
####################### cloudwatchでログ監視 ###########################
# awslogs のインストール
yum -y install awslogs
# awslogs の設定
sed -i 's/region = us-east-1/region = ap-northeast-1/' /etc/awslogs/awscli.conf
cat <<EOT >> /etc/awslogs/awslogs.conf
[HttpAccessLog]
file = /var/log/httpd/access_log
log_group_name = HttpAccessLog
log_stream_name = {instance_id}
datetime_format = %b %d %H:%M:%S
[HttpErrorLog]
file = /var/log/httpd/error_log
log_group_name = HttpErrorLog
log_stream_name = {instance_id}
datetime_format = %b %d %H:%M:%S
EOT
systemctl enable awslogsd
systemctl start awslogsd
#----------------------
# ALBターゲットグループ作成
#----------------------
ALBTargetGroup:
Type: AWS::ElasticLoadBalancingV2::TargetGroup
Properties:
VpcId: !ImportValue
'Fn::Sub': '${EnvironmentName}-VPCId'
HealthCheckPath: /readme.html
HealthCheckProtocol: HTTP
HealthCheckPort: '80'
#ヘルスチェック間隔
HealthCheckIntervalSeconds: 10
#ヘルスチェックのタイムアウト時間
HealthCheckTimeoutSeconds: 5
#ヘルシーと見なすための連続成功回数
HealthyThresholdCount: 2
#アンヘルシーと見なすための連続失敗回数
UnhealthyThresholdCount: 2
Port: 80
Protocol: HTTP
TargetType: instance
#----------------------
# ALBリスナー作成
#----------------------
ALBListener:
Type: AWS::ElasticLoadBalancingV2::Listener
Properties:
DefaultActions:
- Type: forward
TargetGroupArn: !Ref ALBTargetGroup
LoadBalancerArn: !Ref ApplicationLoadBalancer
Port: 80
Protocol: HTTP
#----------------------
# ALB作成
#----------------------
ApplicationLoadBalancer:
Type: AWS::ElasticLoadBalancingV2::LoadBalancer
Properties:
Name: LB1
Scheme: internet-facing
Subnets:
- !ImportValue
'Fn::Sub': '${EnvironmentName}-PublicSubnet1Id'
- !ImportValue
'Fn::Sub': '${EnvironmentName}-PublicSubnet2Id'
SecurityGroups:
- !ImportValue
'Fn::Sub': '${EnvironmentName}-LbSecurityGroupId'
#----------------------
# AutoScalingGroup作成
#----------------------
AutoScalingGroup:
Type: AWS::AutoScaling::AutoScalingGroup
Properties:
#起動テンプレート
LaunchTemplate:
LaunchTemplateId: !Ref LaunchTemplate
Version: !GetAtt LaunchTemplate.LatestVersionNumber
# AutoScalingグループにALBを紐付ける
TargetGroupARNs:
- !Ref ALBTargetGroup
# 任意な名前
AutoScalingGroupName: Test-AutoScaling1
# 希望する容量
DesiredCapacity: 2
# 最小キャパシティ
MinSize: 2
# 最大キャパシティ
MaxSize: 4
VPCZoneIdentifier:
- !ImportValue
'Fn::Sub': '${EnvironmentName}-PublicSubnet1Id'
- !ImportValue
'Fn::Sub': '${EnvironmentName}-PublicSubnet2Id'
# ヘルスチェックタイプ ELBの場合はELB
HealthCheckType: ELB
# ヘルスチェック感覚
HealthCheckGracePeriod: 300
#----------------------
# SNSトピックの作成
#----------------------
NotificationTopic:
Type: AWS::SNS::Topic
Properties:
Subscription:
- Endpoint: dev.takakura0318@gmail.com
Protocol: email
TopicName: "NotificationTopic"
#----------------------
# CloudWatchアラーム(CPUが70%を超えた場合)
#----------------------
HighCpuAlarm:
Type: AWS::CloudWatch::Alarm
Properties:
AlarmDescription: "Alarm when CPU exceeds 70%"
# メトリクスの選択
Namespace: AWS/EC2
MetricName: CPUUtilization
# 統計
Statistic: Average
# 集計期間
Period: 300
# 静的
EvaluationPeriods: 1
# 条件値
Threshold: 70
# 演算子:より大きい
ComparisonOperator: GreaterThanThreshold
# よくわからないけどざっくり名前みたいもの
Dimensions:
- Name: AutoScalingGroupName
Value: !Ref AutoScalingGroup
AlarmActions:
- !Ref NotificationTopic
- !Ref HighCpuScalingPolicy
# 欠落データは見つかりませんで処理
TreatMissingData: missing
#----------------------
# CloudWatchアラーム(CPUが30%以下の場合)
#----------------------
LowCpuAlarm:
Type: AWS::CloudWatch::Alarm
Properties:
AlarmDescription: "Alarm when CPU falls below 30%"
MetricName: CPUUtilization
Namespace: AWS/EC2
Statistic: Average
Period: 300
EvaluationPeriods: 1
Threshold: 30
ComparisonOperator: LessThanThreshold
Dimensions:
- Name: AutoScalingGroupName
Value: !Ref AutoScalingGroup
AlarmActions:
- !Ref NotificationTopic
- !Ref LowCpuScalingPolicy
TreatMissingData: notBreaching
#----------------------
# AutoScalingグループのスケーリングポリシー
# CPU使用率が70%より大きい場合はEC2を1台追加する
#----------------------
HighCpuScalingPolicy:
Type: AWS::AutoScaling::ScalingPolicy
Properties:
AutoScalingGroupName: !Ref AutoScalingGroup
# ポリシータイプ
PolicyType: SimpleScaling
# 1台追加
ScalingAdjustment: 1
AdjustmentType: ChangeInCapacity
# 別のスケーリングアクティビティを許可するまでの秒数
Cooldown: 30
#----------------------
# AutoScalingグループのスケーリングポリシー
# CPU使用率が30%以下の場合はEC2を1台削除する
#----------------------
LowCpuScalingPolicy:
Type: AWS::AutoScaling::ScalingPolicy
Properties:
AutoScalingGroupName: !Ref AutoScalingGroup
PolicyType: SimpleScaling
ScalingAdjustment: -1
AdjustmentType: ChangeInCapacity
Cooldown: 30
#----------------------
# S3バケットの作成
#----------------------
S3Bucket:
Type: AWS::S3::Bucket
Properties:
# Route53にて、ALBと連携したフェイルオーバールーティング機能を使う為、バケット名はドメイン名を指定する必要がある
BucketName: blog.aws-dev-lab-demo.shop
PublicAccessBlockConfiguration:
BlockPublicAcls: false
IgnorePublicAcls: false
BlockPublicPolicy: false
RestrictPublicBuckets: false
WebsiteConfiguration:
IndexDocument: index.html
ErrorDocument: error.html
#バケットに権限付与
BucketPolicy:
Type: AWS::S3::BucketPolicy
Properties:
Bucket: !Ref S3Bucket
PolicyDocument:
Version: '2012-10-17'
Statement:
- Sid: 'PublicReadGetObject'
Effect: 'Allow'
Principal: '*'
Action: 's3:GetObject'
Resource: !Sub 'arn:aws:s3:::${S3Bucket}/*'
#----------------------
# 作成したホストゾーンにレコードを追加する
#----------------------
# フェイルオーバーのためのRoute 53レコードセットグループ
MyRecordSetGroup:
Type: AWS::Route53::RecordSetGroup
Properties:
HostedZoneId: !ImportValue
'Fn::Sub': '${EnvironmentName}-HostedZoneId'
RecordSets:
# ALBに対するプライマリレコード
- Name: "blog.aws-dev-lab-demo.shop"
Type: A
SetIdentifier: "Primary-ALB"
Failover: "PRIMARY"
HealthCheckId: !Ref ALBHealthCheck
AliasTarget:
HostedZoneId: !GetAtt ApplicationLoadBalancer.CanonicalHostedZoneID
DNSName: !GetAtt ApplicationLoadBalancer.DNSName
EvaluateTargetHealth: true
# S3に対するセカンダリレコード
- Name: "blog.aws-dev-lab-demo.shop"
Type: A
SetIdentifier: "Secondary-S3"
Failover: "SECONDARY"
AliasTarget:
HostedZoneId: "Z2M4EHUR26P7ZW"
# ここの値を仮にマネコンで設定する場合はプルダウン値にサジェストがある。そのサジェストにいずれかに合致する値を指定しないフェイルオーバされないので注意
DNSName: !Sub "http://${S3Bucket}.s3-website-${AWS::Region}.amazonaws.com"
EvaluateTargetHealth: false
ALBHealthCheck:
Type: AWS::Route53::HealthCheck
Properties:
HealthCheckConfig:
# ALBのリッスンポート
Port: 80
Type: HTTP
# ALBのヘルスチェックパス
ResourcePath: "/readme.html"
FullyQualifiedDomainName: !GetAtt ApplicationLoadBalancer.DNSName
# ヘルスチェックのリクエスト間隔(秒)
RequestInterval: 30
# ヘルスチェックが失敗と判断されるまでの連続回数
FailureThreshold: 3
#----------------------
# Outputs
#----------------------動作確認
お名前.comの該当ドメインのネームサーバーを更新する。
更新値は、Route53のホストゾーン作成時に、自動作成されるNSレコードを参照する
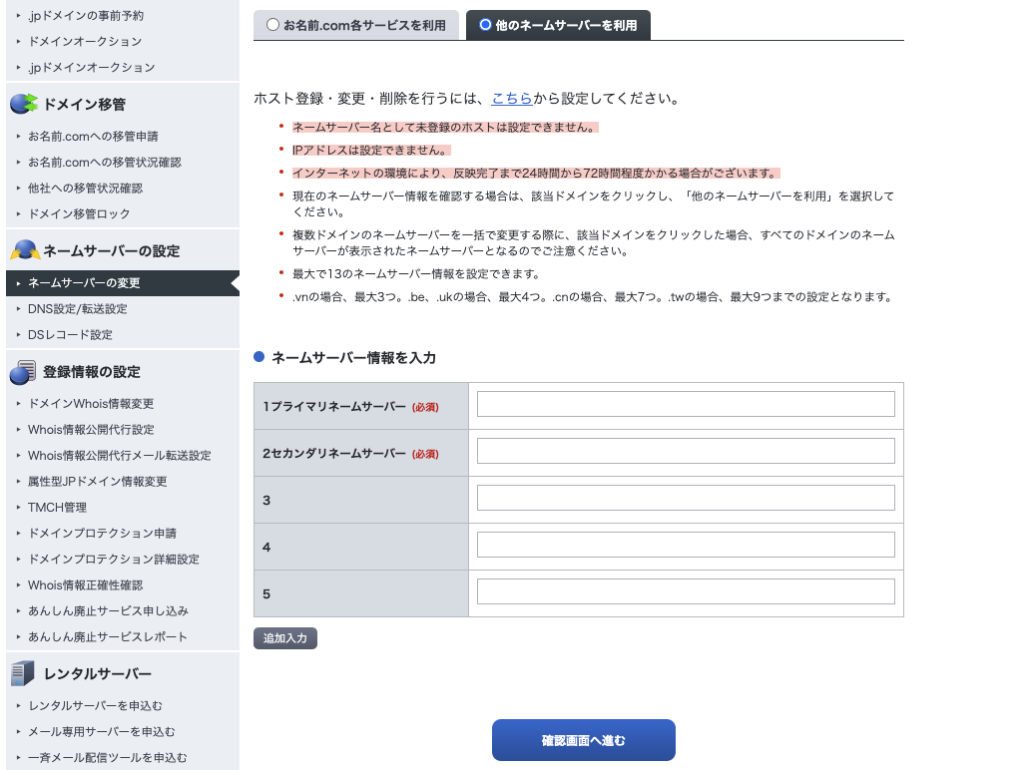
S3バケットにsorryページ用の静的ファイルをアップロードする
・index.html
・image.png
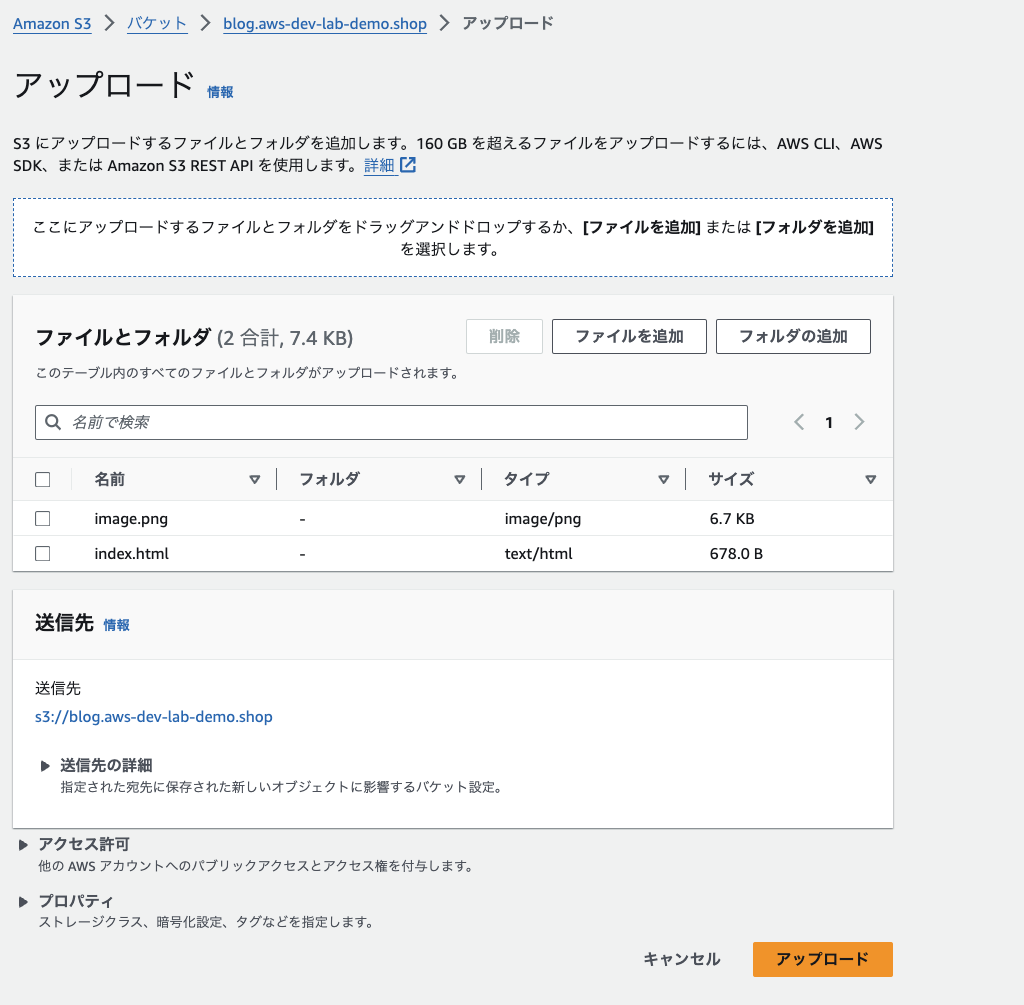
EC2>AutoScalingグループの下記項目を変更する
・希望するキャパシティ
【変更前】
2
【変更後】
0
・最初キャパシティ
【変更前】
2
【変更後】
0
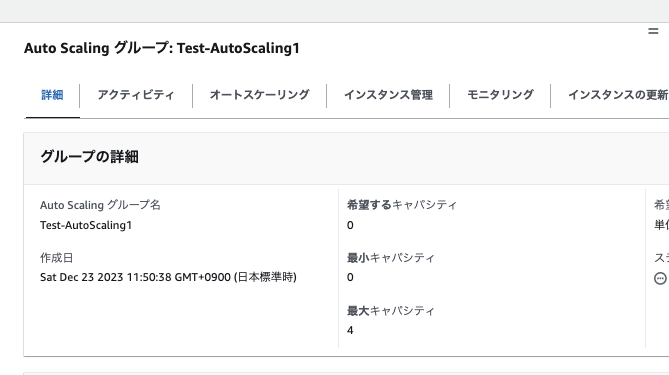
テストに入る前に事前に、http://blog.aws-dev-lab-demo.shop/readme.htmlにアクセスして、ページが正常に表示されることを確認すること
EC2インスタンスを終了させる
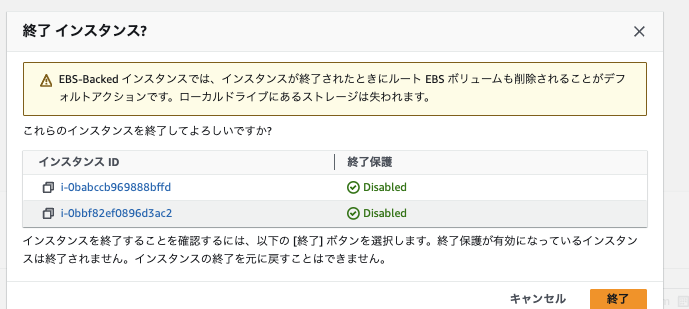
Route53>ヘルスチェックにて、Route53からプライマリ(ALB)に対するヘルスチェック結果がアンヘルシーであることを確認する

sorryページが表示されたら、Route53のフェイルオーバルーティングの動作確認は完了

ハンズオン5
構成
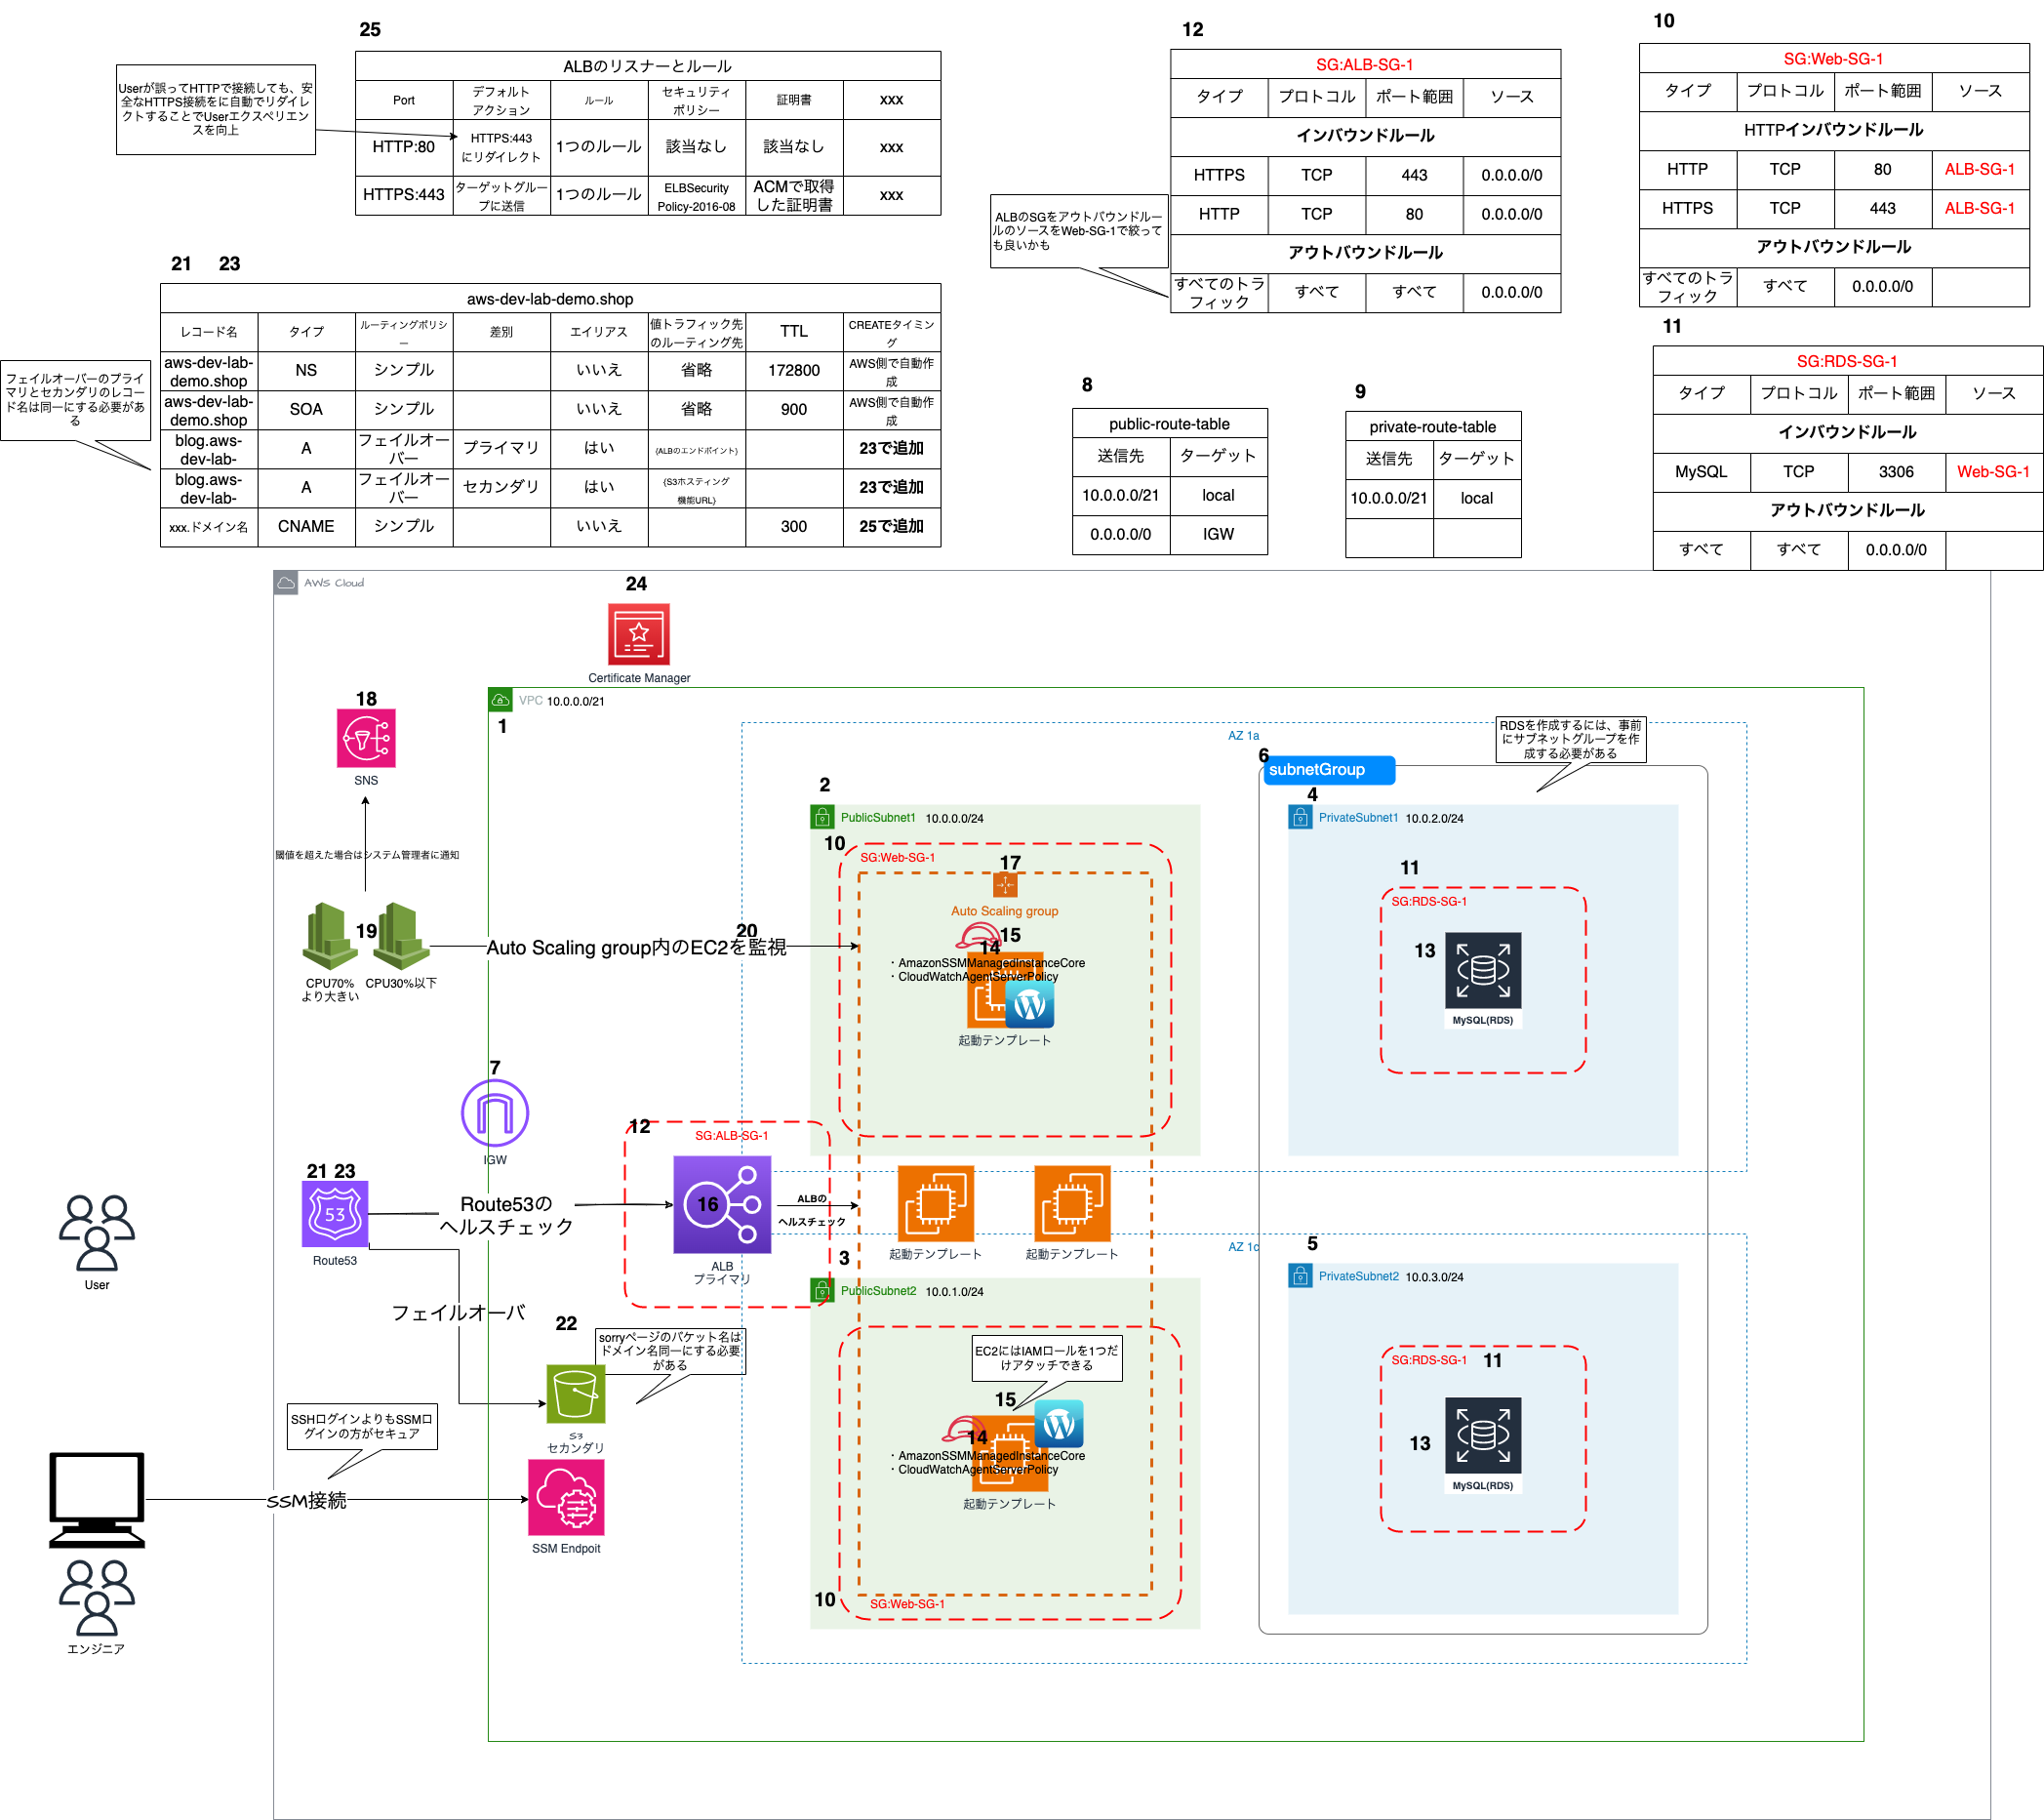
24.AWS Certificate Managerで証明書を取得する
25.ALBのリスナーを修正する
・HTTP通信の場合は、HTTPSにリダイレクトする
CloudFormationテンプレート
AWSTemplateFormatVersion: '2010-09-09'
Description: 'hands-on1'
#----------------------------------------------------------------
# パラメーター
#----------------------------------------------------------------
Parameters:
  # プロジェクト名を入力する。各リソースのNameタグで参照する
  EnvironmentName:
    Description: hands-on1-template
    Type: String

  # VPCのCIDRレンジ
  VpcCIDR:
    Description: Please enter the IP range (CIDR notation) for this VPC
    Type: String
    Default: 10.0.0.0/21

  # パブリックサブネット1
  PublicSubnet1CIDR:
    Description: Please enter the IP range (CIDR notation) for the public subnet in the first Availability Zone
    Type: String
    Default: 10.0.0.0/24

  # パブリックサブネット2
  PublicSubnet2CIDR:
    Description: Please enter the IP range (CIDR notation) for the public subnet in the first Availability Zone
    Type: String
    Default: 10.0.1.0/24

  # プライベートサブネット1
  PrivateSubnet1CIDR:
    Description: Please enter the IP range (CIDR notation) for the private subnet in the first Availability Zone
    Type: String
    Default: 10.0.2.0/24

  # プライベートサブネット2
  PrivateSubnet2CIDR:
    Description: Please enter the IP range (CIDR notation) for the private subnet in the first Availability Zone
    Type: String
    Default: 10.0.3.0/24

#----------------------------------------------------------------
# リソース
#----------------------------------------------------------------
Resources:
  #----------------------
  # VPC作成
  #----------------------
  VPC:
    Type: AWS::EC2::VPC
    Properties:
      CidrBlock: !Ref VpcCIDR
      # 何の設定かわからないが、基本的にtrueにしても良さそう
      EnableDnsSupport: true
      EnableDnsHostnames: false
      Tags:
        - Key: Name
          Value: !Ref EnvironmentName
  #----------------------
  # Publicサブネット作成
  #----------------------
  # パブリックサブネット1
  PublicSubnet1:
    Type: AWS::EC2::Subnet
    Properties:
      VpcId: !Ref VPC
      # AZ-1a
      AvailabilityZone: ap-northeast-1a
      CidrBlock: !Ref PublicSubnet1CIDR
      # サブネットで起動されたインスタンスが起動時にパブリック IP アドレスを設定するかどうか
      # Publicサブネットなのでtrueにする
      MapPublicIpOnLaunch: true
      Tags:
        - Key: Name
          Value: !Sub ${EnvironmentName} Public Subnet

  # パブリックサブネット2
  PublicSubnet2:
    Type: AWS::EC2::Subnet
    Properties:
      VpcId: !Ref VPC
      # AZ-1c
      AvailabilityZone: ap-northeast-1c
      CidrBlock: !Ref PublicSubnet2CIDR
      MapPublicIpOnLaunch: true
      Tags:
        - Key: Name
          Value: !Sub ${EnvironmentName} Public Subnet
  #----------------------
  # Privateサブネット作成
  #----------------------
  #プライベートサブネット1
  PrivateSubnet1:
    Type: AWS::EC2::Subnet
    Properties:
      VpcId: !Ref VPC
      # AZ-1a
      AvailabilityZone: ap-northeast-1a
      CidrBlock: !Ref PrivateSubnet1CIDR
      # Privateサブネットなのでfalseにする
      MapPublicIpOnLaunch: false
      Tags:
        - Key: Name
          Value: !Sub ${EnvironmentName} Private Subnet

  #プライベートサブネット2
  PrivateSubnet2:
    Type: AWS::EC2::Subnet
    Properties:
      VpcId: !Ref VPC
      # AZ-1c
      AvailabilityZone: ap-northeast-1c
      CidrBlock: !Ref PrivateSubnet2CIDR
      # Privateサブネットなのでfalseにする
      MapPublicIpOnLaunch: false
      Tags:
        - Key: Name
          Value: !Sub ${EnvironmentName} Private Subnet

  #----------------------
  # IGW作成
  #----------------------
  InternetGateway:
    Type: AWS::EC2::InternetGateway
    Properties:
      Tags:
        - Key: Name
          Value: !Ref EnvironmentName

  #----------------------
  # IGWをVPCにアタッチする
  #----------------------
  InternetGatewayAttachment:
    Type: AWS::EC2::VPCGatewayAttachment
    Properties:
      InternetGatewayId: !Ref InternetGateway
      VpcId: !Ref VPC

  #----------------------
  # ルートテーブル作成 (Publicサブネット用)
  #----------------------
  # ルートテーブル(Publicサブネット用)作成
  PublicRouteTable:
    Type: AWS::EC2::RouteTable
    Properties:
      VpcId: !Ref VPC
      Tags:
        - Key: Name
          Value: !Sub ${EnvironmentName} Public Routes

  # 上記のルートテーブルに、レコードを追加する
  DefaultPublicRoute:
    Type: AWS::EC2::Route
    DependsOn: InternetGatewayAttachment
    Properties:
      RouteTableId: !Ref PublicRouteTable
      # IGW用のレコードを追加する
      DestinationCidrBlock: 0.0.0.0/0
      GatewayId: !Ref InternetGateway

  # Publicサブネット1に、上記ルートテーブルを関連付ける
  PublicSubnet1RouteTableAssociation:
    Type: AWS::EC2::SubnetRouteTableAssociation
    Properties:
      RouteTableId: !Ref PublicRouteTable
      SubnetId: !Ref PublicSubnet1

  # Publicサブネット2に、パブリックサブネット用ルートテーブルを関連付ける
  PublicSubnet2RouteTableAssociation:
    Type: AWS::EC2::SubnetRouteTableAssociation
    Properties:
      RouteTableId: !Ref PublicRouteTable
      SubnetId: !Ref PublicSubnet2

  #----------------------
  # RDSサブネットグループ作成
  #----------------------
  RdsSubnetGroup:
    Type: AWS::RDS::DBSubnetGroup
    Properties:
      DBSubnetGroupDescription: "Subnet Group for RDS instances"
      SubnetIds:
        - !Ref PrivateSubnet1
        - !Ref PrivateSubnet2
      DBSubnetGroupName: my-rds-subnet-group
      Tags:
        - Key: Name
          Value: !Sub "${EnvironmentName} RDS Subnet Group"

  #----------------------
  # Route 53ホストゾーン作成
  #----------------------
  HostedZone:
    Type: AWS::Route53::HostedZone
    Properties:
      Name: aws-dev-lab-demo.shop

  #----------------------
  # AWS Certificate Manager(証明書)作成
  #----------------------
  Certificate:
    Type: AWS::CertificateManager::Certificate
    Properties:
      DomainName: "blog.aws-dev-lab-demo.shop"
      # 検証方法
      ValidationMethod: DNS
      DomainValidationOptions:
        - DomainName: "blog.aws-dev-lab-demo.shop"
          HostedZoneId: !Ref HostedZone

#----------------------
# エクスポート
#----------------------
Outputs:
  VPCId:
    Value: !Ref VPC
    Description: "VPC ID"
    Export:
      Name: !Sub "${EnvironmentName}-VPCId"

  PublicSubnet1Id:
    Value: !Ref PublicSubnet1
    Description: "PublicSubnet1"
    Export:
      Name: !Sub "${EnvironmentName}-PublicSubnet1Id"

  PublicSubnet2Id:
    Value: !Ref PublicSubnet2
    Description: "PublicSubnet2"
    Export:
      Name: !Sub "${EnvironmentName}-PublicSubnet2Id"

  RdsSubnetGroupId:
    Value: !Ref RdsSubnetGroup
    Description: "RDS Subnet Group Name"
    Export:
      Name: !Sub "${EnvironmentName}-RdsSubnetGroupId"

  HostedZoneId:
    Description: "The HostedZone ID"
    Value: !Ref HostedZone
    Export:
      Name: !Sub "${EnvironmentName}-HostedZoneId"

  CertificateArn:
    Description: "The ARN of the SSL Certificate"
    Value: !Ref Certificate
    Export:
      Name: !Sub "${EnvironmentName}-CertificateArn"
AWSTemplateFormatVersion: '2010-09-09'
Description: 'hands-on1'
#----------------------------------------------------------------
# パラメーター
#----------------------------------------------------------------
Parameters:
EnvironmentName:
Description: hands-on1-template
Type: String
#----------------------------------------------------------------
# リソース
#----------------------------------------------------------------
Resources:
#----------------------
# セキュリティグループ作成
#----------------------
# EC2用のセキュリティグループ
WebSecurityGroup:
Type: AWS::EC2::SecurityGroup
Properties:
GroupName: Web-SG-1
GroupDescription: "Description"
VpcId: !ImportValue
'Fn::Sub': '${EnvironmentName}-VPCId'
#インバウンドルール
SecurityGroupIngress:
- IpProtocol: tcp
FromPort: 80
ToPort: 80
SourceSecurityGroupId: !Ref LbSecurityGroup
- IpProtocol: tcp
FromPort: 443
ToPort: 443
SourceSecurityGroupId: !Ref LbSecurityGroup
#アウトバウンドルール
SecurityGroupEgress:
- IpProtocol: -1
CidrIp: 0.0.0.0/0
Tags:
- Key: Name
Value: Web-sg1
#RDS用セキュリティグループ
RdsSecurityGroup:
Type: AWS::EC2::SecurityGroup
Properties:
GroupName: RDS-SG-1
GroupDescription: "Description"
VpcId: !ImportValue
'Fn::Sub': '${EnvironmentName}-VPCId'
SecurityGroupIngress:
# Replace with your specific IP range or remove the CidrIp property to allow access from anywhere
- IpProtocol: tcp
FromPort: 3306
ToPort: 3306
SourceSecurityGroupId: !Ref WebSecurityGroup
Tags:
- Key: Name
Value: RDS-SG-1
# ALB用のセキュリティグループ
LbSecurityGroup:
Type: AWS::EC2::SecurityGroup
Properties:
GroupName: LB-SG-1
GroupDescription: "Security Group for ALB"
VpcId: !ImportValue
'Fn::Sub': '${EnvironmentName}-VPCId'
SecurityGroupIngress:
# HTTP
- IpProtocol: tcp
FromPort: 80
ToPort: 80
CidrIp: 0.0.0.0/0
# HTTPS
- IpProtocol: tcp
FromPort: 443
ToPort: 443
CidrIp: 0.0.0.0/0
Tags:
- Key: Name
Value: LB-SG-1
#----------------------
# エクスポート
#----------------------
Outputs:
WebSecurityGroup:
Value: !Ref WebSecurityGroup
Description: "Web Security Group ID"
Export:
Name: !Sub "${EnvironmentName}-WebSecurityGroupId"
RdsSecurityGroup:
Value: !Ref RdsSecurityGroup
Description: "Security Group ID for RDS access"
Export:
Name: !Sub "${EnvironmentName}-RdsSecurityGroupId"
# ALB用セキュリティグループのエクスポート
LbSecurityGroup:
Description: "Security Group ID for ALB"
Value: !Ref LbSecurityGroup
Export:
Name: !Sub "${EnvironmentName}-LbSecurityGroupId"AWSTemplateFormatVersion: '2010-09-09'
Description: 'hands-on1'
#----------------------------------------------------------------
# パラメーター
#----------------------------------------------------------------
Parameters:
# EC2インスタンスタイプ
InstanceType:
Type: String
Default: t2.micro
AllowedValues:
- t2.micro
- t2.nano
Description: Select EC2 instance type.
EnvironmentName:
Description: hands-on1-template
Type: String
#----------------------------------------------------------------
# リソース
#----------------------------------------------------------------
Resources:
#----------------------
# RDS作成
#----------------------
MyRDSInstance:
Type: AWS::RDS::DBInstance
Properties:
# データベースエンジン
Engine: mysql
# マスターユーザー名
MasterUsername: wordpress
# ストレージの割り当て (GB)
AllocatedStorage: 20
# マスターパスワード(実際の環境ではセキュアな方法で提供する)
MasterUserPassword: "ChangeMe1234"
# DBインスタンスクラス
DBInstanceClass: db.t2.micro
# データベース名
DBName: wordpress
# VPCの設定(Outputsから参照)
DBSubnetGroupName: !ImportValue
'Fn::Sub': '${EnvironmentName}-RdsSubnetGroupId'
# パブリックアクセス無効
PubliclyAccessible: false
# セキュリティグループ
VPCSecurityGroups:
- !ImportValue
'Fn::Sub': '${EnvironmentName}-RdsSecurityGroupId'
# マルチAZ
MultiAZ: false
#----------------------
# IAMロール クロススタック参照ができない為、ここでIAMロールを作成する
# ポリシー
# ・SSMログインの為のポリシー
# ・EC2のログをcloudwatchに送信する為のポリシー
#----------------------
SsmSessionManagerIamRole:
Type: AWS::IAM::Role
Properties:
AssumeRolePolicyDocument:
Version: '2012-10-17'
Statement:
- Effect: 'Allow'
Principal:
Service:
- 'ec2.amazonaws.com'
Action:
- 'sts:AssumeRole'
Path: '/'
RoleName: 'SsmSessionManagerIamRole'
ManagedPolicyArns:
- arn:aws:iam::aws:policy/AmazonSSMManagedInstanceCore
- arn:aws:iam::aws:policy/CloudWatchAgentServerPolicy
SessionManagerIamInstanceProfile:
Type: 'AWS::IAM::InstanceProfile'
Properties:
Path: '/'
Roles:
- !Ref SsmSessionManagerIamRole
#----------------------
# 起動テンプレート作成(EC2インスタンスの設計書を作成)
#----------------------
LaunchTemplate:
Type: AWS::EC2::LaunchTemplate
Properties:
LaunchTemplateName: MyLaunchTemplate
LaunchTemplateData:
# AmazonLinux2
ImageId: "ami-0e25eba2025eea319"
InstanceType: !Ref InstanceType
NetworkInterfaces:
# 自動割当パプリックIPを有効
- AssociatePublicIpAddress: true
DeviceIndex: 0
# セキュリティグループはこちらに指定
Groups:
- !ImportValue
'Fn::Sub': '${EnvironmentName}-WebSecurityGroupId'
# ストレージを設定
BlockDeviceMappings:
- DeviceName: "/dev/xvda"
Ebs:
VolumeType: "gp2"
VolumeSize: 8
# SSM経由でSSH接続出来るようにするIAMロールをアタッチする
IamInstanceProfile:
Arn: !GetAtt SessionManagerIamInstanceProfile.Arn
UserData:
Fn::Base64: !Sub |
#!/bin/bash
# AWS CLIをインストール
yum install -y aws-cli
# Amazon Linux 2 に PHP、MySQL、Apache、WordPress をインストール
amazon-linux-extras install -y php7.4
yum install -y mysql httpd php-mbstring php-xml gd php-gd
systemctl enable httpd.service
systemctl start httpd.service
wget https://ja.wordpress.org/latest-ja.tar.gz
tar zxvf latest-ja.tar.gz
cp -r wordpress/* /var/www/html/
chown apache:apache -R /var/www/html/
# HTTPSを認識するための設定をwp-config.phpに追加
# wp-config-sample.phpをコピーしてwp-config.phpを作成
cp /var/www/html/wp-config-sample.php /var/www/html/wp-config.php
# HTTPSを認識するための設定をwp-config.phpに追加
sed -i '/That'\''s all, stop editing! Happy publishing./i \
if (isset($_SERVER['\''HTTP_X_FORWARDED_PROTO'\'']) && $_SERVER['\''HTTP_X_FORWARDED_PROTO'\''] === '\''https'\'') {\
$_SERVER['\''HTTPS'\''] = '\''on'\'';\
$_ENV['\''HTTPS'\''] = '\''on'\'';\
}' /var/www/html/wp-config.php
####################### cloudwatchでログ監視 ###########################
# awslogs のインストール
yum -y install awslogs
# awslogs の設定
sed -i 's/region = us-east-1/region = ap-northeast-1/' /etc/awslogs/awscli.conf
cat <<EOT >> /etc/awslogs/awslogs.conf
[HttpAccessLog]
file = /var/log/httpd/access_log
log_group_name = HttpAccessLog
log_stream_name = {instance_id}
datetime_format = %b %d %H:%M:%S
[HttpErrorLog]
file = /var/log/httpd/error_log
log_group_name = HttpErrorLog
log_stream_name = {instance_id}
datetime_format = %b %d %H:%M:%S
EOT
systemctl enable awslogsd
systemctl start awslogsd
#----------------------
# ALBターゲットグループ作成
#----------------------
ALBTargetGroup:
Type: AWS::ElasticLoadBalancingV2::TargetGroup
Properties:
VpcId: !ImportValue
'Fn::Sub': '${EnvironmentName}-VPCId'
HealthCheckPath: /readme.html
HealthCheckProtocol: HTTP
HealthCheckPort: '80'
#ヘルスチェック間隔
HealthCheckIntervalSeconds: 10
#ヘルスチェックのタイムアウト時間
HealthCheckTimeoutSeconds: 5
#ヘルシーと見なすための連続成功回数
HealthyThresholdCount: 2
#アンヘルシーと見なすための連続失敗回数
UnhealthyThresholdCount: 2
Port: 80
Protocol: HTTP
TargetType: instance
#----------------------
# ALBリスナー作成
#----------------------
#HTTP
# 既存のHTTPリスナーをリダイレクト用に変更
ALBListener:
Type: AWS::ElasticLoadBalancingV2::Listener
Properties:
LoadBalancerArn: !Ref ApplicationLoadBalancer
Port: 80
Protocol: HTTP
DefaultActions:
- Type: redirect
RedirectConfig:
Protocol: HTTPS
Port: '443'
StatusCode: HTTP_301
# HTTPSリスナーを追加
HttpsListener:
Type: AWS::ElasticLoadBalancingV2::Listener
Properties:
LoadBalancerArn: !Ref ApplicationLoadBalancer
Port: 443
Protocol: HTTPS
Certificates:
- CertificateArn: !ImportValue
'Fn::Sub': '${EnvironmentName}-CertificateArn'
DefaultActions:
- Type: forward
TargetGroupArn: !Ref ALBTargetGroup
#----------------------
# ALB作成
#----------------------
ApplicationLoadBalancer:
Type: AWS::ElasticLoadBalancingV2::LoadBalancer
Properties:
Name: LB1
Scheme: internet-facing
Subnets:
- !ImportValue
'Fn::Sub': '${EnvironmentName}-PublicSubnet1Id'
- !ImportValue
'Fn::Sub': '${EnvironmentName}-PublicSubnet2Id'
SecurityGroups:
- !ImportValue
'Fn::Sub': '${EnvironmentName}-LbSecurityGroupId'
#----------------------
# AutoScalingGroup作成
#----------------------
AutoScalingGroup:
Type: AWS::AutoScaling::AutoScalingGroup
Properties:
#起動テンプレート
LaunchTemplate:
LaunchTemplateId: !Ref LaunchTemplate
Version: !GetAtt LaunchTemplate.LatestVersionNumber
# AutoScalingグループにALBを紐付ける
TargetGroupARNs:
- !Ref ALBTargetGroup
# 任意な名前
AutoScalingGroupName: Test-AutoScaling1
# 希望する容量
DesiredCapacity: 2
# 最小キャパシティ
MinSize: 2
# 最大キャパシティ
MaxSize: 4
VPCZoneIdentifier:
- !ImportValue
'Fn::Sub': '${EnvironmentName}-PublicSubnet1Id'
- !ImportValue
'Fn::Sub': '${EnvironmentName}-PublicSubnet2Id'
# ヘルスチェックタイプ ELBの場合はELB
HealthCheckType: ELB
# ヘルスチェック感覚
HealthCheckGracePeriod: 300
#----------------------
# SNSトピックの作成
#----------------------
NotificationTopic:
Type: AWS::SNS::Topic
Properties:
Subscription:
- Endpoint: dev.takakura0318@gmail.com
Protocol: email
TopicName: "NotificationTopic"
#----------------------
# CloudWatchアラーム(CPUが70%を超えた場合)
#----------------------
HighCpuAlarm:
Type: AWS::CloudWatch::Alarm
Properties:
AlarmDescription: "Alarm when CPU exceeds 70%"
# メトリクスの選択
Namespace: AWS/EC2
MetricName: CPUUtilization
# 統計
Statistic: Average
# 集計期間
Period: 300
# 静的
EvaluationPeriods: 1
# 条件値
Threshold: 70
# 演算子:より大きい
ComparisonOperator: GreaterThanThreshold
# よくわからないけどざっくり名前みたいもの
Dimensions:
- Name: AutoScalingGroupName
Value: !Ref AutoScalingGroup
AlarmActions:
- !Ref NotificationTopic
- !Ref HighCpuScalingPolicy
# 欠落データは見つかりませんで処理
TreatMissingData: missing
#----------------------
# CloudWatchアラーム(CPUが30%以下の場合)
#----------------------
LowCpuAlarm:
Type: AWS::CloudWatch::Alarm
Properties:
AlarmDescription: "Alarm when CPU falls below 30%"
MetricName: CPUUtilization
Namespace: AWS/EC2
Statistic: Average
Period: 300
EvaluationPeriods: 1
Threshold: 30
ComparisonOperator: LessThanThreshold
Dimensions:
- Name: AutoScalingGroupName
Value: !Ref AutoScalingGroup
AlarmActions:
- !Ref NotificationTopic
- !Ref LowCpuScalingPolicy
TreatMissingData: notBreaching
#----------------------
# AutoScalingグループのスケーリングポリシー
# CPU使用率が70%より大きい場合はEC2を1台追加する
#----------------------
HighCpuScalingPolicy:
Type: AWS::AutoScaling::ScalingPolicy
Properties:
AutoScalingGroupName: !Ref AutoScalingGroup
# ポリシータイプ
PolicyType: SimpleScaling
# 1台追加
ScalingAdjustment: 1
AdjustmentType: ChangeInCapacity
# 別のスケーリングアクティビティを許可するまでの秒数
Cooldown: 30
#----------------------
# AutoScalingグループのスケーリングポリシー
# CPU使用率が30%以下の場合はEC2を1台削除する
#----------------------
LowCpuScalingPolicy:
Type: AWS::AutoScaling::ScalingPolicy
Properties:
AutoScalingGroupName: !Ref AutoScalingGroup
PolicyType: SimpleScaling
ScalingAdjustment: -1
AdjustmentType: ChangeInCapacity
Cooldown: 30
#----------------------
# S3バケットの作成
#----------------------
S3Bucket:
Type: AWS::S3::Bucket
Properties:
# Route53にて、ALBと連携したフェイルオーバールーティング機能を使う為、バケット名はドメイン名を指定する必要がある
BucketName: blog.aws-dev-lab-demo.shop
PublicAccessBlockConfiguration:
BlockPublicAcls: false
IgnorePublicAcls: false
BlockPublicPolicy: false
RestrictPublicBuckets: false
WebsiteConfiguration:
IndexDocument: index.html
ErrorDocument: error.html
#バケットに権限付与
BucketPolicy:
Type: AWS::S3::BucketPolicy
Properties:
Bucket: !Ref S3Bucket
PolicyDocument:
Version: '2012-10-17'
Statement:
- Sid: 'PublicReadGetObject'
Effect: 'Allow'
Principal: '*'
Action: 's3:GetObject'
Resource: !Sub 'arn:aws:s3:::${S3Bucket}/*'
#----------------------
# 作成したホストゾーンにレコードを追加する
#----------------------
# フェイルオーバーのためのRoute 53レコードセットグループ
MyRecordSetGroup:
Type: AWS::Route53::RecordSetGroup
Properties:
HostedZoneId: !ImportValue
'Fn::Sub': '${EnvironmentName}-HostedZoneId'
RecordSets:
# ALBに対するプライマリレコード
- Name: "blog.aws-dev-lab-demo.shop"
Type: A
SetIdentifier: "Primary-ALB"
Failover: "PRIMARY"
HealthCheckId: !Ref ALBHealthCheck
AliasTarget:
HostedZoneId: !GetAtt ApplicationLoadBalancer.CanonicalHostedZoneID
DNSName: !GetAtt ApplicationLoadBalancer.DNSName
EvaluateTargetHealth: true
# S3に対するセカンダリレコード
- Name: "blog.aws-dev-lab-demo.shop"
Type: A
SetIdentifier: "Secondary-S3"
Failover: "SECONDARY"
AliasTarget:
HostedZoneId: "Z2M4EHUR26P7ZW"
# ここの値を仮にマネコンで設定する場合はプルダウン値にサジェストがある。そのサジェストにいずれかに合致する値を指定しないフェイルオーバされないので注意
DNSName: !Sub "http://${S3Bucket}.s3-website-${AWS::Region}.amazonaws.com"
EvaluateTargetHealth: false
#----------------------
# Route53→ALBに対する対するヘルスチェック
#----------------------
ALBHealthCheck:
Type: AWS::Route53::HealthCheck
Properties:
HealthCheckConfig:
# ALBのリッスンポート
Port: 80
Type: HTTP
# ALBのヘルスチェックパス
ResourcePath: "/readme.html"
FullyQualifiedDomainName: !GetAtt ApplicationLoadBalancer.DNSName
# ヘルスチェックのリクエスト間隔(秒)
RequestInterval: 30
# ヘルスチェックが失敗と判断されるまでの連続回数
FailureThreshold: 3
#----------------------
# Outputs
#----------------------動作確認
css崩れ解消されていれば成功。データベース接続エラーは、今回のハンズオンの本質じゃないので無視。仮に修正する場合は、wp-config.phpあたりをみなす
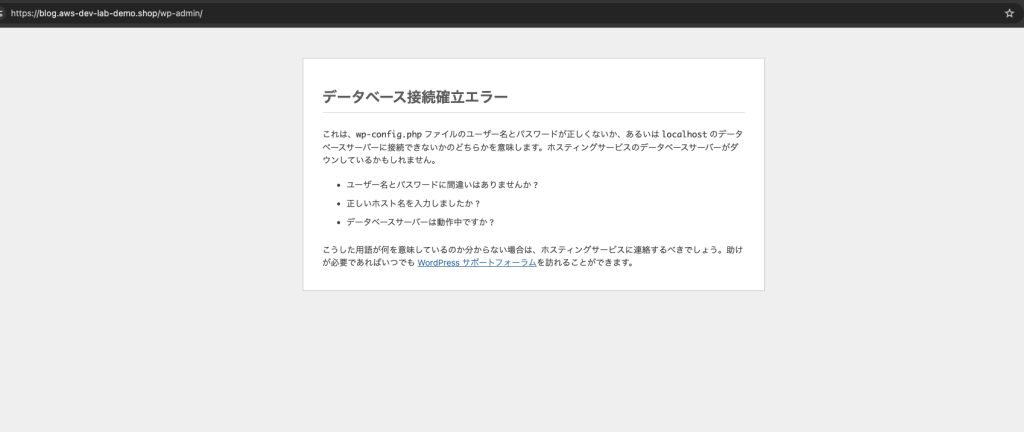
ハンズオン6
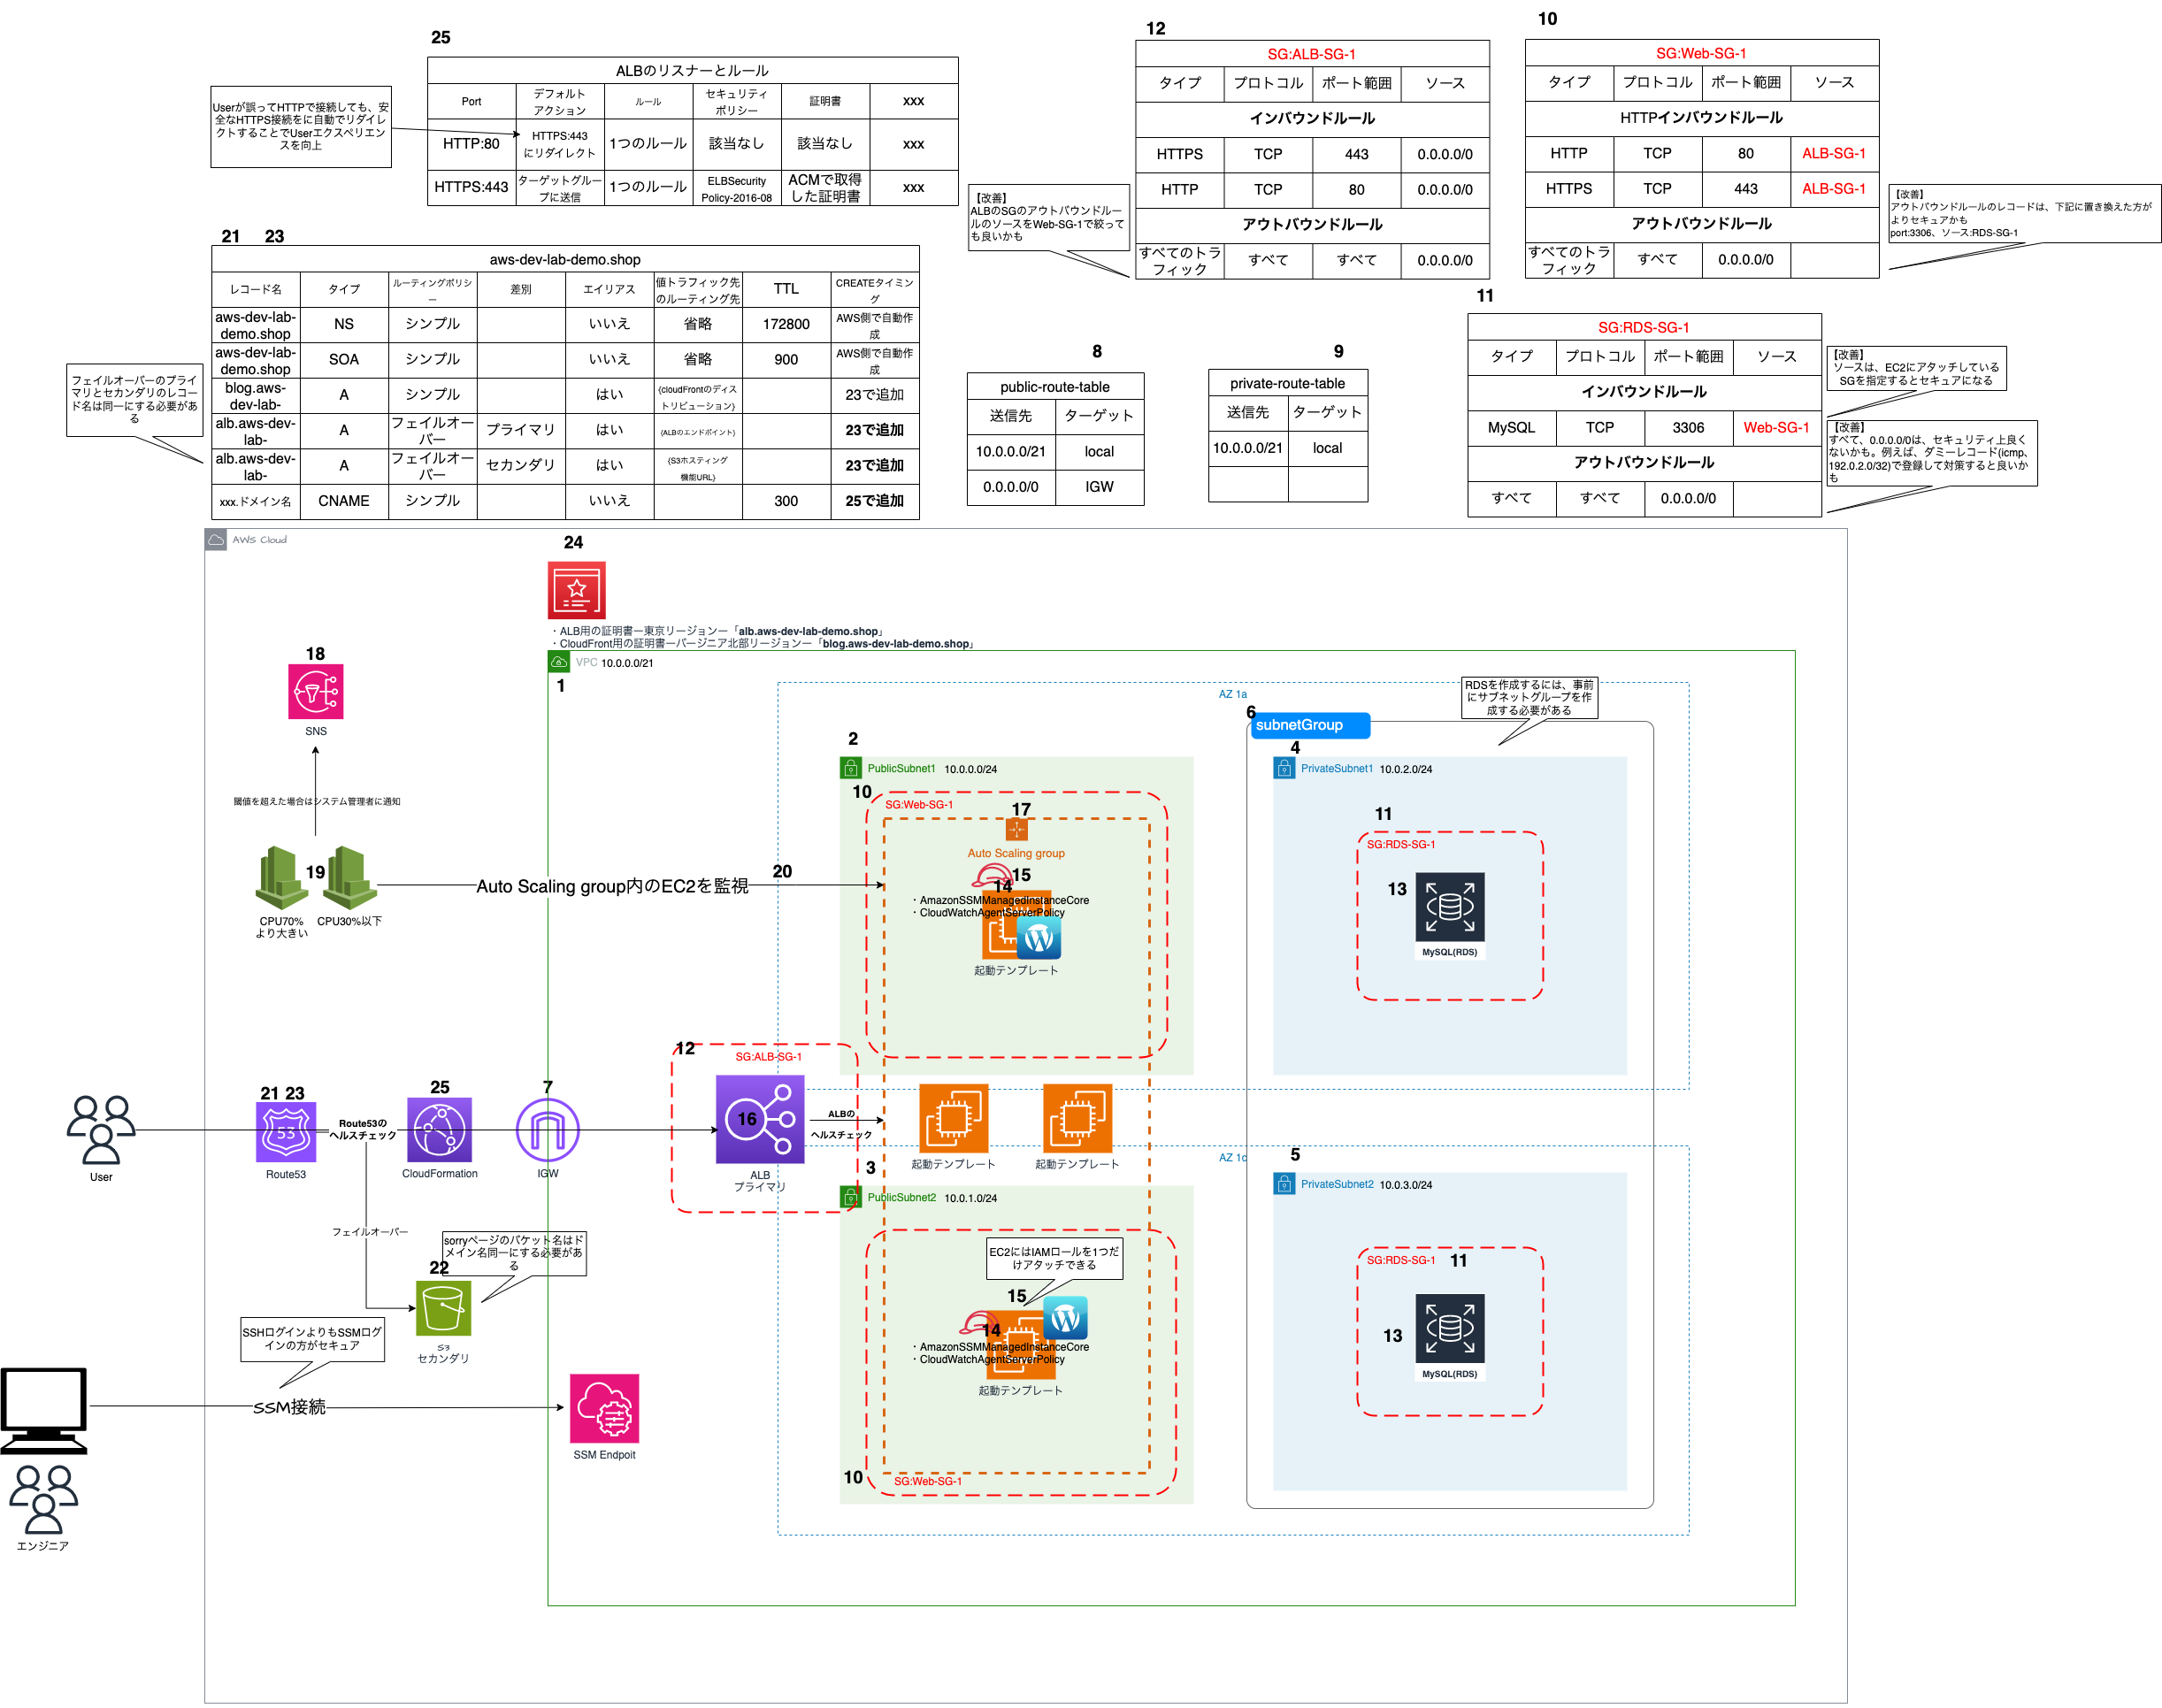
ACMでワイルドカード指定での証明書が取得できない原因は暇なときに調査する


コメント